
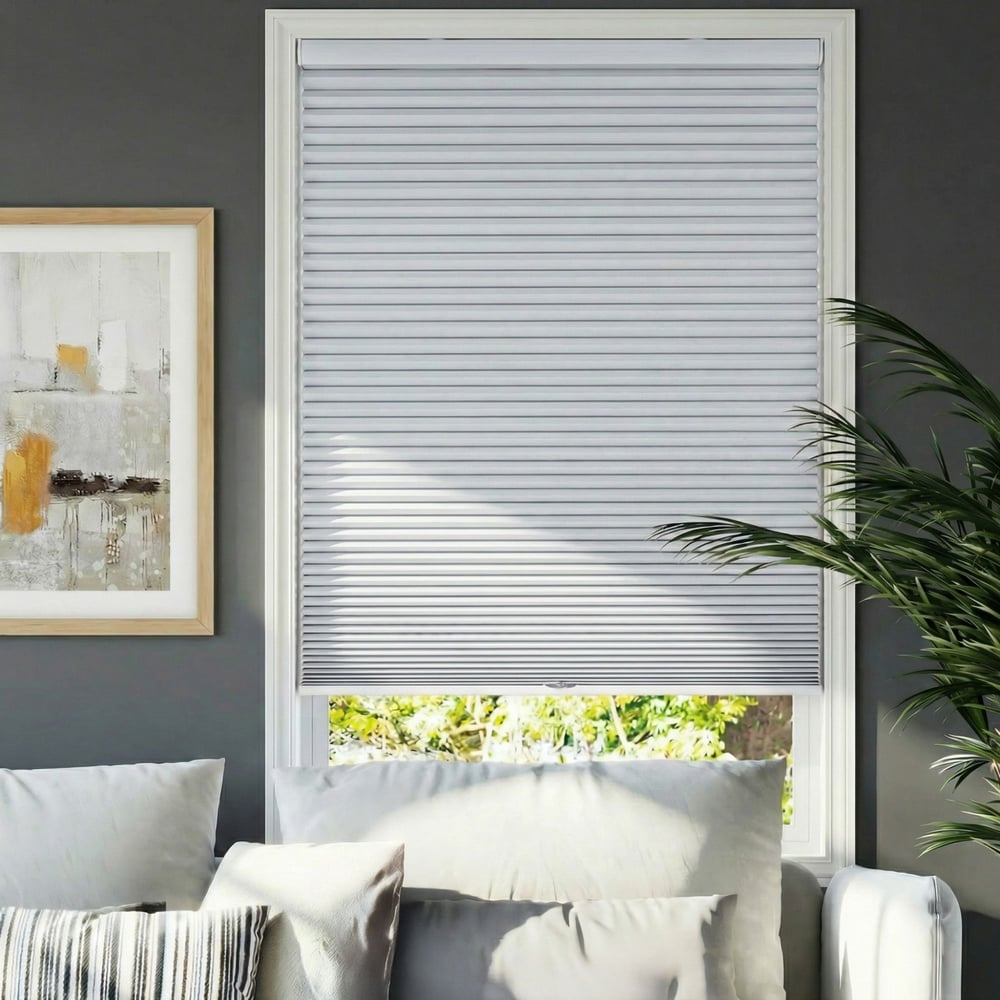

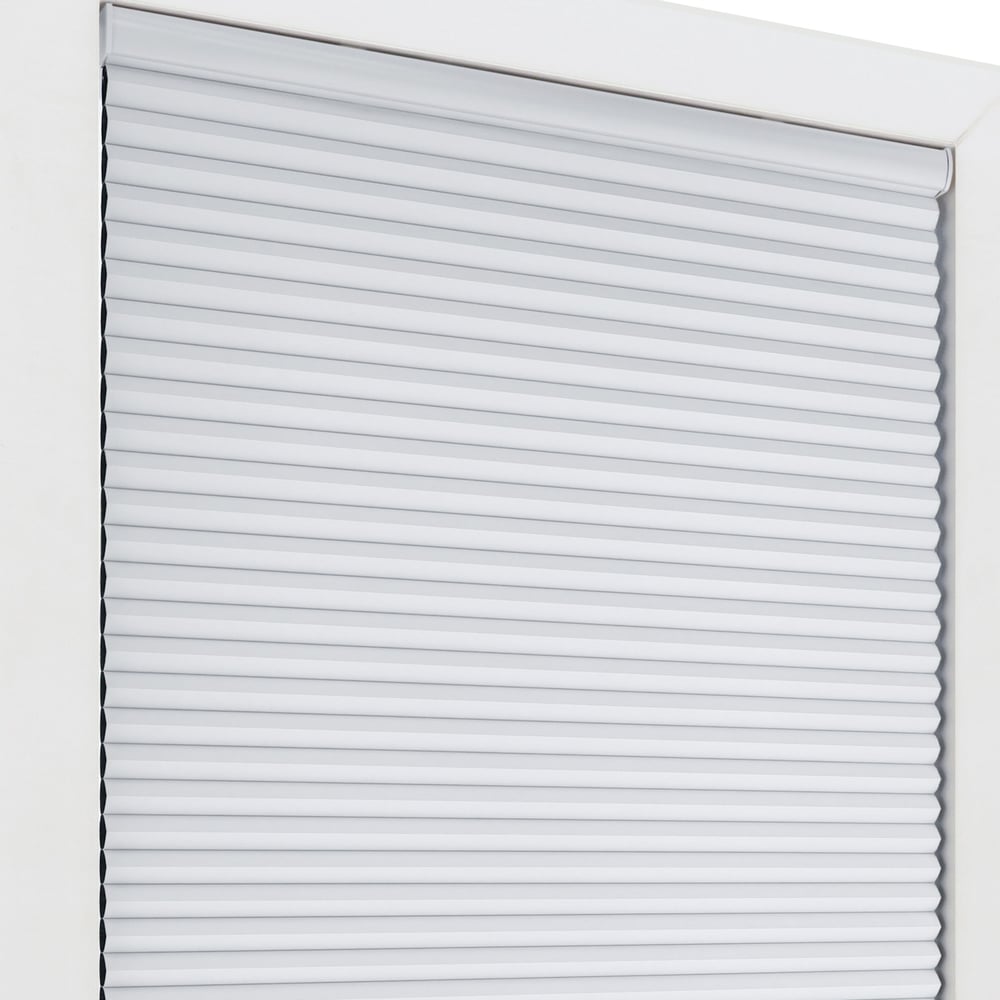

LEVOLOR Blackout Single Cellular Shades
SKU: LBOSCS109
Made to order, ships in 30–32 business days. Once shipped, delivery typically takes 5 business days, depending on your location.
Sometimes you want bright sunshine in your room, and sometimes you need it dark. Block the outside light when you need to with these LEVOLOR blackout single cellular shades. Available in a wide variety of colors and with your choice of lift system, you can enjoy blissful slumber. Plus, they are great at insulating in both winter and summer for year-round energy efficiency!
- 3/4" Single Cell Layer
- Smart Option: Motorize
Color: Cool White
24 colors available
$ - Essential
Mount: Not selected
Size: 24" W × 36" H
Measurements to the nearest 1/8 inch.
Fit or Free Guarantee. If for any reason your window coverings don't fit, even if you make a mistake in measuring, we'll remake them in the size you need free of charge. More details about the Fit or Free Guarantee
Lift Type: Not selected
LEVOLOR Hub: Not selected
Installation Type: Not selectedOptional
Door Brackets (Hold Downs): Not selectedOptional
Extension Brackets: Not selected
Name your windowOptional
Installation help nearby
DIY Install is simple, but if you'd prefer help, enter your ZIP code to find available pros in your area.
- Fit or Free Guarantee
- Free Shipping
- 60-Day Satisfaction Guarantee
Product Information
LEVOLOR has designed their blackout cellular shades to prevent any light from passing through the shade, perfect for blocking light either during the day or night (think streetlights, signs, headlights – anything that interrupts your sleep). The large single cells of this shade are excellent at insulating as well! Whether it's blocking hot outside air in the summer or keeping in the warmth during the winter, these shades help reduce your energy bills year-round. The best part is that you can customize the size, color and lift style of your new shades to perfectly fit your decor and needs. Want simple, hassle-free operation? Cordless shades are a great fit. Looking for something a little fancier? LEVOLOR offers a top-notch motorization system that provides effortless operation of all your shades at once and the option to tie into your home automation system. It's the complete package!
Get to know this shade:
- Blackout shade material prevents any light from passing through the shade
- 3/4" single cell honeycomb design provides an insulating barrier in the window
- White backing provides a neutral streetside appearance
- Durable aluminum headrails are color coordinated
Why you'll love this shade:
- Honeycomb fabric design traps air to help cool your home in summer and warm your home in window
- Perfect for bedrooms, nurseries and more to darken the room when needed (day or night)
- The large 3/4" cell size is well proportioned even for larger windows
- Motorized lift options are available in standard bottom up or with top-down/bottom up operation
- All shade styles conform with the current child safety regulations
- LEVOLOR is a brand trusted by homeowners for over 100 years for quality, durability and innovation
Key considerations:
- When choosing cordless lift, be sure you can easily reach as high as the top of the window frame; otherwise consider an alternate lift option
- A hub is required to control motorized shades with the LEVOLOR app or home automation
- Child & Pet Safety
- Privacy
Made to order, ships in 30–32 business days. Once shipped, delivery typically takes 5 business days, depending on your location.
Key Features
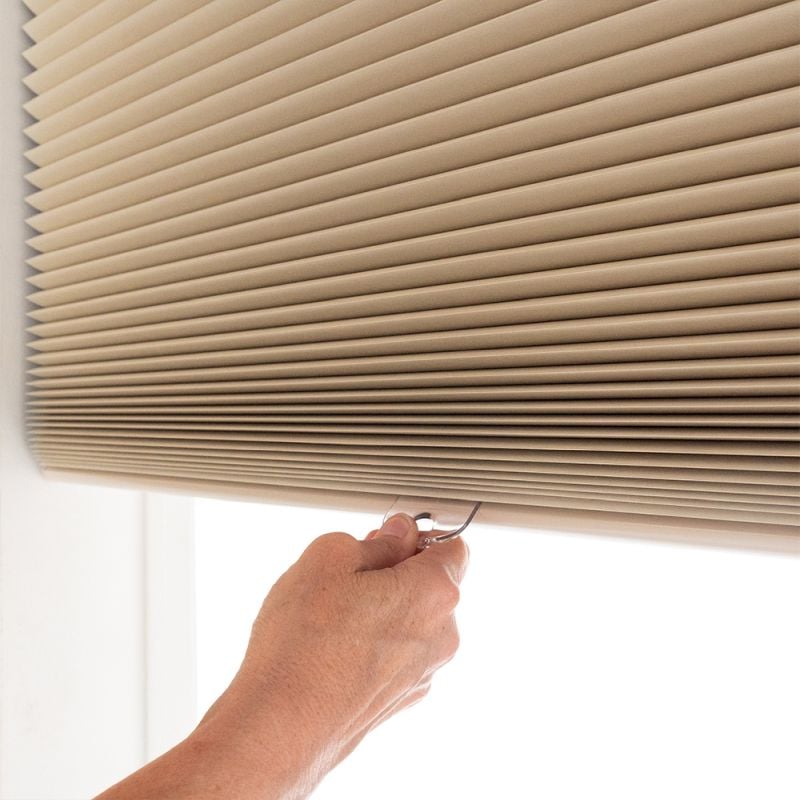
Cordless Lift
Grab the small clear handle to adjust the shade as needed.
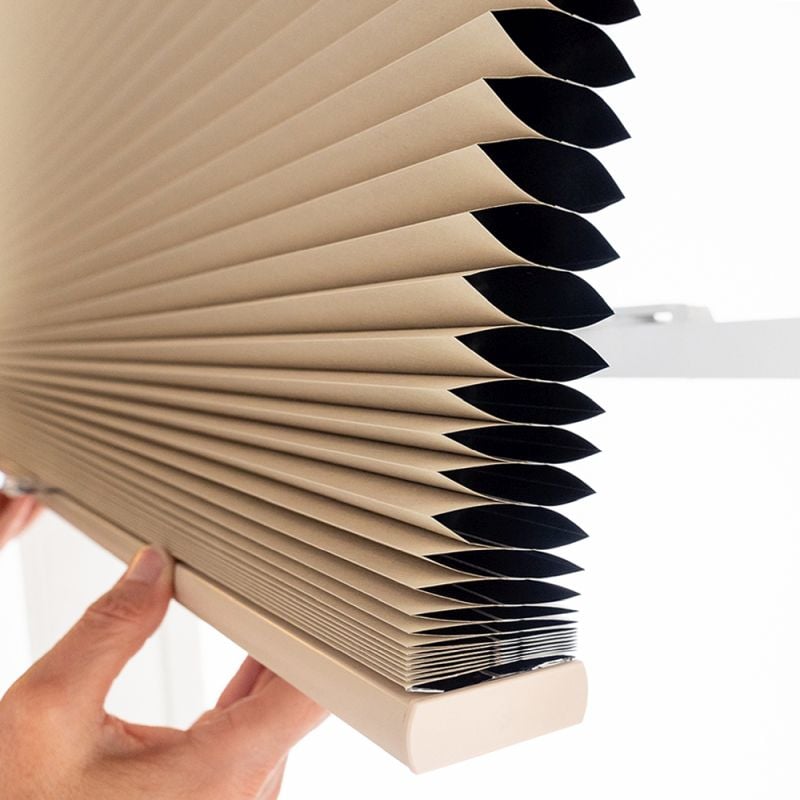
Insulating/Energy Efficient
Insulating/Energy Efficient
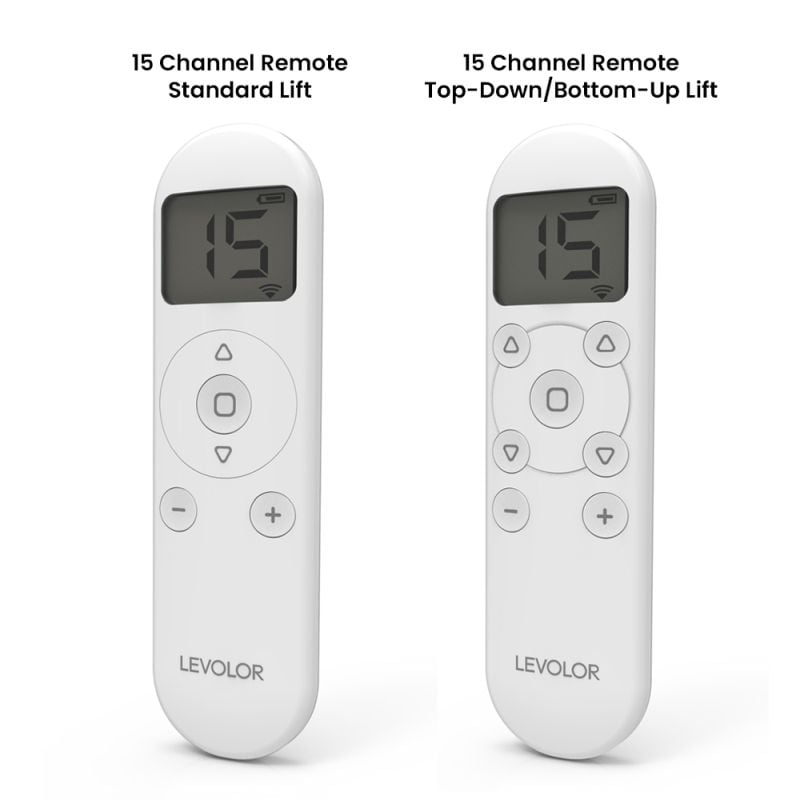
Motorization
Efficiently operate your shades with the optional 15-channel battery powered remote.
Specifications & Restrictions
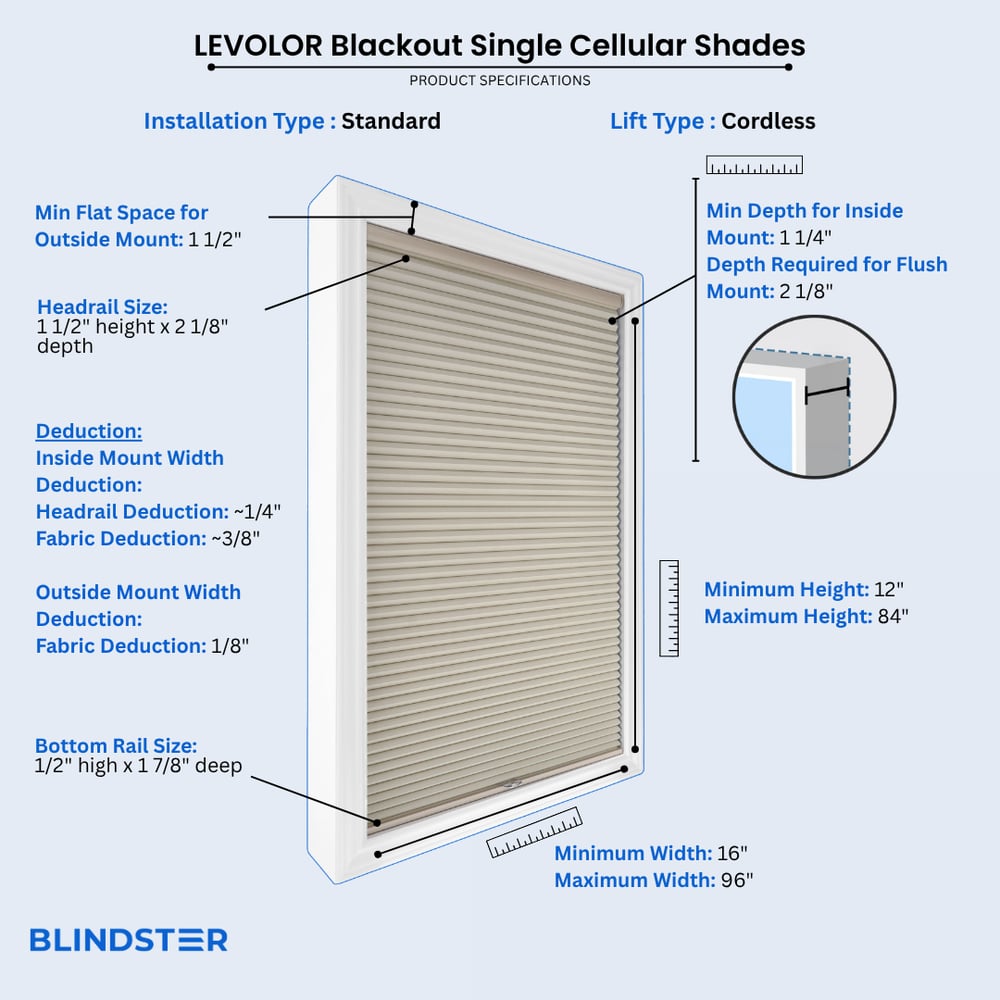
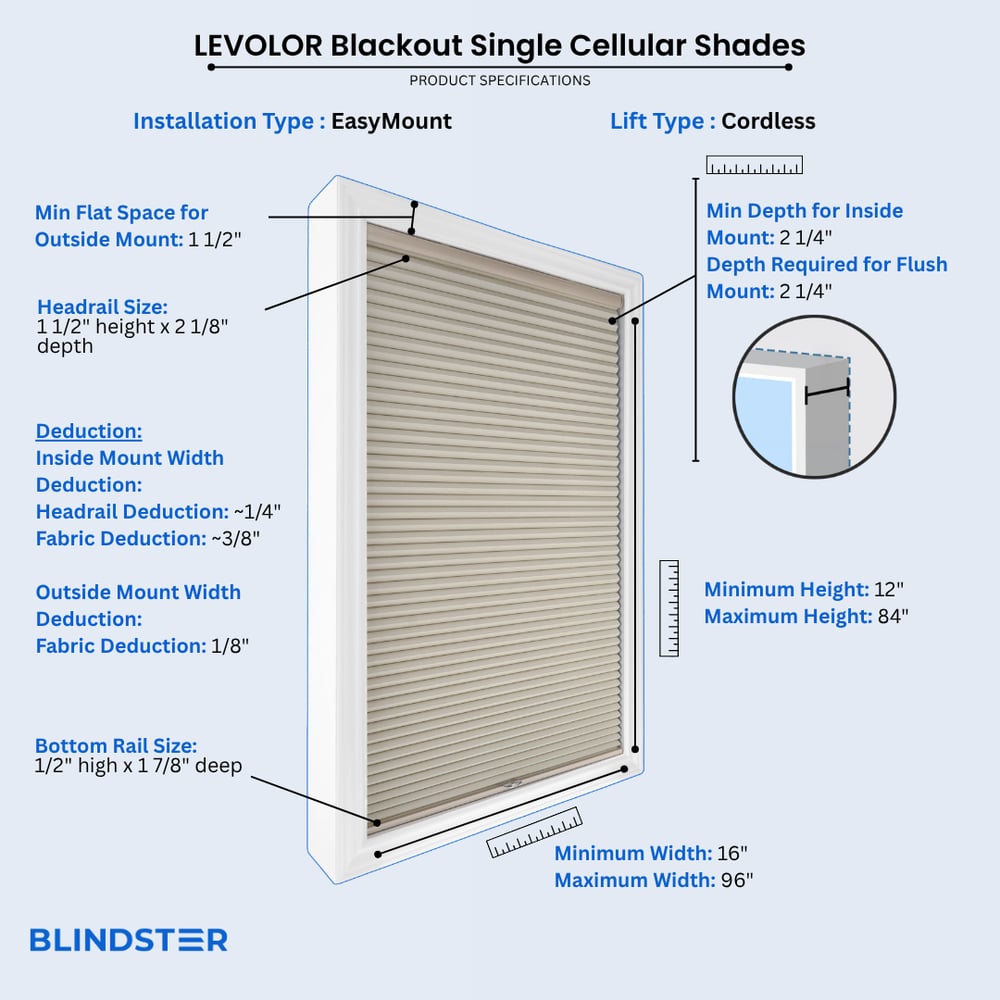
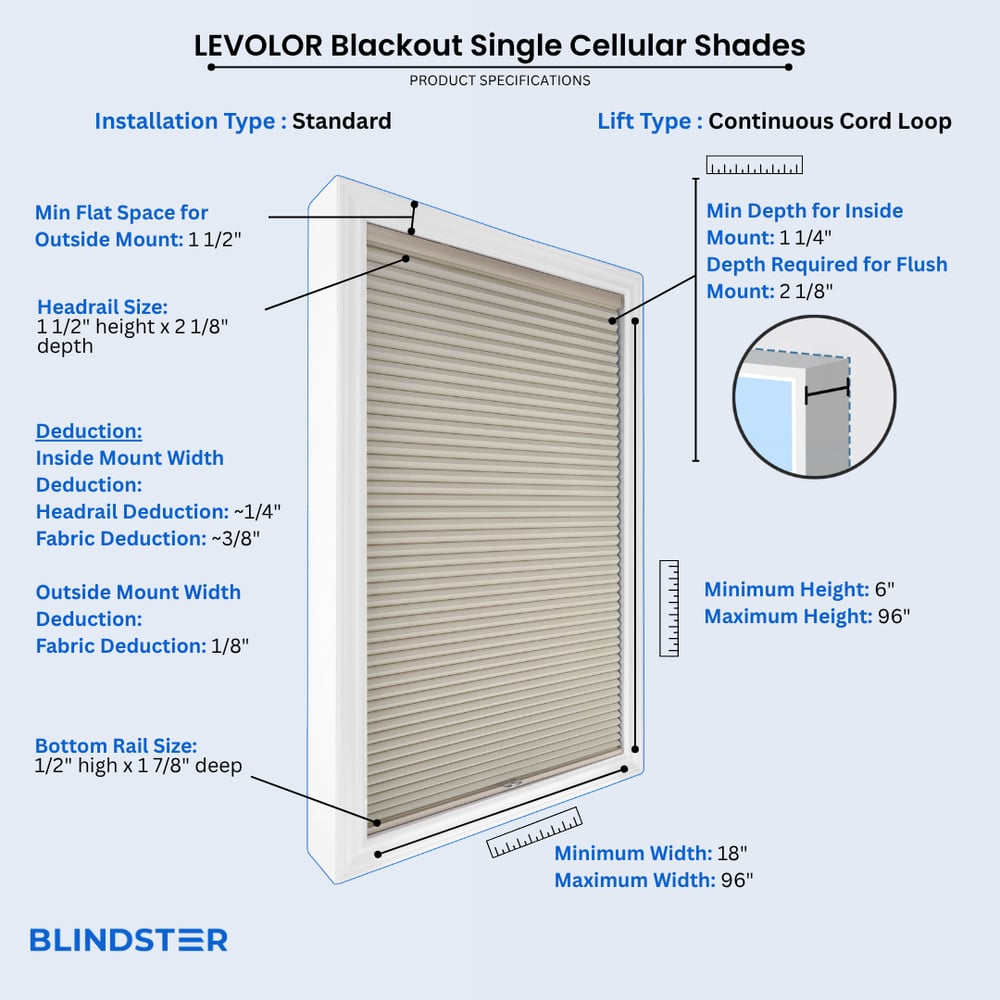
- Width
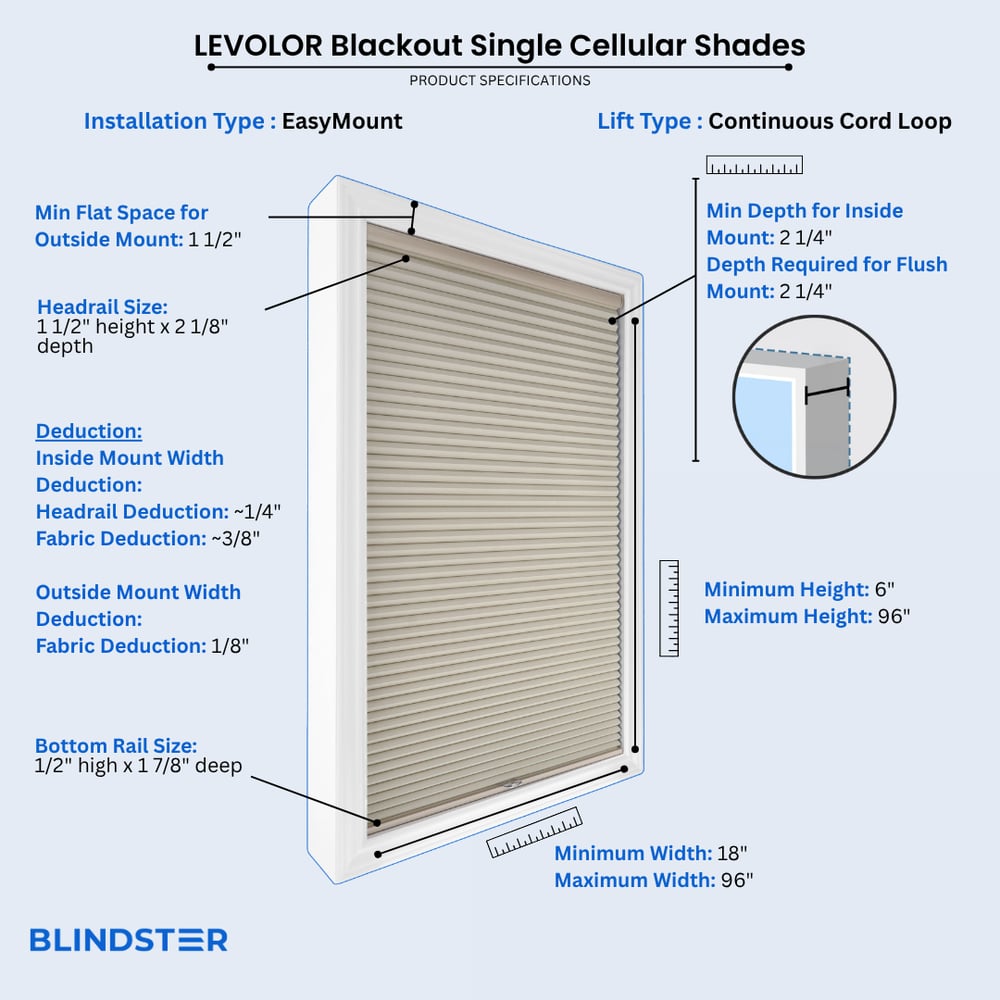
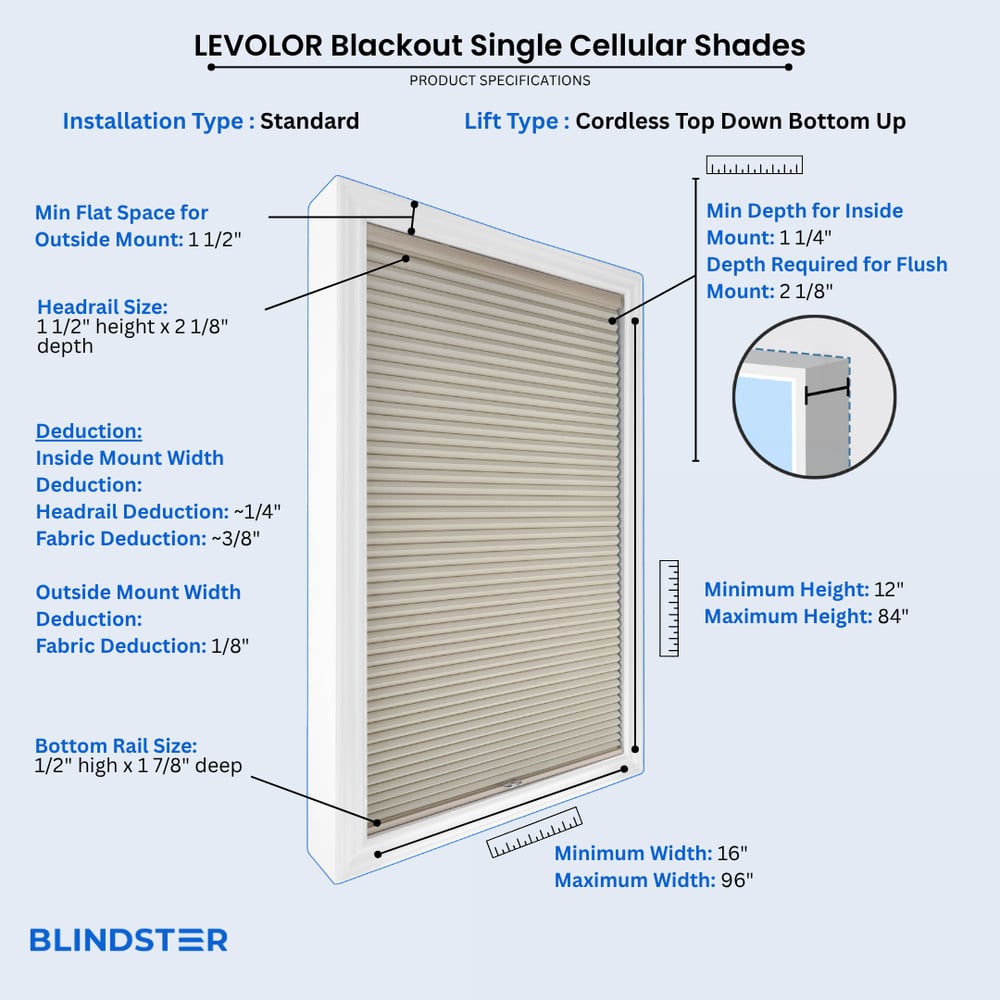
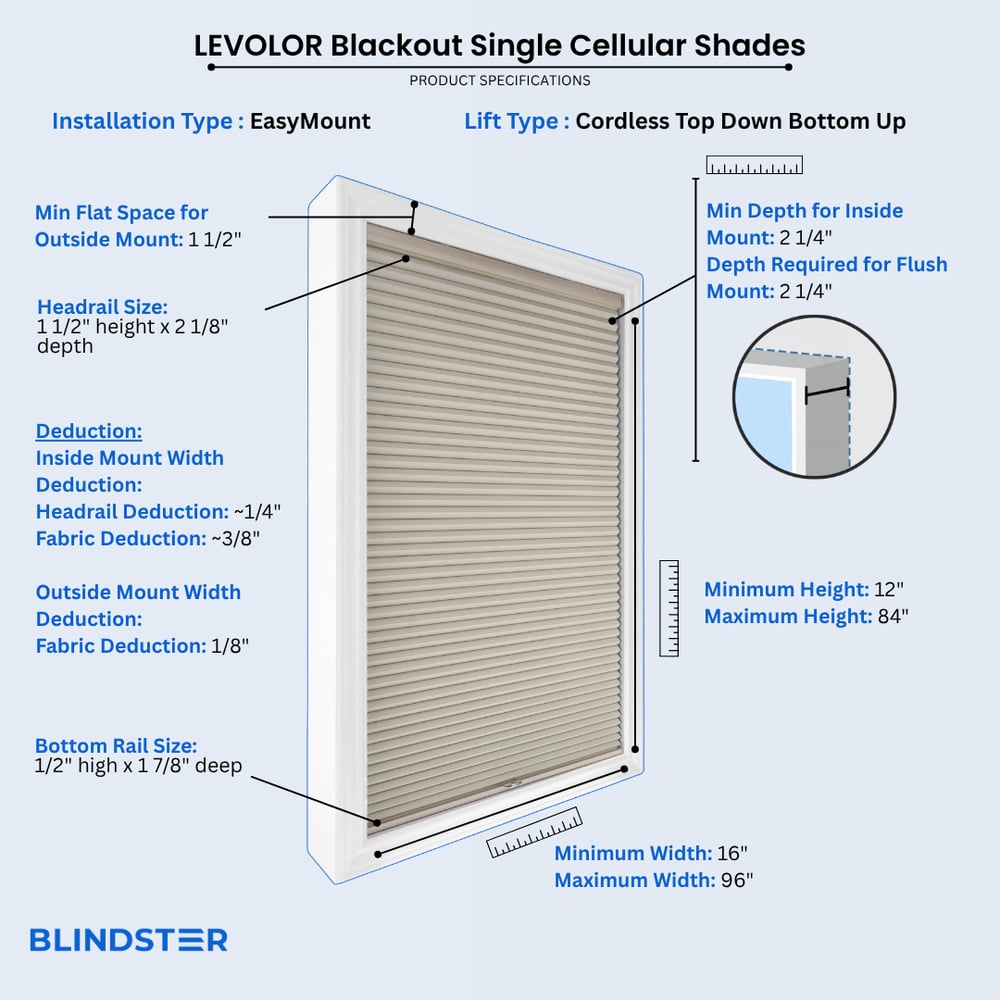
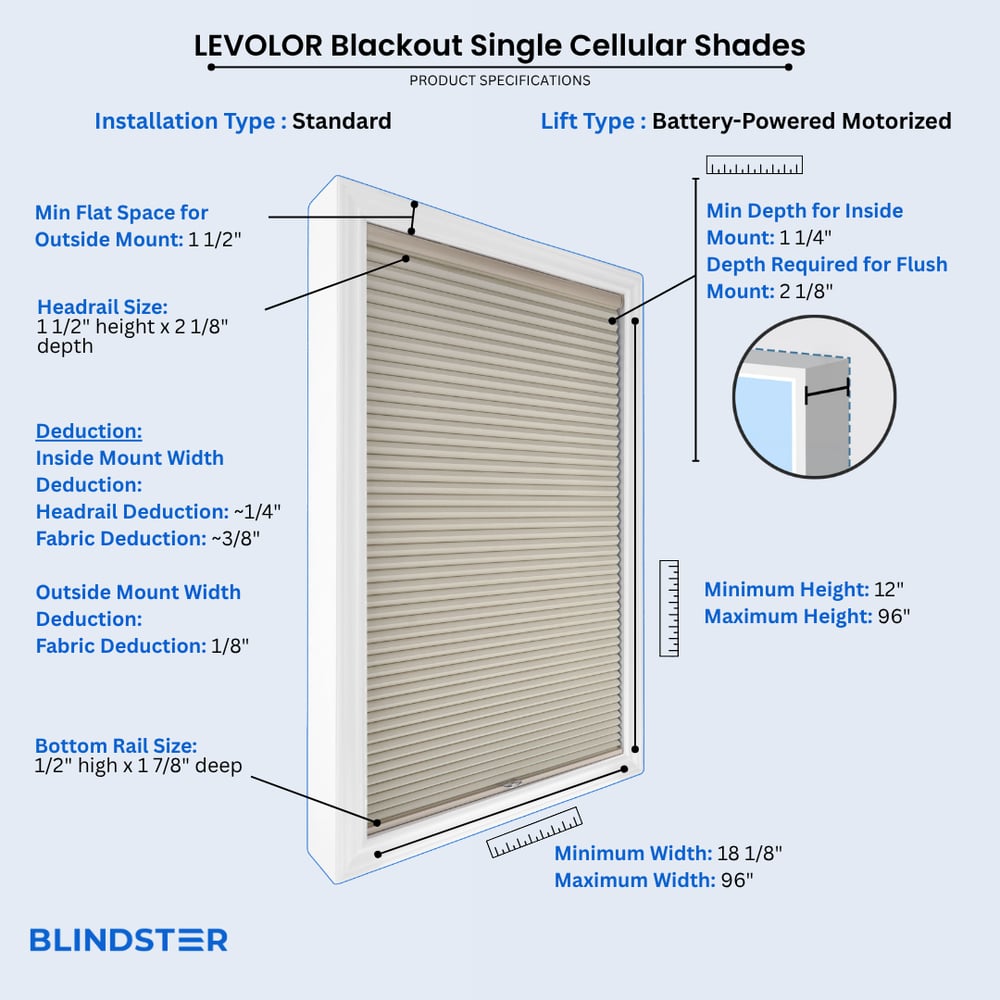
- 16" – 96"
- Height
- 6" – 96"
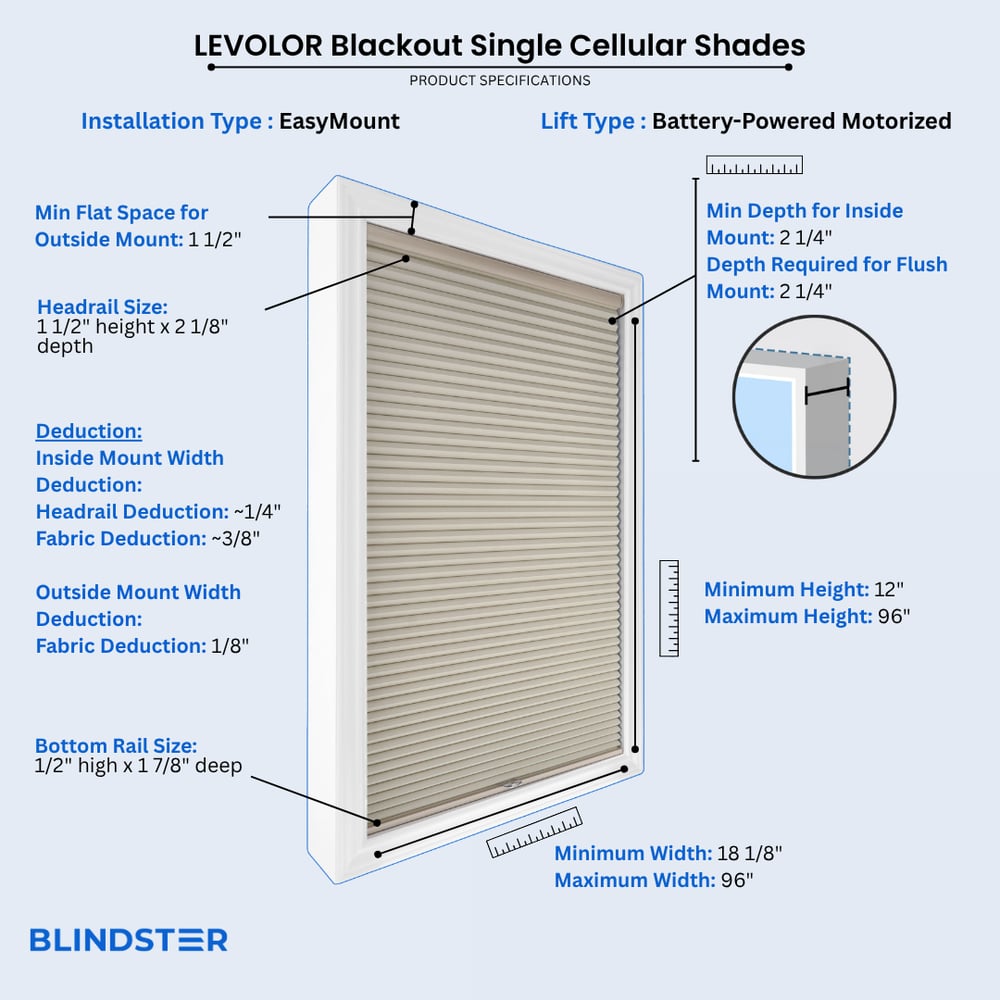
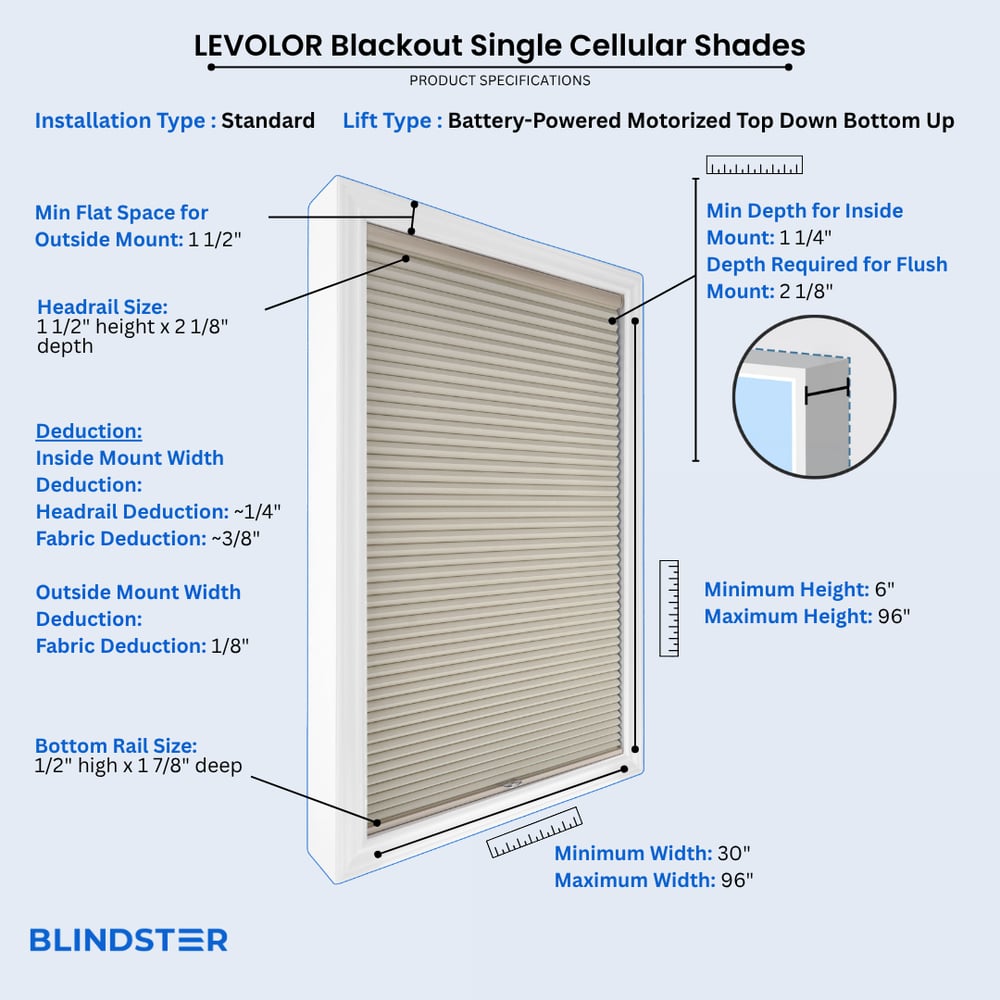
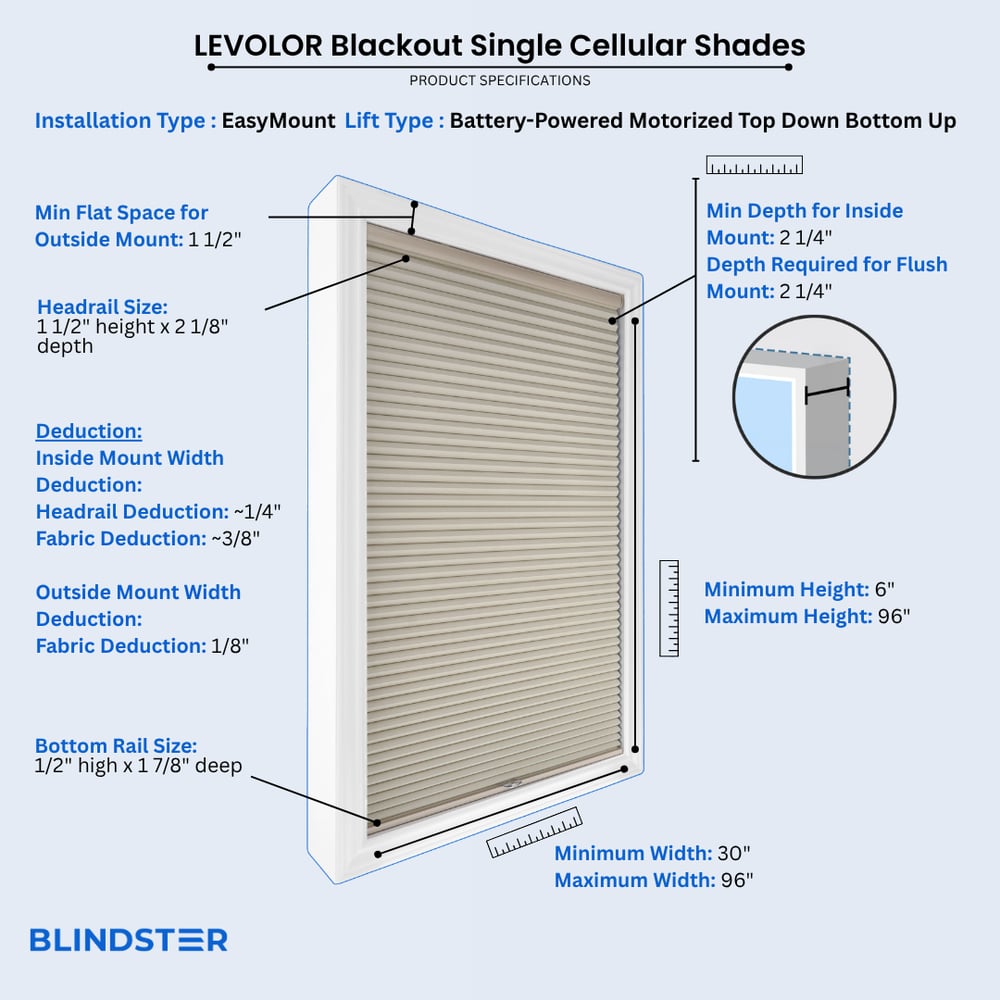
- Min flat space for outside mount
1 ½ inches
- Min depth for inside mount
1 ¼ inch (Standard Installation) & 3 inches (EasyMount Installation)
- Depth required for flush mount
2 1/8 inches (Standard Installation) 3 inches (EasyMount Installation)
- Headrail size
1 ½ inch height x 2 1/8 inches depth
- Inside Mount Width Deduction
Approximately ¼ inch headrail deduction and 3/8 inch fabric deduction
- Outside Mount
Fabric is made 1/8" less than width ordered; headrail will arrive at ordered width
- Bottom Rail Size (for all lift types)
½" high x 1 7/8" deep
- Remote Control Range (Motorized lift)
98 feet
- Easy Rechargeable Feature (Motorized Lift)
Powered by an integrated, rechargeable lithium-ion battery
- 15 CHANNEL REMOTE CONTROL REQUIRED TO OPERATE MOTORIZED SHADES
Remote will only operate LEVOLOR motorized roman shades; other Blindster remotes will not operate the shades
- Charger Required To Operate Motorized Shades
At least 1 charger needs to be ordered
*Recharge time on a shade is 5 hours, chargers are not meant to be plugged into the shade long term.
Restrictions
- Motorized lift on cellular shades is not compatible with the motorized lift on our Solar, Roller, or Zebra Sheer Shades
- Side Mount not available for Inside Mount, top mount only
- Continuous Cord Loop will come in 6" increments based on shade height. Cord Loops start at 18" drop.
- EasyMount not available for Outside Mount
How to Measure
How to Measure: Inside Mount
3 min read
Let's make sure an inside mount will work for your window! Using a metal tape measure, first check if you have sufficient depth:
- Measure inside the window opening from the back of the window to the front of the opening where the shade would mount. The depth at the top of the window must be at least 3/4" to mount the brackets. To have a flush mount (meaning the shade is fully recessed in the window opening) the depth must be at least 2 1/8". If your depth is not sufficient for mounting the brackets, please see our outside mount instructions or consider a different product.
- 3" of depth is needed at the top of the window opening if ordering the EasyMount headrail.
How to Measure:
Let's start with the Width:
- Measure inside of the window opening/frame from left to right to the nearest 1/8" at three places: at the top of the opening, the middle of the opening, and then the bottom of the opening. Write down all 3 measurements and circle the narrowest. If rounding is necessary, round down to the nearest 1/8". That is your ordering width.
Now, let's do the Height:
- Measure the inside of the window opening/frame from the top of the opening to the bottom of the opening/sill to the nearest 1/8" in three places: on the left-hand side, the middle, and on the right-hand side. Write down all 3 measurements and circle the tallest. That is your ordering height.
Note: Always provide us with the actual measurement of the window opening. We will make the necessary deduction of approximately 1/4" to your shade's headrail and 3/8" to the fabric width to allow room for installation and for proper movement of the shade within the window opening. No deductions will be made to your height.
How to Measure: Outside Mount
3 min read
Before you start measuring, decide where above your window opening you want to mount your shade. You will need at least 1 1/2" of flat vertical space above the window to mount the brackets. The shade can be installed directly above the window opening, or higher up to give the appearance of a larger window and to have more clear space in the window when the shade is raised.
If you have trim around the window, you can mount the shade above the trim, directly on the trim (if you have the required minimum flat space for the brackets), or to the sides of the trim if you do not have enough mounting space above the window or on the trim itself. See the directions below for how you'd like to install your shade.
If you do not have sufficient vertical space for mounting the brackets, please see our inside mount instructions or consider a different product.
Width:
- Looking at your window and surrounding wall, decide what area you would like to cover. We recommend the shade extends about 2" on each side of the window opening for the best light control and appearance.
- Using a metal tape measure, measure from left to right including your desired extra space on each side of the window—that is your ordering width.
Height:
- Consider how far above the window you would like to install your shade but at least starting with the minimum vertical space referenced above. The shade can be positioned higher up to give the appearance of a larger window and to have more clear space in the window when the shade is raised.
- Measure from the top of where you will mount the shade on the wall down to where you want the bottom of the shade to be, using the same extra space below your window opening as you used above; if you have a protruding windowsill, measure down to the top of the sill. That is your ordering height.
Width:
- Looking at your window and surrounding wall, decide what area you would like to cover. We recommend the shade extends about 2" on either side of the window opening for the best light control and appearance. You can also choose to have the shade the same width as your window trim.
- Using a metal tape measure, measure from left to right including any desired extra space on each side of the window—that is your ordering width.
Height:
- Consider how far above the window you would like to install your shade but at least starting with the minimum vertical space referenced above. The shade can be positioned higher up to give the appearance of a larger window and to have more clear space in the window when the shade is raised.
- Measure from the top of where you will mount the shade on the wall down to where you want the bottom of the shade to be, using the same extra space below your window opening as you used above, or to the bottom edge of the trim if you prefer; if you have a protruding windowsill, measure down to the top of the sill. That is your ordering height.
Note: We provide complimentary extension brackets upon request. These are used in conjunction with the standard installation brackets to position the shade away from the wall and prevent the shade from hitting the frame. Extension brackets add up to 4" of additional depth for installation.
Width:
- Confirm that the height of your trim is at least the minimum height required for installing the mounting brackets. At the top of your window, use a steel measuring tape and measure from outer edge to outer edge of the trim. That is your ordering width.
Height:
- Measure from the top of your trim to the bottom of your trim or to the top of the windowsill if you have a protruding sill. That is your ordering height.
Width:
- Using a metal tape measure, measure left to right from the outside edge of the trim piece that goes around the glass to the other outside edge. That is your ordering width. However, if you have space, it is best to order the shade about 2" wider for better light control.
Height:
- Consider how far above the window trim piece you would like to install your shade but at least starting with the minimum vertical space referenced above. Measure down to where you want the bottom of the shade to be, using the same extra space below the window trim piece as you used above. That is your ordering height.
Note: We carry complimentary hold-downs (door brackets) which can be requested during the ordering process. These should be installed for a successful door mount as they secure the shade at the bottom of the door so that it does not swing when the door opens and closes.
How to Install
How to Install: Inside Mount
2 min read
Let's make sure you have what you need!
What came with your blinds?
- Installation brackets
- Clear handle (cordless lift types only)*
- 1 handle for shades 42" or less
- 2 handles for shades greater than 42"
- Cord tensioner bracket & instruction pack (cord loop lift only)*
- #6 hex head screws (one per bracket mounting hole)
- Remote (motorized only; if ordered)*
- Hub (motorized only; if ordered)*
What else will you need in order to complete the installation?
- Rechargeable drill with 3/32" drill bit & ¼" hex nut driver bit
- Phillips screwdriver
- Pencil
- Tape measure
- Ladder
*If applicable to your order.
Download the PDF below for a complete step by step guide on how to install your inside mount blinds based on your lift type and for more information on how many brackets are required for your order.
How to Install: Outside Mount
4 min read
Let's make sure you have what you need!
What came with your blinds?
- Installation brackets
- Clear handle (cordless lift types only)*
- 1 handle for shades 42" or less
- 2 handles for shades greater than 42"
- Cord tensioner bracket & instruction pack (cord loop lift only)*
- Extension Brackets*
- Hold down brackets*
- #6 hex head screws (one per bracket mounting hole)
- Remote (motorized only; if ordered)*
- Hub (motorized only; if ordered)*
What else will you need in order to complete the installation?
- Rechargeable drill with 3/32" drill bit & ¼" hex nut driver bit
- Phillips screwdriver
- Pencil
- Tape measure
- Ladder
*If applicable to your order.
Download the PDF below for a complete step by step guide on how to install your outside mount blinds based on your lift type and for more information on how many brackets are required for your order.
Videos
Introduction to LEVOLOR Cellular Shades
Levolor EasyMount
LEVOLOR Custom Cellular Shades - Features & Benefits
How to Measure for LEVOLOR Inside Mount Blinds and Shades
How to Measure for LEVOLOR Outside Mount Blinds and Shades
Reviews
4.5
Based on 6 reviews
Mark
Levolor cellular blinds I ordered fit perfectly. Very high-quality. Easy to install only took about 15 minutes.
Sam
Work like a blackout shade should easy install