


Motorized Light Filtering Single Cellular Shades
SKU: BLN-MLFSCS
Made to order, ships in 1–3 business days. Once shipped, delivery typically takes 5 business days, depending on your location.
If you're looking for a stress-free window treatment, then look no further – this motorized cellular shade features remote control operation that is easy and convenient. The light-filtering cellular fabric insulates your window against heat and cold while gently diffusing natural light into the room. You'll love operating your new shades with the push of a button!
Color: Cool Silver
4 colors available · Fabric: 100% Polyester
$ - Essential
Mount: Not selected
Size: 24" W × 36" H
Measurements to the nearest 1/8 inch.
Fit or Free Guarantee. If for any reason your window coverings don't fit, even if you make a mistake in measuring, we'll remake them in the size you need free of charge. More details about the Fit or Free Guarantee
Lift Type: Not selected
Name your windowOptional
Installation help nearby
DIY Install is simple, but if you'd prefer help, enter your ZIP code to find available pros in your area.
- Fit or Free Guarantee
- Free Shipping
- 60-Day Satisfaction Guarantee
Product Information
Take the stress out of your life by taking the cords off your shades! These insulating cellular shades feature an internal motor that raises and lowers the shade via remote control. You can program multiple shades to move with a single button, and even program a "favorite" partially open position of the shades (also with a single button push). Plus the cellular design helps keep cold air out in winter and hot air out in summer, helping to reduce your energy bills. No special wiring is required to install these shades, as they also have a rechargeable battery inside. How's that for a stress-free shade?
Get to know this shade:
- Motor and rechargeable battery are hidden inside the top of the shade
- Single cell honeycomb fabric has 3/8" pleats and is the same color front and back
- Insulating cellular material has a high R-value of 3.4
- Top and bottom rails are color coordinated to the shade and are semi-gloss PVC
Why you'll love this shade:
- Remote control operation provides convenience and elegance without dangling cords or manual lifting
- Control individual shades or group shades to operate simultaneously with the multi-functional/multi-channel remote
- Rechargeable battery is long lasting, up to six months between charges – simply plug the cord into the shade for a few hours to recharge
- Lower energy bills with year-round insulation against both outdoor heat and cold
- Certified Best for Kids™ for child-safe use
Key considerations:
- At least one remote and one charger are needed to operate the shade; multiple shades can be used with a single remote and charger
- We recommend one remote per room to operate and organize groups of shades
Great for:Living RoomBedroomOfficeKitchenDining RoomEntry WayUtility Room
- Privacy
- Child & Pet Safety
- Insulating/Energy Efficient
Made to order, ships in 1–3 business days. Once shipped, delivery typically takes 5 business days, depending on your location.
Specifications & Restrictions
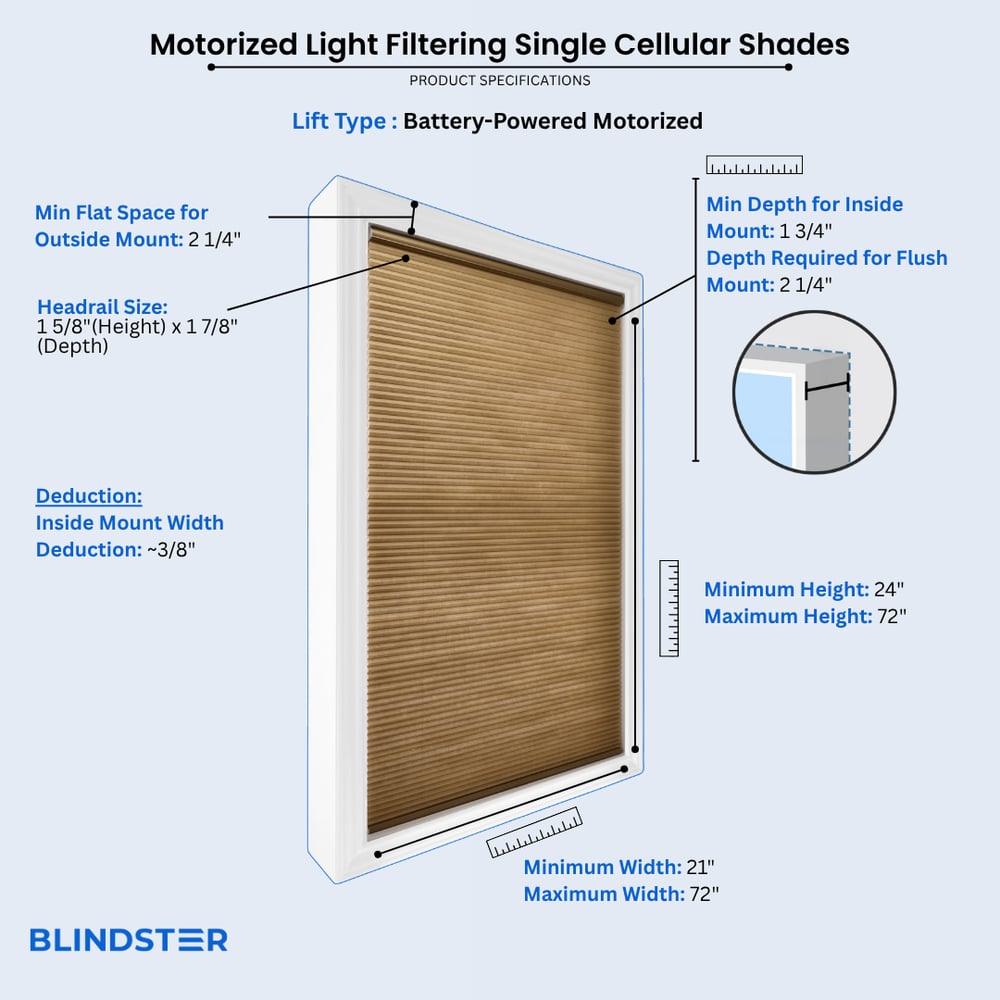
- Width
- 21" – 72"
- Height
- 24" – 72"
- Min Depth for Inside mount
1 ¾ inches
- Depth Required for flush mount
2 ¼ inches
- Min flat space for outside mount
2 ¼ inches
- Inside Mount Width Deductions
Approximately 3/8 inches
- Headrail Size
1 5/8 inches (high) x 1 7/8 inches (deep)
- 6 channel remote control required to operate motorized shades
Remotes from other companies will not operate Blindster shades
- All shades are programmed at the factory to operate on channel 6
Each remote can be programmed to control up to 6 shades
- Remote Control Range
65 feet
- Easy Rechargeable Feature
Red light appears on end cap when battery needs to be charged. Connect the AC Charger to the USB'C' charger port on the motor head.
- This product's motorized remote is NOT compatible with the following products:
Deluxe Cellular Shades & Premium Solar Shades categories
- Battery Charger required to recharge shades
At least 1 Charger is needed per order.
Restrictions
- 6 Channel remote offered with all shades for an additional cost , shades must have at least one remote to operate.
- Motorized is the only available lift type.
- 2on1 headrails are not an option.
- Side Mount not available for Inside Mount, top mount only
How to Measure
How to Measure: Inside Mount
3 min read
INSIDE MOUNT:
Let's make sure an inside mount will work for your window! Using a metal tape measure, first check if you have sufficient depth:
- Measure inside the window opening from the back of the window to the front of the opening where the shade would mount. The depth at the top of the window must be at least 1 3/4" to mount the brackets. To have a flush mount (meaning the shade is fully recessed in the window opening) the depth must be at least 2 1/4". If your depth is not sufficient for mounting the brackets, please see our outside mount instructions or consider a different product.
How to Measure:
Let's start with the Width:
- Measure inside of the window opening/frame from left to right to the nearest 1/8" at three places: at the top of the opening, the middle of the opening, and then the bottom of the opening. Write down all 3 measurements and circle the narrowest. If rounding is necessary, round down to the nearest 1/8". That is your ordering width.
Now, let's do the Height:
- Measure the inside of the window opening/frame from the top of the opening to the bottom of the opening/sill to the nearest 1/8" in three places: on the left-hand side, the middle, and on the right-hand side. Write down all 3 measurements and circle the tallest. That is your ordering height.
Note: Always provide us with the actual measurement of the window opening. We will make the necessary deduction of approximately 3/8" to your shade's width to allow room for installation and for proper movement of the shade within the window opening. No deductions will be made to your height.
How to Measure: Outside Mount
4 min read
Before you start measuring, decide where above your window opening you want to mount your shade. You will need at least 2 1/4" of flat vertical space above the window to mount the brackets. The shade can be installed directly above the window opening, or higher up to give the appearance of a larger window and to have more clear space in the window when the shade is raised.
If you have trim around the window, you can mount the shade above the trim, directly on the trim (if you have the required minimum flat space for the brackets), or to the sides of the trim if you do not have enough mounting space above the window or on the trim itself. See the directions below for how you'd like to install your shade.
If you do not have sufficient vertical space for mounting the brackets, please see our inside mount instructions or consider a different product.
Width:
- Looking at your window and surrounding wall, decide what area you would like to cover. We recommend the shade extends about 2" on each side of the window opening for the best light control and appearance.
- Using a metal tape measure, measure from left to right including your desired extra space on each side of the window—that is your ordering width.
Height:
- Consider how far above the window you would like to install your shade but at least starting with the minimum vertical space referenced above. The shade can be positioned higher up to give the appearance of a larger window and to have more clear space in the window when the shade is raised.
- Measure from the top of where you will mount the shade on the wall down to where you want the bottom of the shade to be, using the same extra space below your window opening as you used above; if you have a protruding windowsill, measure down to the top of the sill. That is your ordering height.
Width:
- Looking at your window and surrounding wall, decide what area you would like to cover. We recommend the shade extends about 2" on either side of the window opening for the best light control and appearance. You can also choose to have the shade the same width as your window trim.
- Using a metal tape measure, measure from left to right including any desired extra space on each side of the window—that is your ordering width.
Height:
- Consider how far above the window you would like to install your shade but at least starting with the minimum vertical space referenced above. The shade can be positioned higher up to give the appearance of a larger window and to have more clear space in the window when the shade is raised.
- Measure from the top of where you will mount the shade on the wall down to where you want the bottom of the shade to be, using the same extra space below your window opening as you used above, or to the bottom edge of the trim if you prefer; if you have a protruding windowsill, measure down to the top of the sill. That is your ordering height.
Width:
- Confirm that the height of your trim is at least the minimum height required for installing the mounting brackets. At the top of your window, use a steel measuring tape and measure from outer edge to outer edge of the trim. That is your ordering width.
Height:
- Measure from the top of your trim to the bottom of your trim or to the top of the windowsill if you have a protruding sill. That is your ordering height.
Width:
- Using a metal tape measure, measure left to right from the outside edge of the trim piece that goes around the glass to the other outside edge. That is your ordering width. However, if you have space, it is best to order the shade about 2" wider for better light control.
Height:
- Consider how far above the window trim piece you would like to install your shade but at least starting with the minimum vertical space referenced above. Measure down to where you want the bottom of the shade to be, using the same extra space below the window trim piece as you used above. That is your ordering height.
Note: We carry complimentary hold-downs (door brackets) which can be requested during the ordering process. These should be installed for a successful door mount as they secure the shade at the bottom of the door so that it does not swing when the door opens and closes.
How to Install
How to Install: Inside Mount
2 min read
Let's make sure you have what you need!
What came with your blinds?
- Mounting brackets*
- 1 ½" #8 hex head wood screws (two per bracket)
- Plastic anchors (for drywall or plaster mounting)
- Handle for bottom rail
What else will you need in order to complete the installation?
- Rechargeable drill with 3/32" drill bit & ¼" drill bit
- Phillips screwdriver
- Pencil
- Tape measure
- Ladder
*Quantity will vary depending on width. Regarding mounting brackets- if your shade is 18"-36" wide you will have two mounting brackets. If your shade is 36 1/8"-48" wide you will have three mounting brackets. If your shade is 48 1/8"-72" wide you will have four mounting brackets.
Download the PDF below for a complete step by step guide on how to install your inside mount blinds.
How to Install: Outside Mount
4 min read
Let's make sure you have what you need!
What came with your blinds?
- Mounting brackets*
- 1 ½" #8 hex head wood screws (two per bracket)
- Plastic anchors (for drywall or plaster mounting)
- Handle for bottom rail
- Hold down brackets**
What else will you need in order to complete the installation?
- Rechargeable drill with 3/32" drill bit & ¼" drill bit
- Phillips screwdriver
- Pencil
- Tape measure
- Ladder
*Quantity will vary depending on width. Regarding mounting brackets- if your shade is 18"-36" wide you will have two mounting brackets. If your shade is 36 1/8"-48" wide you will have three mounting brackets. If your shade is 48 1/8"-72" wide you will have four mounting brackets.
**If applicable to your order.
Download the PDF below for a complete step by step guide on how to install your outside mount blinds.
Read More About This Product
Why Choose Motorized Light Filtering Single Cellular Shades for Your Home?
Upgrade your window treatments with our motorized light filtering single cellular shades. They're a modern, convenient, and energy-efficient solution that blends style and functionality. Whether you're outfitting a bedroom, living room, or hard-to-reach window, these motorized cellular shades provide excellent insulation, cordless safety, and a clean look for any décor.
Effortless Control with Remote Operation
No more tangled cords or hard-to-reach shades. These remote control cellular shades raise and lower with the push of a button. Program individual shades or control multiple shades at once with a single 6-channel remote. Set a favorite open position and enjoy intuitive operation from up to 65 feet away.
Light Filtering Fabric for Comfort and Style
The light filtering fabric gently diffuses sunlight, brightening your room without harsh glare. The single-cell honeycomb design blocks heat in the summer and keeps warmth in during winter, helping to reduce energy costs year-round.
Built-In Rechargeable Motor
A hidden, rechargeable battery-powered motor makes installation simple and requires no wiring. Once charged, the battery can last up to six months. When it's time to recharge, a discreet red light indicator lets you know, and recharging only takes a few hours.
Superior Insulation and Energy Efficiency
With an R-value of 3.4, the honeycomb cellular material is built to insulate. This means better temperature control and lower utility bills without compromising on aesthetics. These energy-saving shades are ideal for both summer heat and winter chill.
Safe and Stylish for Every Room
These cordless cellular shades are Certified Best for Kids™, making them a safe option for homes with children or pets. The semi-gloss PVC top and bottom rails are color-matched for a seamless look that suits any room, from the dining room to the home office.
Smart Setup Without the Hassle
Each shade is paired with the remote control at the factory, making setup faster. Need multiple shades? Group them under the same remote for synchronized operation, or customize each shade to its own channel. No special mount or proprietary system needed, just follow the simple installation guide and enjoy.
Videos
Cellular Shades - The Choice for Maximum Versatility
How to Measure for Inside Mount
How to Measure for Outside Mount
How to Install Cellular Shades
How They're Made - Cellular Shades
Reviews
4.8
Based on 62 reviews
Lilly
Exactly what we ordered. Delivered faster than expected. Blind looks and operates perfectly.
Vicki
had a bit of difficulty getting it to work at first. Had to call customer service, and they were helpful getting the wire connected, then it worked perfectly.
Paul
The shade is compact, quiet, easy to install and a great deal. Love it, those that see and try it are in awe. Blindster customer service is outstanding. I ordered three more for my living room.
Michael
Received my order in a timely fashion and well packaged. Installation instructions were clear and easy to follow. Highly recommend this company!
Lamont
Very easy to install and works very well!
James
Pery fit and better quality than my last purchase of a brand name.
Christina
Best customer service and the blinds are exactly what I expected. I thought the valance part would be a bit bulky and take away from the look of our transom windows but they blend right in and when they are lowered, they are absolutely beautiful and the fit is perfect! Thank you Blindster!
Keseian,
The installation was easy size was exact price was great
David
Easy installation, great looking , very happy!
Jere
As a first time cutomer, I was anxious. Ordered 3 shades for a bay window. Received order in the time frame identified and communication regarding shade production/status was great. Installation was easy and instructions were well written. Only concern is the center (larger) shade does not retract to the same height as the side shades. Difference is a full 1 1/4 inches. Attempted to modify factory retraction preset, but to no avail.