


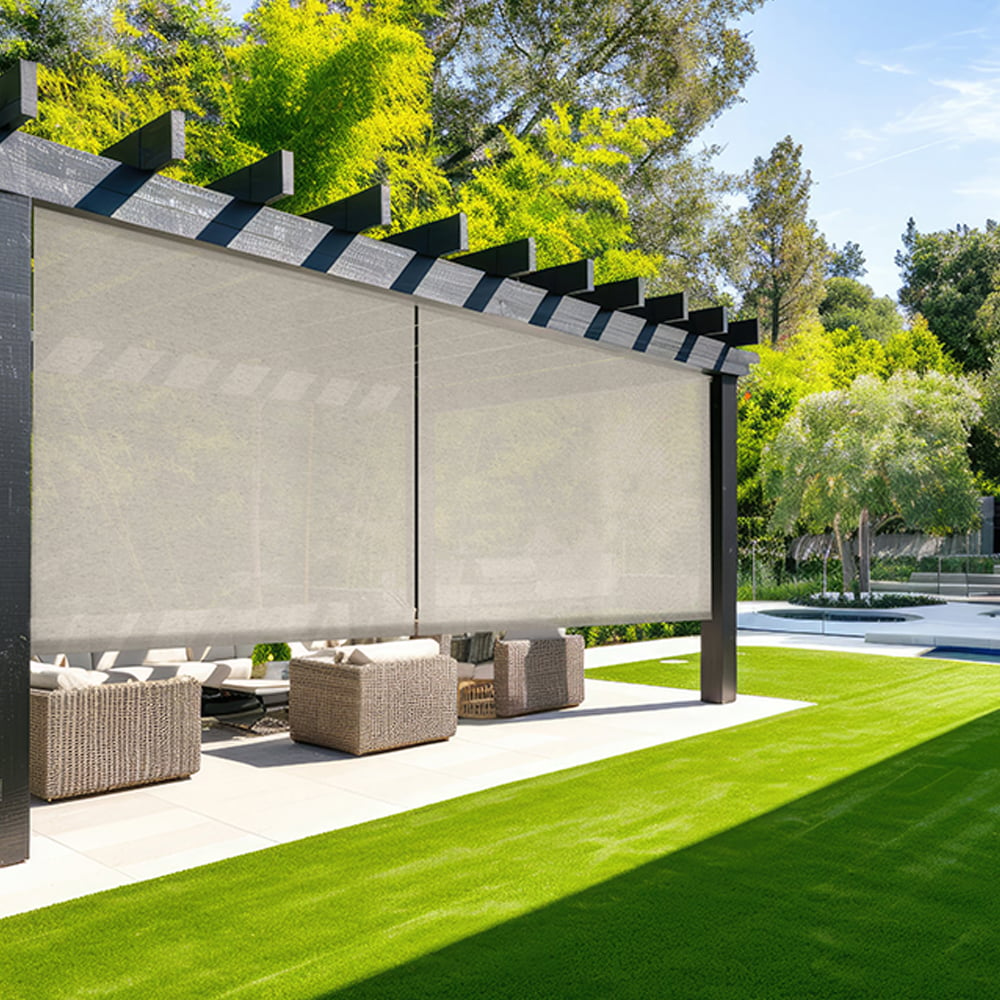
Deluxe Textured Exterior Outdoor Solar Shades
SKU: BLN-DTEOS
Made to order, ships in 3–5 business days. Once shipped, delivery typically takes 5 business days, depending on your location.
Too much direct sunshine or high heat have you down? This shade helps block unwanted light and lower temperatures either inside your home or in outdoor areas. The unique woven material reduces heat gain and UV transmission – plus the flaxen-look textured weave provides a more natural look to the shade!
- 5% Openness
- Certified For Outdoor Use
- Universal Mounting Brackets
Color: Natural
4 colors available
$ - Essential
Mount: Not selected
Size: 24" W × 36" H
Measurements to the nearest 1/8 inch.
Fit or Free Guarantee. If for any reason your window coverings don't fit, even if you make a mistake in measuring, we'll remake them in the size you need free of charge. More details about the Fit or Free Guarantee
Openness Percentage: Not selected
Lift Type: Not selected
Roll Orientation: Not selected
Cassette Valance: Not selected
Bungee Hold Downs: Not selected
Name your windowOptional
Installation help nearby
DIY Install is simple, but if you'd prefer help, enter your ZIP code to find available pros in your area.
- Fit or Free Guarantee
- Free Shipping
- 60-Day Satisfaction Guarantee
Product Information
Outdoor shades are perfect for reducing bright sunlight and excessive heat to help you enjoy your outdoor spaces – install them on patios, porches, overhangs, gazebos and more to make your space more pleasant. Plus, the mesh weave of the shade material not only allows air to still flow through, but you can also keep your view! The small gaps in the weave block about 95% of UV rays while still letting you see through the shade. You'll also enjoy the organic woven look of these shades – a more natural style than traditional solar screen material. Outdoor shades can also be installed in front of windows to provide the same cooling and glare reduction inside your home.
Get to know this shade:
- Outdoor shades are exterior-grade, with durable waterproof material
- Shade fabric blocks 95% of UV rays while still allowing visibility outwards through the shade
- Includes a clear beaded nylon beaded chain to raise and lower the shade (includes tensioning device to secure the chain)
Why you'll love this shade:
- Solar screen material reduces heat gain and glare to improve your outdoor comfort and lower energy bills
- Beautiful textured weave provides a more natural look and a distinctive design
- Keep your view to the outside – woven shade material is partially see-through
- Upgrade the look of your shade with an optional cassette valance to cover the fabric roll at the top of the shade for a finished look
- Shade material is fragrance-free, non-toxic, and flame-retardant
Key considerations:
- Shade fabric will be narrower than ordered width up to 1 3/8" in order to accommodate the operating mechanisms and installation brackets
- Shades wider than 96" have a maximum height of 84" (orders larger than 96" wide AND 84" long cannot be produced)
- Includes installation hardware (specialty fasteners may need to be purchased separately for installation in stucco, brick or concrete)
- Bungee hold downs are recommended to help hold the shade in place
Great for:Patio & Outdoor
- Easy to Clean
- Water Resistant
- Eco-Friendly
- Privacy
Made to order, ships in 3–5 business days. Once shipped, delivery typically takes 5 business days, depending on your location.
Specifications & Restrictions
- Width
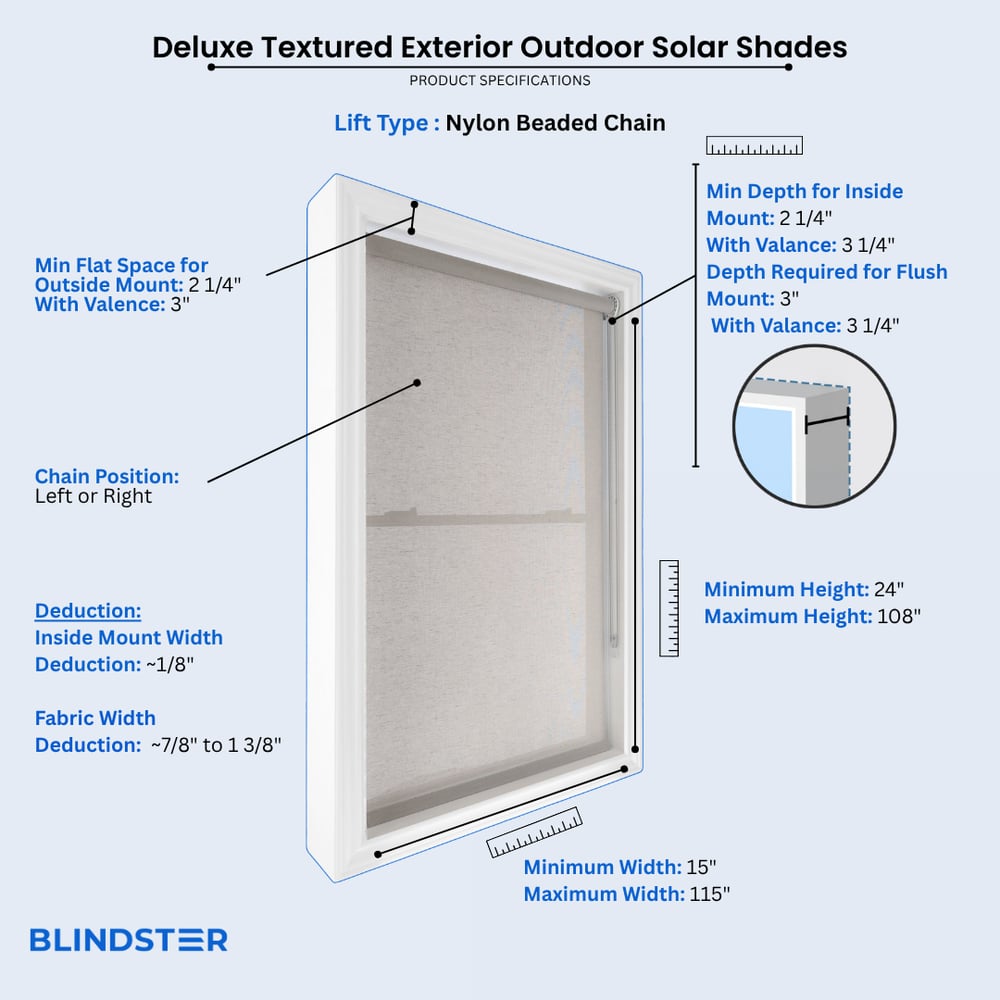
- 15" – 115"
- Height
- 24" – 108"
- Min depth for inside mount
2 ¼ inches
- Min depth for inside mount (with valance)
3 ¼ inches
- Depth required for flush mount
3 inches
- Depth required for flush mount (with valance)
3 ¼ inches
- Min Flat Space For Outside Mount
2 ¼ inches
- Min Flat Space For Outside Mount (with valance)
3 inches
- Inside Mount Width Deduction
Approximately 1/8 inch
- Fabric Width Deduction
Approximately 7/8 to 1 3/8 inches (applies to all solar shades regardless of mount type)
Restrictions
- Reverse Roll not available with Cassette System
- Optional cassette valance cannot be mounted at the sides. It must be mounted at the back or at the top of the cassette
- Not available with a Motorized or Cordless lift option
How to Measure
How to Measure: Inside Mount
3 min read
Let's make sure an inside mount will work for your installation! If you plan to install in between the posts of a patio, deck, pergola or similar structure, and mounting to the underside of a cross beam, then this is considered an inside mount. Using a metal tape measure, first check if you have sufficient depth:
- Measure the depth of the mounting surface from front to back. To install the brackets, the depth must be at least 2 1/4" for shades without a cassette valance and 3 1/4" for shades with a cassette valance. To have a flush mount (meaning the shade is fully recessed within the opening) the depth must be at least 3" without a cassette valance and 3 1/4" for shades with a cassette valance. If your depth is not sufficient for mounting the brackets, please see our outside mount instructions.
How to Measure:
Let's start with the Width:
- Measure inside of the opening/frame from left to right at the top of the opening to the nearest 1/8". If rounding is necessary, round down to the nearest 1/8". That is your ordering width.
Now, let's do the Height:
- Measure from the bottom of the cross beam/mounting surface down to wherever you would like the shade to stop in three places: on the left-hand side, the middle, and on the right-hand side. If the shade will go to the ground, we recommend leaving 6-12" of space for air flow and for room to install tie downs if selected. Write down all 3 measurements to the nearest 1/8" and circle the tallest. That is your ordering height.
Note: Always provide us with the actual measurement of the opening. We will make the necessary deduction of approximately 1/8" to the width of the top of the shade to accommodate the installation brackets.
The fabric portion of the shade will be approximately 7/8" – 1 3/8" narrower than the ordered width (up to 3/4" gap on each side between the window opening and the edge of the fabric).
No deductions will be made to the ordered height.
How to Measure: Outside Mount
3 min read
Before you start measuring, decide where you want to mount your exterior shade – this can be on the wall of your home, on a cross beam of your deck, patio or gazebo, or any location that is sturdy enough to secure the shades. You will need at least 2 1/4" of flat vertical space above the window to mount the brackets for shades without a cassette valance, or at least 3" for shades with a cassette valance. There should also be no obstructions down the entire length of the area you plan to install the shade (handrails, hooks, or other protruding elements). Follow the directions below for where you'd like to install your shade.
If you do not have sufficient vertical space for mounting the brackets, please see our inside mount instructions or consider a different installation location.
Your ordered width will be the "tip to tip" measurement, which is the widest part of the top of the shade including the brackets and cassette valance (if applicable). The fabric portion of the shade will be approximately 1" – 1 1/2" narrower than the ordered width (up to 3/4" on each side. If you wish to have the fabric cover a specific width, we recommend ordering slightly wider – just ensure that you have enough additional horizontal space to mount the shade.
Width:
- Looking at your window and surrounding wall or other installation location, decide what area you would like to cover. We recommend the shade extends about 2-3" on each side of the window opening for the best light control and appearance.
- Using a metal tape measure, measure from left to right including your desired extra space on each side of the window—that is your ordering width.
Height:
- Consider how far above the window or other opening you would like to install your shade but at least starting with the minimum vertical space referenced above. Since the shade spools onto the roll, it does not need to be installed high above the window to have the shade fabric fully clear the window.
- Measure from the top of where you will mount the shade on the wall or cross beam down to where you want the bottom of the shade to be, using the same extra space below your window opening as you used above; if you have a protruding windowsill, measure down to the top of the sill. If the shade will go to the ground, we recommend leaving 6-12" of space for air flow and for room to install tie downs if selected. That is your ordering height.
Width:
- Looking at your window and surrounding wall, decide what area you would like to cover. We recommend the shade extends about 2-3" on either side of the window opening for the best light control and appearance.
- Using a metal tape measure, measure from left to right including any desired extra space on each side of the window—that is your ordering width.
Height:
- Consider how far above the window you would like to install your shade but at least starting with the minimum vertical space referenced above. Since the shade spools onto the roll, it does not need to be installed high above the window to have the shade fabric fully clear the window.
- Measure from the top of where you will mount the shade on the wall down to where you want the bottom of the shade to be, using the same extra space below your window opening as you used above, or to the bottom edge of the trim if you prefer; if you have a protruding windowsill, measure down to the top of the sill. That is your ordering height.
Note: The shade fabric may rub against the trim when operating. If your trim is more than 1/2" thick, consider adding shims (not included) under the brackets for additional clearance. If your trim is 3/4" or thicker, we recommend ordering the shade with the reverse roll option.
Width:
- We don't normally recommend mounting roller shades directly on the trim unless your window configuration doesn't allow for other placements. Your ordered width will be the bracket to bracket measurement which cannot exceed the width of your trim. However, the fabric portion of roller shades is always narrower than the ordered width, and will not extend to the edges of the trim.
- Confirm that the height of your trim is at least the minimum height required for installing the mounting brackets. At the top of your window, use a steel measuring tape and measure from outer edge to outer edge of the trim. That is your ordering width.
- Note that the fabric portion of the shade will be narrower than your ordered width.
Height:
- Measure from the top of your trim to the bottom of your trim or to the top of the windowsill if you have a protruding sill. That is your ordering height.
How to Install
How to Install: Inside Mount
2 min read
Let's make sure you have what you need!
What came with your blinds?
- Installation brackets
- Tension device and loop control
- Cassette valance*
What else will you need in order to complete the installation?
- Rechargeable drill with 5/64" and ¼" bit
- Phillips screwdriver
- Pencil
- Tape measure
- Ladder
*If applicable to your order.
Download the applicable PDF below for a complete step by step guide on how to install your inside mount blinds based on the ordered lift type.
How to Install: Outside Mount
4 min read
Let's make sure you have what you need!
What came with your blinds?
- Installation brackets
- Tension device and loop control
- Cassette valance*
What else will you need in order to complete the installation?
- Rechargeable drill with 5/64" and ¼" bit
- Phillips screwdriver
- Pencil
- Tape measure
- Ladder
*If applicable to your order.
Download the applicable PDF below for a complete step by step guide on how to install your outside mount blinds based on the ordered lift type.
Read More About This Product
Enjoy Cooler Spaces, Better Views & Stylish Shade Outdoors
Whether you're shading a patio, porch, or sunny window, the Deluxe Textured Exterior Outdoor Solar Shades are built to improve comfort without blocking your view. These durable outdoor shades filter harsh sunlight, reduce heat, and cut down on glare, so you can relax in style while still enjoying the outdoors.
Heat & Glare Reduction
Made from durable mesh fabric, these outdoor shades block up to 95% of UV rays, helping reduce glare and heat inside or outside your home. They're ideal for creating cooler, more usable outdoor spaces even on hot and sunny days.
Maintain Your View
The open-weave design allows for outward visibility while still providing effective shading. You can enjoy a more pleasant environment without sacrificing the view from your patio, porch, or window.
Natural Look, Durable Design
With a woven flaxen-style texture, these shades offer a softer, more organic appearance than standard solar materials. They're made with waterproof, exterior-grade fabric that stands up to the elements season after season.
Safe & Easy to Use
Each shade comes with a color-coordinated nylon beaded chain and a secure tensioning device. It's a simple, reliable lift system that meets safety guidelines and works well for everyday use.
Optional Cassette & Bungee Upgrades
Add a cassette valance to conceal the fabric roll at the top for a more polished finish, or install bungee hold downs to keep the shade steady during breezy conditions. These upgrades enhance both form and function in outdoor settings.
Videos
How to Measure for Inside Mount
How to Measure for Outside Mount
Reviews
4.9
Based on 10 reviews
Jeffrey
The blinds came as ordered and fig perfect!!
Ed
Ordering was easy and the blinds arrived quick. Good quality and well made. Would buy again
Kimberly
Really easy to install and solid quality so far!
Anthony
Great product,easy to install, best of all, they remade 2 shades that did not fit my color scheme
Jean
Highly recommend Blindster. We have been looking for blinds for our porch for 3 years. Waited until we found a product that was exactly what we wanted for our needs. The staff at Blindster went above and beyond to make sure we bought the correct blinds.
Kacey
Love this material and how it's transformed my patio into an enjoyable space.
Karen
The shades look very nice and keep the west sun from heating up the room while allowing an outside view.