


Premium Exterior Outdoor Solar Shades
SKU: BLNPOERS116
Made to order, ships in 3–5 business days. Once shipped, delivery typically takes 5 business days, depending on your location.
For the ultimate in outdoor sun protection, you need a shade that is durable, reliable, and built to last. Available with either manual crank operation or remote-control motorization, our Premium Exterior Outdoor Solar Shades are the perfect solution to excessive sun, heat, glare to take your outdoor space to the next level.
- 5% or 10% Openness
- Certified For Outdoor Use
- Universal Mounting Brackets
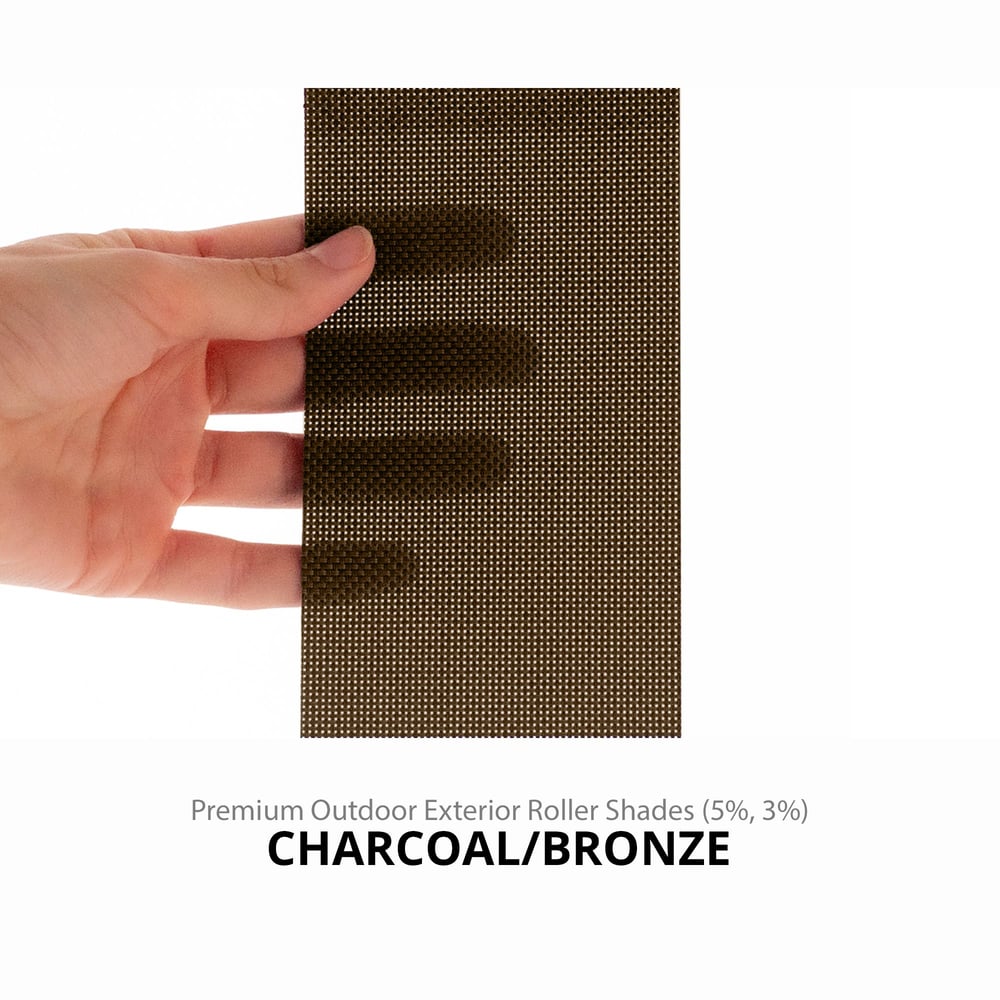
Color: Charcoal/Bronze
6 colors available
$ - Essential
$$ - Classic
Mount: Not selected
Size: 24" W × 36" H
Measurements to the nearest 1/8 inch.
Fit or Free Guarantee. If for any reason your window coverings don't fit, even if you make a mistake in measuring, we'll remake them in the size you need free of charge. More details about the Fit or Free Guarantee
Openness Percentage: Not selected
Lift Type: Not selected
Cable Guide: Not selected
Name your windowOptional
Installation help nearby
DIY Install is simple, but if you'd prefer help, enter your ZIP code to find available pros in your area.
- Fit or Free Guarantee
- Free Shipping
- 60-Day Satisfaction Guarantee
Product Information
Finish your outdoor space with one of the best exterior sun shades on the market – our Premium Exterior Outdoor Solar shades are made to beautifully block excessive heat and UV rays for years to come. You can also install these directly to your home to help block outside heat and reduce cooling bills in the summer. Plus, the unique solar shade material preserves your view so you can still see outward during the day.
Our Premium Outdoor Shades start with a 4" aluminum headbox on the top that houses the fabric roll and internal mechanisms and can be mounted to a variety of surfaces. There are also cables that run from the headbox to a fixed location – you can select either deck mounted or wall mounted brackets to anchor the cables. The bottom rail on the fabric portion of the shade connects to the cables for smooth and controlled operation. Enjoy cooler temps, less glare, and UV protection without losing your view – in style with Blindster's Premium Exterior Solar Shades!
Get to know this shade:
- Custom-made exterior shade with cable guides for increased durability; can be installed in most locations
- Features your choice of either 3% or 5% fabric openness that blocks 97% or 95% of UV rays (respectively) while still providing daytime view-through
- Premium grade aluminum headbox covers operating mechanisms and fabric tube, providing a professional finished appearance (available in either white or bronze)
- Choose either manual crank or remote-controlled motorized operation
Why you'll love this shade:
- Shades provide protection from heat, glare, UV rays and even errant golf balls!
- Outdoor-rated sidetrack system with metal hem bar and rail guard ensures durable and reliable operation
- UV-coated cable guide system functions smoothly for long life of both the cables and the cable guides
- Fabric edges are welded to minimize fraying out of the box and over time for long-lasting fabric life
- Choose a light color fabric to reflect more heat, or a darker color for the highest view-through and glare protection
- Comes standard with manual crank operation – just twist the crank to raise or lower the shade (at least one crank required per order)
- Option remote-control motorized feature provides effortless operation with the push of a button
- Motorized shades feature premium Somfy motors, and include a standard electrical plug with 10-foot cord for easy installation – no special wiring required
Key considerations:
- Can be mounted on a variety of surfaces – you'll need to provide the appropriate installation screws (and anchors if necessary) to install the headbox portion of the shade; brackets for the cable guides are included
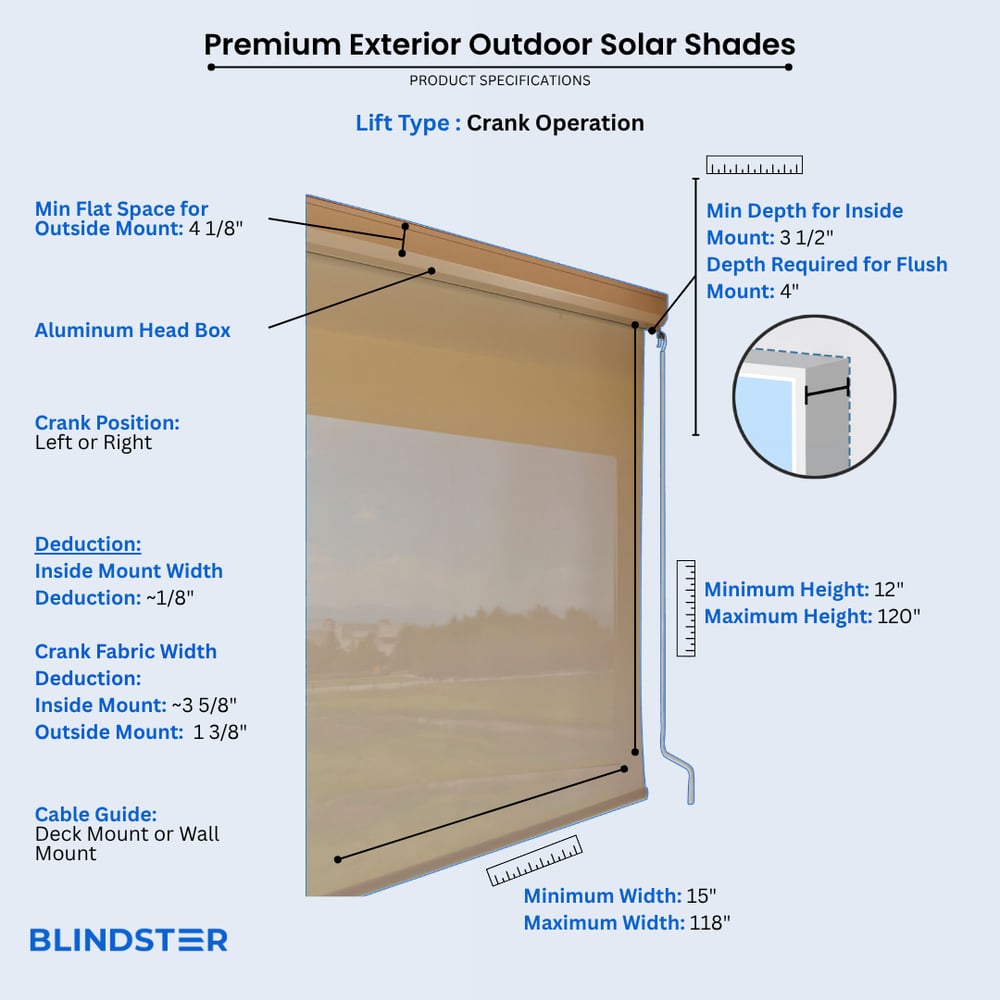
- Fabric will be up to 3 5/8" narrower than the ordered width to accommodate the fabric roll and operating mechanisms within the shade's hardware and headbox
- When fully raised, bottom hem bar hangs 2" below the headbox
- Front cover of the aluminum headbox is removable - must have enough clearance to attach at a 90-degree angle
Great for:Patio & Outdoor
- Easy to Clean
- Water Resistant
- Eco-Friendly
- Privacy
Made to order, ships in 3–5 business days. Once shipped, delivery typically takes 5 business days, depending on your location.
Specifications & Restrictions
- Width
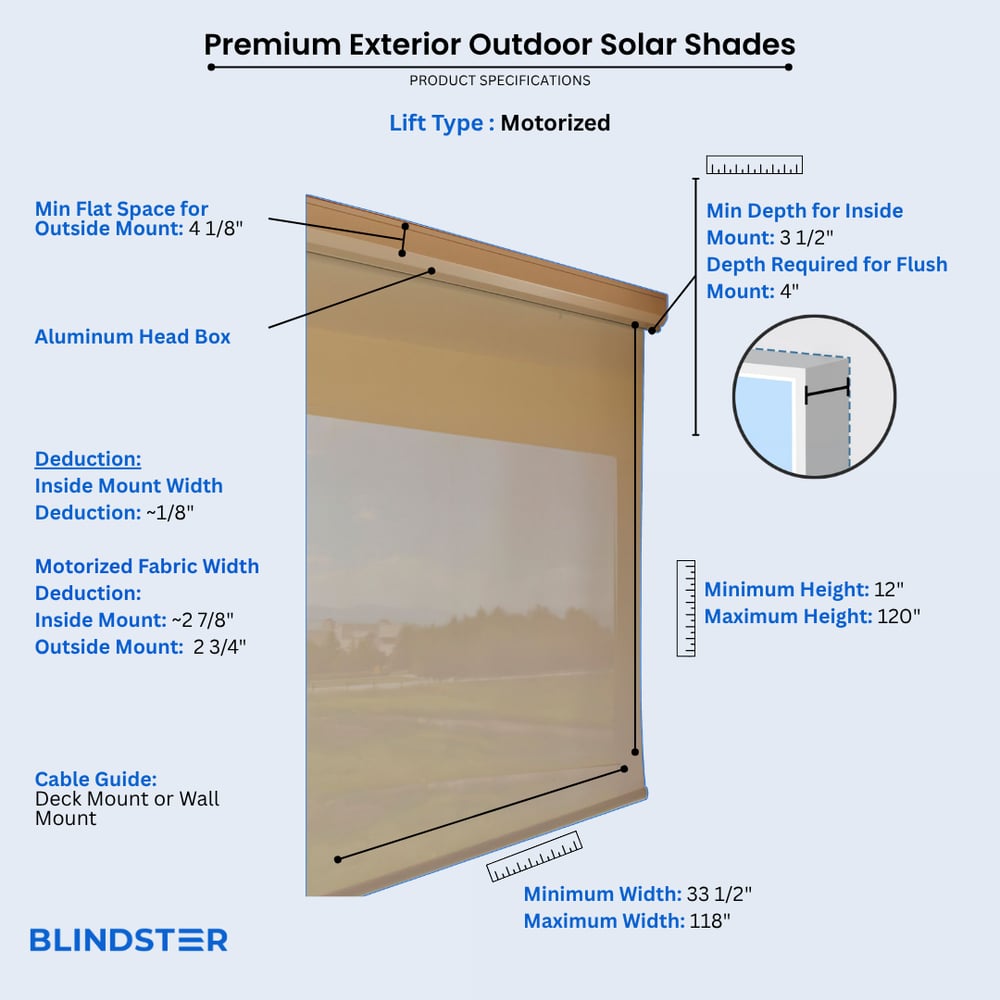
- 15" – 118"
- Height
- 12" – 120"
- Aluminum Head Box
4 ½" (high) x 4" (deep)
- Min depth for inside mount
3 ½ inches
- Depth required for flush mount
4 inches
- Min Flat Space For Outside Mount
4 1/8 inches
- Inside Mount Width Deduction
Approximately 1/8 inch
- Motorized Fabric Width Deduction
Approximately 2 7/8 inches for Inside Mount and 2 ¾ inches for Outside Mount
- Crank Fabric Width Deduction
Approximately 3 5/8 inches for Inside Mount and 3 ½ inches for Outside Mount
- Motorized Plug-In
10-foot electrical plug
Restrictions
- Not suitable for installation on doors due to cable guides
How to Measure
How to Measure: Inside Mount
3 min read
Let's make sure an inside mount will work for your installation! If you plan to install in between the posts of a patio, deck, pergola, or similar structure, and mounting to the underside of a cross beam, then this is considered an inside mount. Using a metal tape measure, first check if you have sufficient depth:
- Measure the depth of the mounting surface from front to back. To install the brackets, the depth must be at least 3 1/2". To have a flush mount (meaning the shade is fully recessed within the opening) the depth must be at least 4". If your depth is not sufficient for mounting the brackets, please see our outside mount instructions.
How to Measure:
Let's start with the Width:
- Measure inside of the opening/frame from left to right at the top of the opening to the nearest 1/8". If rounding is necessary, round down to the nearest 1/8". That is your ordering width.
Now, let's do the Height:
- Measure from the bottom of the cross beam/mounting surface down to wherever you would like the shade to stop in three places: on the left-hand side, the middle, and on the right-hand side. If the shade will go all the way to the ground, we recommend leaving 6-12" of space for air flow and for room to install the cable guides. Write down all 3 measurements to the nearest 1/8" and circle the tallest. That is your ordering height.
Note: Always provide us with the actual measurement of the opening. We will make the necessary deduction of approximately 1/8" to the width of the top of the shade to accommodate the installation brackets.
The fabric portion of the shade will be approximately 2 7/8" narrower than the ordered width (up to 1 1/2" gap on each side between the side of the opening and the edge of the fabric).
No deductions will be made to the ordered height.
How to Measure: Outside Mount
3 min read
Before you start measuring, decide where you want to mount your exterior shade – this can be on the wall of your home, on a cross beam of your deck, patio or gazebo, or any location that is sturdy enough to secure the shades. You will need at least 4 1/8" of flat vertical space above the window to mount the brackets. There should also be no obstructions down the entire length of the area you plan to install the shade (handrails, hooks, or other protruding elements). Follow the directions below for where you'd like to install your shade.
If you do not have sufficient vertical space for mounting the brackets, please see our inside mount instructions or consider a different installation location.
Your ordered width will be the "tip to tip" measurement, which is the widest part of the top of the shade including the brackets and head box. The fabric portion of the shade will be approximately 2 3/4" narrower than the ordered width (about 1 3/8" on each side. If you wish to have the fabric cover a specific width, we recommend ordering slightly wider – just ensure that you have enough additional horizontal space to mount the shade.
Width:
- Looking at your window and surrounding wall or other installation location, decide what area you would like to cover. We recommend the shade extends about 2-3" on each side of the window opening for the best light control and appearance.
- Using a metal tape measure, measure from left to right including your desired extra space on each side of the window—that is your ordering width.
Height:
- Consider how far above the window or other opening you would like to install your shade but at least starting with the minimum vertical space referenced above. Since the shade spools into the headbox, it does not need to be installed high above the window to have the shade fabric fully clear the window or other opening.
- Measure from the top of where you will mount the shade on the wall or cross beam down to where you want the bottom of the shade to be, using the same extra space below your window opening as you used above; if you have a protruding windowsill, measure down to the top of the sill. If the shade will go to the ground, we recommend leaving 6-12" of space for air flow and for room to install cable guides. That is your ordering height.
Width:
- Looking at your window and surrounding wall, decide what area you would like to cover. We recommend the shade extends about 2-3" on either side of the window opening for the best light control and appearance.
- Using a metal tape measure, measure from left to right including any desired extra space on each side of the window—that is your ordering width.
Height:
- Consider how far above the window you would like to install your shade but at least starting with the minimum vertical space referenced above. Since the shade spools onto the roll, it does not need to be installed high above the window to have the shade fabric fully clear the window.
- Measure from the top of where you will mount the shade on the wall down to where you want the bottom of the shade to be, using the same extra space below your window opening as you used above, or to the bottom edge of the trim if you prefer; if you have a protruding windowsill, measure down to the top of the sill. That is your ordering height.
Note: The shade fabric may rub against the trim when operating. If your trim is more than 1/2" thick, consider adding shims (not included) under the brackets for additional clearance. If your trim is 3/4" or thicker, we recommend ordering the shade with the reverse roll option.
Width:
- We don't normally recommend mounting roller shades directly on the trim unless your window configuration doesn't allow for other placements. Also be sure that the trim is structurally sound and can support the installation screws and weight of the shade. Your ordered width will be the bracket to bracket measurement which cannot exceed the width of your trim. However, the fabric portion of roller shades is always narrower than the ordered width, and will not extend to the edges of the trim.
- Confirm that the height of your trim is at least the minimum height required for installing the mounting brackets. At the top of your window, use a steel measuring tape and measure from outer edge to outer edge of the trim. That is your ordering width.
- Note that the fabric portion of the shade will be narrower than your ordered width.
Height:
- Measure from the top of your trim to the bottom of your trim or to the top of the windowsill if you have a protruding sill. That is your ordering height.
How to Install
How to Install: Inside Mount
2 min read
Let's make sure you have what you need!
What came with your blinds?
- Installation brackets
- Enclosed Assembly screws
- Cable Guide brackets/assembly
- 4" x 4 ½" headbox w/ endplates
- Crank*
- Remote*
What else will you need in order to complete the installation?
- Rechargeable drill with bit extenders
- Appropriate Fasteners and & Corresponding Bit (mounting screws are not provided)
- Phillips screwdriver
- Pliers
- Sharp Cable Cutters
- Level
- Pencil
- Tape measure
- Ladder
*If applicable to your order.
Download the applicable PDF below for a complete step by step guide on how to install your inside mount blinds based on the ordered lift type.
Please Note: Hardware and enclosure assembly screws are included, but mounting screws are not provided. The type and size of screw required are project specific and will vary depending upon the mounting surface.
How to Install: Outside Mount
4 min read
Let's make sure you have what you need!
What came with your blinds?
- Installation brackets
- Enclosed Assembly screws
- Cable Guide brackets/assembly
- 4" x 4 ½" headbox w/ endplates
- Crank*
- Remote*
What else will you need in order to complete the installation?
- Rechargeable drill with bit extenders
- Appropriate Fasteners and & Corresponding Bit (mounting screws are not provided)
- Phillips screwdriver
- Pliers
- Sharp Cable Cutters
- Level
- Pencil
- Tape measure
- Ladder
*If applicable to your order.
Download the applicable PDF below for a complete step by step guide on how to install your inside mount blinds based on the ordered lift type.
Please Note: Hardware and enclosure assembly screws are included, but mounting screws are not provided. The type and size of screw required are project specific and will vary depending upon the mounting surface.
Videos
Reduce Glare
Lift Options
Crank Operation
Motorized Lift
Block the Sun and Preserve Your View
Installation Guide - Blindster Premium Exterior Outdoor Roller Shades
Quick View Installation Guide - Blindster Premium Exterior Outdoor Roller Shades
Reviews
4.5
Based on 2 reviews
Ben
The afternoon sun shines directly into my large living room windows overlooking my enclosed patio, and the heat and glare is terrible. Being able to find exterior shades that not only fit the large openings on my patio but will also hold up to east Texas weather (the cable guides are awesome) and block out the sunlight with the convenience of also being motorized has been awesome. The 3% openness turns my living room from feeling like the surface of the sun to the feeling of a very comfortable overcast day. Its also very worth mentioning the amount of heat they keep out of my house as well. I really don't know how I managed without them, and the quality is exceptional! Very Happy!