


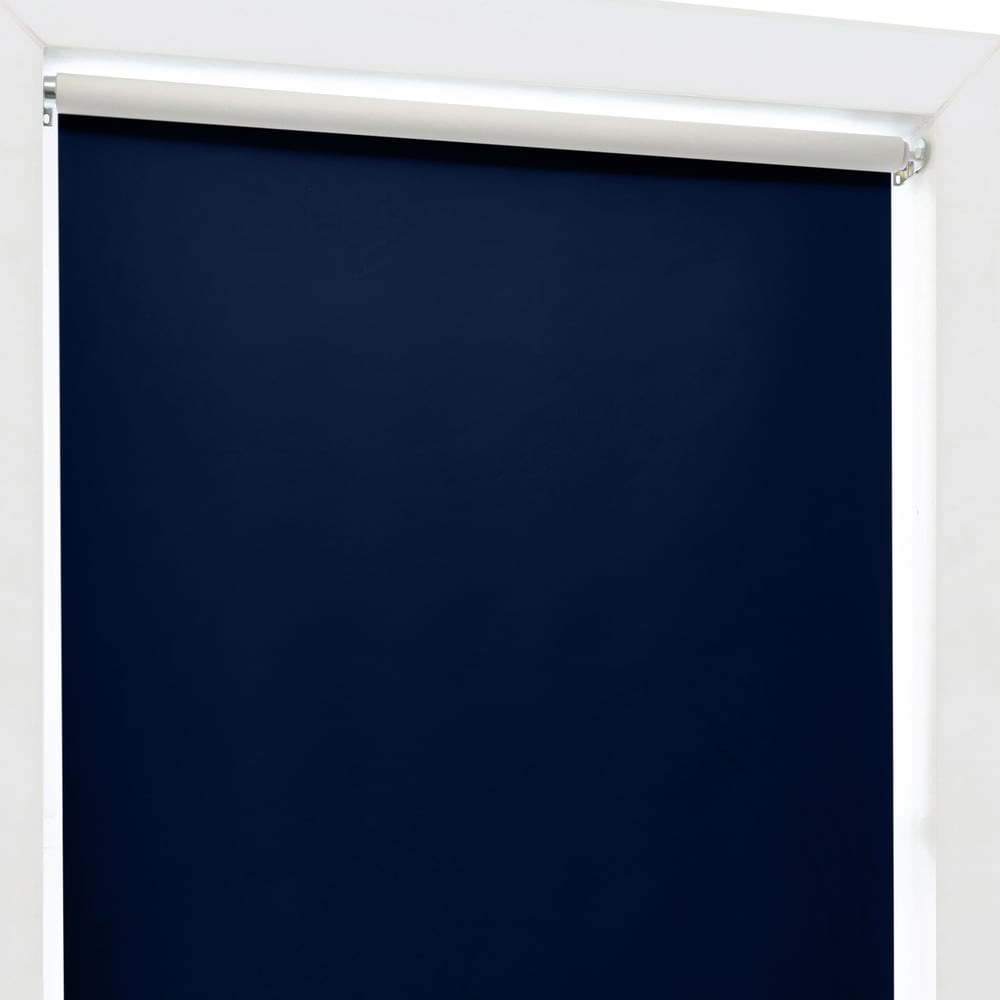
Deluxe Blackout Vinyl Roller Shades
SKU: BLN-DBVRS
Made to order, ships in 3–5 business days. Once shipped, delivery typically takes 5 business days, depending on your location.
Sleep better and save money with our most budget-friendly roller shade. Tried and true 4-ply vinyl blackout fabric prevents any light passing through the shade and is durable and easy to clean. Shades are made to your window's specifications with the customized lift style and roll direction of your choosing. Add a cassette valance for a finishing touch!
- 4-Ply Vinyl
- Go Cordless!
- Smart Option: Motorize
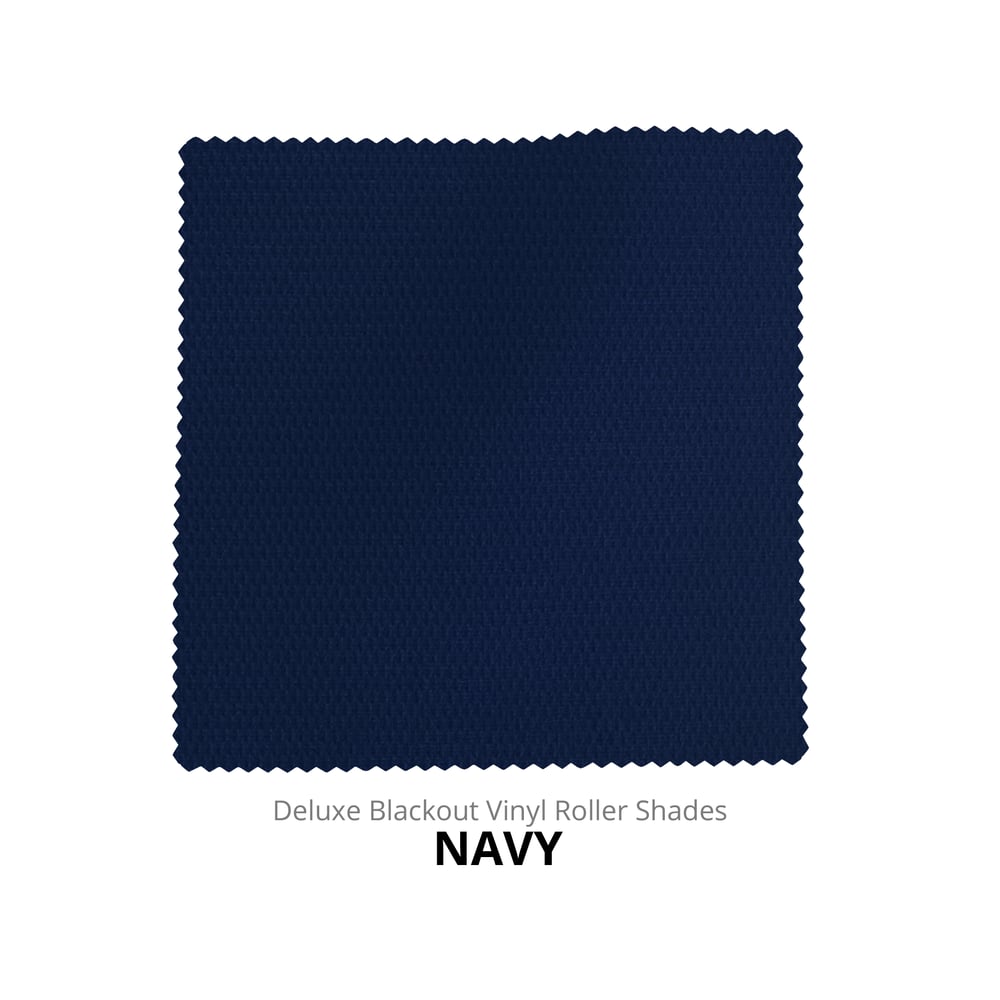
Color: Navy
10 colors available · Fabric: fiberglass reinforced 4-ply vinyl; WHITE backing
$ - Essential
Mount: Not selected
Size: 24" W × 36" H
Measurements to the nearest 1/8 inch.
Fit or Free Guarantee. If for any reason your window coverings don't fit, even if you make a mistake in measuring, we'll remake them in the size you need free of charge. More details about the Fit or Free Guarantee
Lift Type: Not selected
Roll Orientation: Not selected
Cassette Valance: Not selected
Name your windowOptional
Installation help nearby
DIY Install is simple, but if you'd prefer help, enter your ZIP code to find available pros in your area.
- Fit or Free Guarantee
- Free Shipping
- 60-Day Satisfaction Guarantee
Product Information
We love the sunshine but sometimes we want to enjoy it on our own timetable. Enter our Deluxe Blackout Vinyl Roller shades to help you decide when you want to let the sunshine pour in, and when you want to block the sun and dim and room. This budget-friendly shade is packed with value. Customize your lift option and choose from available additional features to enhance the look and performance of your shade.
Get to know this shade:
- 4-ply fiberglass-reinforced vinyl material blocks all light from passing through the shade
- The back (streetside) of every color is white for a neutral appearance from outside
- Four available lift options to choose from: beaded chain, cordless , cordless precision lock, or motorized lift
- Optional cassette valance is color coordinated to the shade (white, vanilla, gray or black)
Why you'll love this shade:
- Blackout fabric gives you maximum light control and privacy, perfect for bedrooms and media rooms or anywhere with bright direct sunlight
- Amazingly priced shade with great features and quality to last for years to come
- Child-safe cordless lift options available – just be sure you can reach as high as you want to lift the shade!
- Selecting a cassette valance adds a designer finish and helps block light at the top of the window for a better blackout experience
- Fabric is flame retardant, durable, and easy to clean (all great for kids' rooms!)
- Meets all CPSC child safety guidelines
Key considerations:
- The fabric portion of the shade will always be about 1 1/2" narrower than your ordered width due to the operating mechanisms and brackets at the top of the shade
- A small amount of light can still enter the room around the sides of the shade
- Shades over 73" wide AND 60" long require a seam in the fabric (see below for more info); our Deluxe Blackout Roller Shades accommodate larger sizes without a seam
Great for:Living RoomBedroomOfficeKitchenMedia RoomBathroomUtility Room
- Easy to Clean
- Privacy
- Child & Pet Safety
Made to order, ships in 3–5 business days. Once shipped, delivery typically takes 5 business days, depending on your location.
Specifications & Restrictions
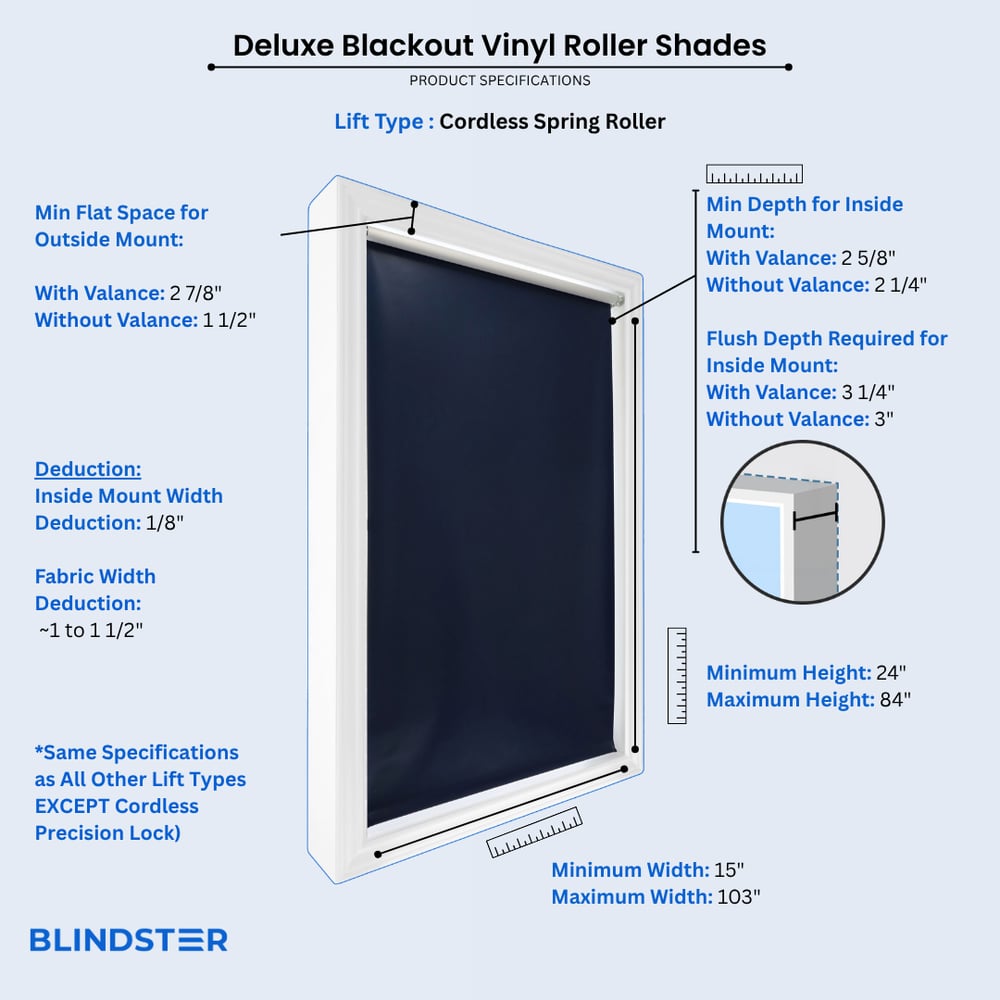
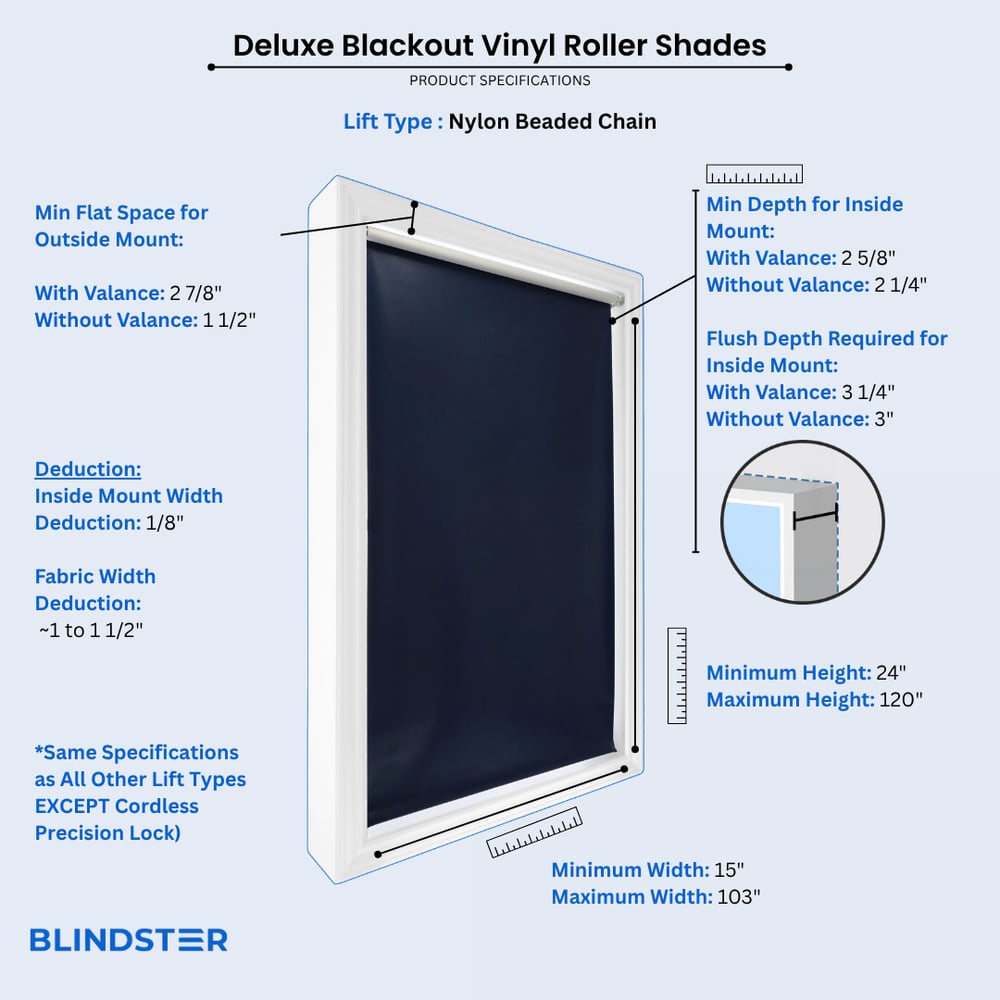
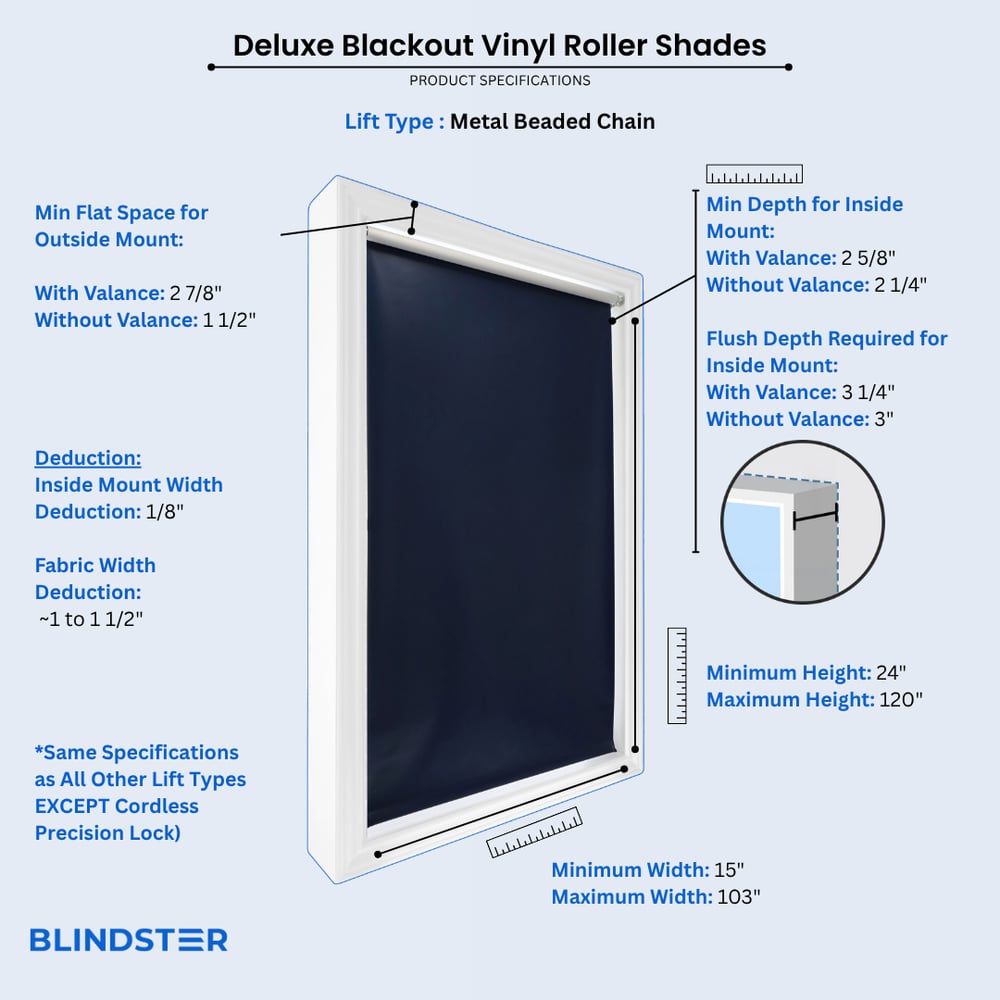
- Width
- 15" – 103"
- Height
- 24" – 120"
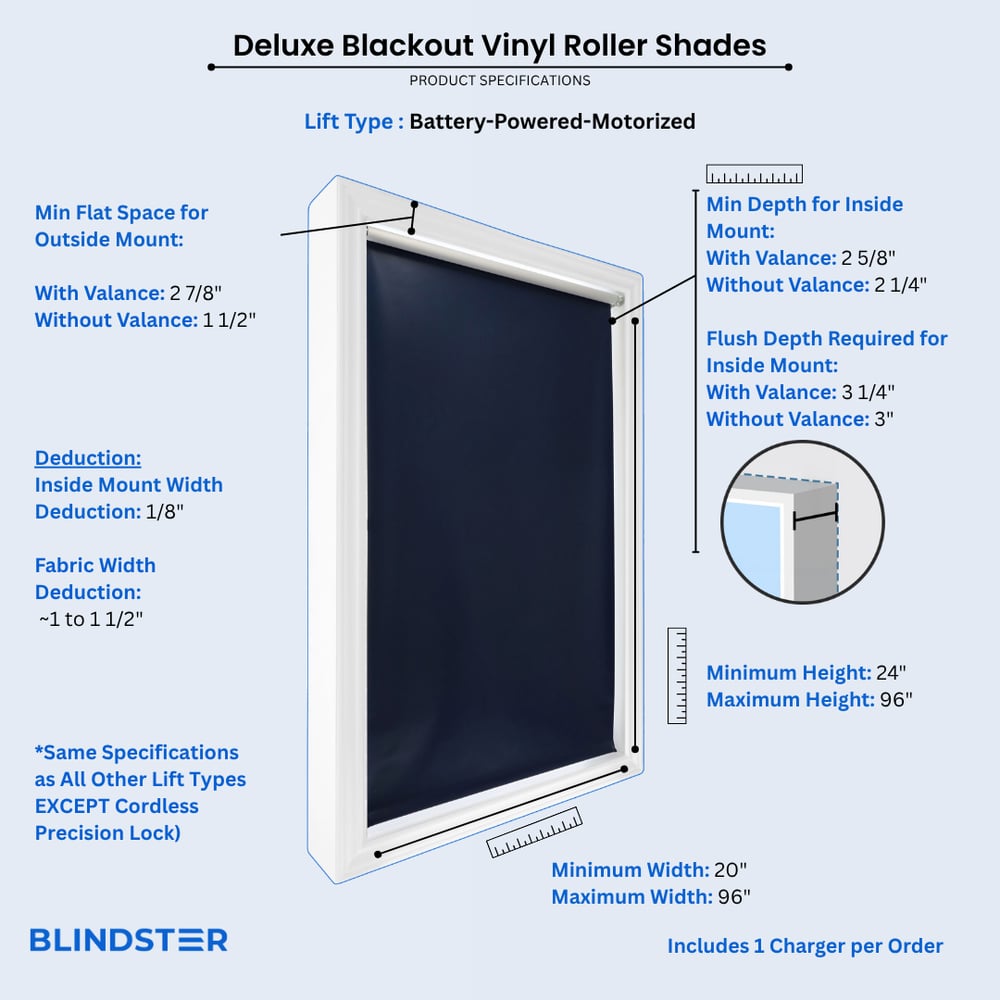
- Min depth for inside mount (without valance)
2 ¼ inches
- Min depth for inside mount (with valance on all lift types EXCEPT Cordless Precision Lock)
2 5/8 inches
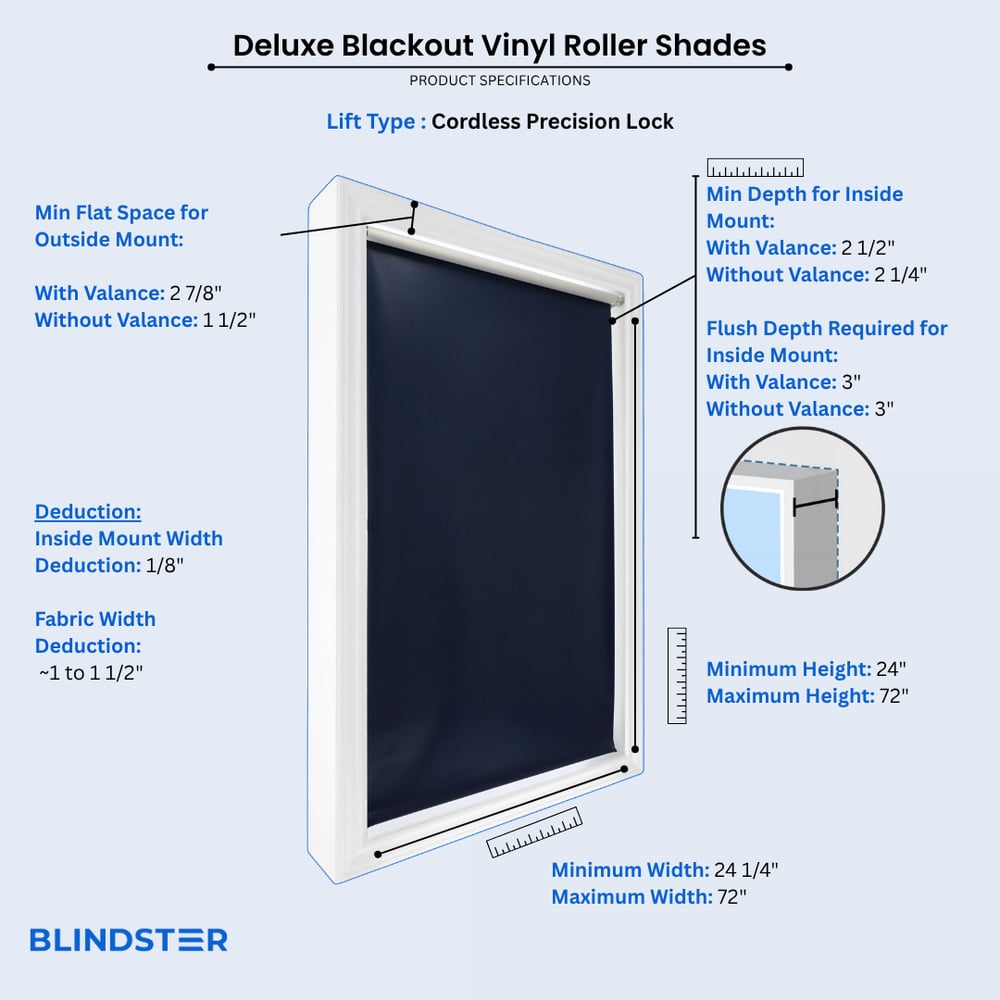
- Min depth required for inside mount (with valance and Cordless Precision Lock)
2 ½ inches
- Min depth required for inside flush mount (without valance)
3 inches
- Min depth required for inside flush mount (with valance on all lift types EXCEPT Cordless Precision Lock)
3 ¼ inches
- Min depth required for inside flush mount (with valance and Cordless Precision Lock)
3 inches
- Min flat space for outside mount (without valance)
1 ½ inches
- Min flat space for outside mount (with valance)
2 7/8 inches
- Valance Size
3 ¼ inches x 3 inches
- Inside Mount Width Deduction
Approximately 1/8 inch
- Fabric Width Deduction
Approximately 1 - 1 ½ inches (applies to all roller shades regardless of mount type)
- 6 channel remote control required to operate motorized shades
Remotes from other companies will not operate Blindster shades
- All shades are pre-programmed at the factory to operate on channel 6
Each remote can be programmed to control up to 6 shades
- Remote Control Range
65 feet
- Easy Rechargeable Feature
Battery wand is integrated into the roller mechanism of all motorized shades
- This product's motorized remote is NOT compatible with the following products:
Deluxe Cellular Shades categories & Premium Solar Shades categories
- Charger included for Motorized Shades
1 Charger per order included
*Recharge time on a shade is 8 hours, chargers are not meant to be plugged into the shade long term.
Restrictions
- Reverse Roll not available with a Cassette Valance
- Cassette Valance and Cordless lift cannot be combined
- Motorized not available on widths less than 20"
- Motorized Roller Shades are not compatible with the Motorized cellular shades, or Premium Motorized Solar Shades
- Reverse roll must be top mounted (cannot be mounted back to the wall for outside mount).
- Shades over 73" wide AND 60" long - vinyl fabric is railroaded (turned on side) and a horizontal seam will be visible. Lengths 60" to 74 1/8" the seam is located approx 55" from the top of the shade. For lengths over 74 1/8" the seam is located approx 45" from the top of the shade.
- Cordless Precision Lock must include a Cassette Valance
How to Measure
How to Measure: Inside Mount
3 min read
Let's make sure an inside mount will work for your window! Using a metal tape measure, first check if you have sufficient depth:
- Measure inside the window opening from the back of the window to the front of the opening where the shade would mount. To mount the brackets, the depth at the top of the window must be at least 2 1/4" for shades without a cassette valance and 2 5/8" for shades with a cassette valance. To have a flush mount (meaning the shade is fully recessed in the window opening) the depth must be at least 3" without a cassette valance and 3 1/2" for shades with a cassette valance. If your depth is not sufficient for mounting the brackets, please see our outside mount instructions or consider a different product.
How to Measure:
Let's start with the Width:
- Measure inside of the window opening/frame from left to right at the top of the opening to the nearest 1/8". If rounding is necessary, round down to the nearest 1/8". That is your ordering width.
Now, let's do the Height:
- Measure the inside of the window opening/frame from the top of the opening to the bottom of the opening/sill to the nearest 1/8" in three places: on the left-hand side, the middle, and on the right-hand side. Write down all 3 measurements and circle the tallest. That is your ordering height.
Note: Always provide us with the actual measurement of the window opening. We will make the necessary deduction of approximately 1/8" to the width of the top of the shade to accommodate the installation brackets.
The fabric portion of the shade will be approximately 1" – 1 1/2" narrower than the ordered width (up to 3/4" gap on each side between the window opening and the edge of the fabric). When maximum light blocking is needed, consider an outside mount or an alternate product.
No deductions will be made to the ordered height.
How to Measure: Outside Mount
3 min read
Before you start measuring, decide where above your window opening you want to mount your shade. You will need at least 1 1/2" of flat vertical space above the window to mount the brackets for shades without a cassette valance, or at least 2" for shades with a cassette valance. Follow the directions below for where you'd like to install your shade.
If you do not have sufficient vertical space for mounting the brackets, please see our inside mount instructions or consider a different product.
Your ordered width will be the "tip to tip" measurement, which is the widest part of the top of the shade including the brackets and cassette valance (if applicable). The fabric portion of the shade will be approximately 1" – 1 1/2" narrower than the ordered width (up to 3/4" on each side. If you wish to have the fabric cover a specific width, we recommend ordering slightly wider – just ensure that you have enough horizontal space to mount the shade.
Width:
- Looking at your window and surrounding wall, decide what area you would like to cover. We recommend the shade extends about 2-3" on each side of the window opening for the best light control and appearance.
- Using a metal tape measure, measure from left to right including your desired extra space on each side of the window—that is your ordering width.
Height:
- Consider how far above the window you would like to install your shade but at least starting with the minimum vertical space referenced above. Since the shade spools onto the roll, it does not need to be installed high above the window to have the shade fabric fully clear the window.
- Measure from the top of where you will mount the shade on the wall down to where you want the bottom of the shade to be, using the same extra space below your window opening as you used above; if you have a protruding windowsill, measure down to the top of the sill. That is your ordering height.
Width:
- Looking at your window and surrounding wall, decide what area you would like to cover. We recommend the shade extends about 2-3" on either side of the window opening for the best light control and appearance.
- Using a metal tape measure, measure from left to right including any desired extra space on each side of the window—that is your ordering width.
Height:
- Consider how far above the window you would like to install your shade but at least starting with the minimum vertical space referenced above. Since the shade spools onto the roll, it does not need to be installed high above the window to have the shade fabric fully clear the window.
- Measure from the top of where you will mount the shade on the wall down to where you want the bottom of the shade to be, using the same extra space below your window opening as you used above, or to the bottom edge of the trim if you prefer; if you have a protruding windowsill, measure down to the top of the sill. That is your ordering height.
Note: The shade fabric may rub against the trim when operating. If your trim is more than 1/2" thick, consider adding shims (not included) under the brackets for additional clearance. If your trim is 3/4" or thicker, we recommend ordering the shade with the reverse roll option.
Width:
- We don't normally recommend mounting roller shades directly on the trim unless your window configuration doesn't allow for other placements. Your ordered width will be the bracket to bracket measurement which cannot exceed the width of your trim. However, the fabric portion of roller shades is always narrower than the ordered width, and will not extend to the edges of the trim.
- Confirm that the height of your trim is at least the minimum height required for installing the mounting brackets. At the top of your window, use a steel measuring tape and measure from outer edge to outer edge of the trim. That is your ordering width.
- Note that the fabric portion of the shade will be narrower than your ordered width.
Height:
- Measure from the top of your trim to the bottom of your trim or to the top of the windowsill if you have a protruding sill. That is your ordering height.
Width:
- Using a metal tape measure, measure left to right from the outside edge of the trim piece that goes around the glass to the other outside edge. That is your ordering width. However, if you have space, it is best to order the shade about 2-3" wider for better light control.
Height:
- Consider how far above the window trim piece you would like to install your shade but at least starting with the minimum vertical space referenced above. Measure down to where you want the bottom of the shade to be, using the same extra space below the window trim piece as you used above. That is your ordering height.
Note: This product is not available with hold down brackets (for attaching the bottom of the shade to the door to prevent swaying). We recommend considering a different product if installing on a door where the bottom of the shade is likely to swing back and forth.
How to Install
How to Install: Inside Mount
2 min read
Let's make sure you have what you need!
What came with your blinds?
- Mounting brackets*
- 1 ½" #8 hex head wood screws
- Plastic anchors (for drywall or plaster mounting)
What else will you need in order to complete the installation?
- Rechargeable drill (use 3/32" drill bit to predrill screw holes & use ¼" drill bit for wall anchors)
- Phillips screwdriver
- Pencil
- Tape measure
- Ladder
*If applicable to your order. If you did not order a cassette valance, you will receive two mounting brackets for either side of the shade. If you did order a cassette valance you will receive concealed cassette mounting brackets that will be installed across the metal cassette, across the width of the shade.
Please note that brackets and componentry may be updated or substituted over time due to availability or product improvements.
IMPORTANT: Do not remove the paper wrapping around the shade's fabric until the shade is installed. Removing this paper prior to installation could result in the fabric shifting on the tube or it might alter the stop location of the fabric.
Download the PDF below for a complete step by step guide on how to install your inside mount shades.
How to Install: Outside Mount
4 min read
Let's make sure you have what you need!
What came with your blinds?
- Mounting brackets*
- 1 ½" #8 hex head wood screws
- Plastic anchors (for drywall or plaster mounting)
What else will you need in order to complete the installation?
- Rechargeable drill (use 3/32" drill bit to predrill screw holes & use ¼" drill bit for wall anchors)
- Phillips screwdriver
- Pencil
- Tape measure
- Ladder
*If applicable to your order. If you did not order a cassette valance, you will receive two mounting brackets for either side of the shade. If you did order a cassette valance you will receive concealed cassette mounting brackets that will be installed across the metal cassette, across the width of the shade.
Please note that brackets and componentry may be updated or substituted over time due to availability or product improvements.
IMPORTANT: Do not remove the paper wrapping around the shade's fabric until the shade is installed. Removing this paper prior to installation could result in the fabric shifting on the tube or it might alter the stop location of the fabric.
Download the PDF below for a complete step by step guide on how to install your outside mount shades.
Read More About This Product
Fabric Insert and Fabric-Wrapped Enhancements
Looking to elevate the look of your roller shade? Optional fabric insert and fabric-wrapped valance upgrades create a clean, tailored finish. These features not only enhance visual appeal but also help conceal the roller mechanism, blending effortlessly with your room's decor. A well-placed fabric insert can bring cohesion to your interior design.
When paired with our Deluxe Blackout Vinyl Roller Shades, these design enhancements offer both form and function. The seamless integration of material details gives these roller shades a more luxurious appearance, ideal for modern and minimalist interiors. Whether you're creating a cozy bedroom or a polished office, these finishing touches ensure your window coverings match your style.
Reduce Light Gaps for Total Darkness
While the 4-ply blackout vinyl blocks direct light, some light gaps may appear on the sides due to hardware clearance. To minimize this, consider an outside mount. You can also adjust the roll direction, standard or reverse, to better control the fabric location relative to the window opening. These small adjustments improve room darkening, making roller shades ideal for bedrooms or nurseries.
Our Deluxe Blackout Vinyl Roller Shades are specifically designed to address these issues with maximum light-blocking material and flexible mounting options. Whether you're dealing with early morning sunlight or midday glare, these roller shades give you greater control over your environment and comfort level. Picking a reverse roll gives the shade a cleaner appearance by hiding the roller, while a standard roll brings the fabric closer to the window for improved light blockage.
Built to Last with Precision Roller Tubes
Each roller shade is built with a durable roller tube designed to keep your fabric taut and aligned. Whether you're adjusting manually or via motorized lift, this hidden component ensures long-term performance and smooth operation with minimal fabric sag.
This attention to structural detail is part of what makes our Deluxe Blackout Vinyl Roller Shades a smart long-term investment. These roller shades are engineered for reliability, even with daily use, and their reinforced components are part of the reason why customers consistently rate them as one of the most dependable blackout options available.
The shade material may need to be seamed together on wider shades to create greater width.
Behind-the-Scenes: Factory-Calibrated and Quality Checked
Every shade is assembled and tested at our factory before shipping. From programming motorized remotes to verifying seam placement, the process ensures your made-to-order shade is built right the first time.
That level of craftsmanship is why so many customers trust our Deluxe Blackout Vinyl Roller Shades for their most light-sensitive areas. Each unit is precisely inspected to meet our standards, so you can count on receiving a flawless, functional set of roller shades that are ready to install straight out of the box.
Safe, Smooth Cordless Lift Mechanism
For customers who opt for manual lifts, the pulling motion on our nylon bead chain is engineered to be quiet, controlled, and safe. You'll appreciate the resistance-balanced design of the roller shades that prevents them from snapping upward or falling too fast. The balanced design ensures smooth pulling with minimal effort, whether you're raising the shade halfway or all the way up.
Cordless lift is especially popular on our Deluxe Blackout Vinyl Roller Shades, as it enhances both safety and visual appeal. These roller shades are ideal for homes with children or pets, offering peace of mind alongside modern convenience. With cordless options, there's no need for constant pulling on chains, just a gentle lift or tug to position your shade exactly where you want it.
Optimize for Coverage
If you're concerned that roller shades will leak some light, consider adding a top cover. Ensure enough space around your window for brackets and fabric clearance. Be sure to measure both depth and width to verify if your window supports the chosen mount.
No matter how you decode to install them, our Deluxe Blackout Vinyl Roller Shades are built to give you flexible solutions for light control and room darkening. These roller shades adapt to your room, your mounting style, and your exact sizing needs, ensuring a snug, attractive fit that performs.
Frequently Asked Questions:
Are vinyl blackout roller shades 100% blackout?
Yes. These shades use 4-ply fiberglass-reinforced vinyl that blocks 100% of light through the fabric itself. Small edge gaps may occur at sides; outside mount installation minimizes this for maximum darkness.
How do I clean vinyl roller shades?
Vinyl roller shades wipe clean with a damp cloth and mild soap. Their non-porous surface resists stains and moisture, making them a low-maintenance choice for kitchens, bathrooms, and high-traffic rooms.
What is the difference between inside mount and outside mount for blackout roller shades?
Inside mount fits the shade within the window frame for a clean look. Outside mount installs above and beyond the frame, overlapping edges to eliminate light gaps — recommended for maximum blackout performance.
Are these vinyl roller shades heavy duty enough for large windows?
Yes. The 4-ply vinyl fabric is reinforced with fiberglass for strength and fade resistance. Shades wider than standard sizes include a fabric seam near the top to maintain structural integrity across larger spans.
Videos
Blindster Expert Review - Blindster Deluxe Blackout Vinyl Roller Shades
Roller Shades - Sleek and Simple
Cordless Blinds and Shades
Motorized Shades
How to Measure for Inside Mount Roller Shades
How to Measure for Outside Mount Roller Shades
How to Install Roller and Solar Shades
How They're Made - Roller Shades
Reviews
4.6
Based on 770 reviews
Sharon
I am very pleased with my blinds I purchased. They fit perfectly and are very nice.
Connie
This is the second time I have ordered from this company. I have been very pleased both times. I will order again from them when needed. Have not had any issues and love that I can order the size that I need exactly.
Rebecca
The blinds looked very nice and were of good quallity. Sadly, the did not provide enough privacy for my windows because you could see inside on the side
Boyd
Fit perfect.
Kris
Highly recommend the motorized blackout shades. It would be nice to offer them longer than 96” with electric motor.
Tammy
Highly RECCOMEND! Best quality shades I’ve ever bought! I only bought 4 at first but they were such high quality that I bought one shade for every window. With winter coming and no storm windows I am 100% positive because they are heavy duty quality shades it will help save money on my heating bill! No joke!
Karen
This is the third time I've changed the window treatments in my kitchen. We have two 6' windows in the room, and it faces due west. The light is blinding in the afternoon, and the heat can be oppressive in the summer. Shades are frankly more economical, and easier to clean than blinds, and I was reuly excited to find them in a color other than white. They work perfectly!
Kevin
Great quality, the blackout shades were as described. Also, their support agents are responsive and helpful. Highly recommend.
Michael
Excellent quality. We are very happy with the blackout blinds we purchased. They included the instructions and all mounting hardware. Installation was quick and easy.
Tonya
The roller shades was the perfect size and mounted easily. Provides the blackout coverage I wanted. Ordering was easy peasy and priced right.