


Deluxe Room Darkening Fabric Roller Shades
SKU: BLN-DRDFRS
Made to order, ships in 5–7 business days. Once shipped, delivery typically takes 5 business days, depending on your location.
Are you looking to block light coming into your room, but think blackout shades are too extreme? Our Deluxe Room Darkening Fabric Roller Shade is the solution you’ve been searching for! Perfect for bedrooms, media rooms and more.
- Reduces Light, Doesn't Fully Blackout
- Go Cordless!
- Smart Option: Motorize
Color: True White
7 colors available · Fabric: High quality woven polyester with WHITE acrylic thermalflock backing
$ - Essential
Mount: Not selected
Size: 24" W × 36" H
Measurements to the nearest 1/8 inch.
Fit or Free Guarantee. If for any reason your window coverings don't fit, even if you make a mistake in measuring, we'll remake them in the size you need free of charge. More details about the Fit or Free Guarantee
Lift Type: Not selected
Roll Orientation: Not selected
Cassette Valance: Not selected
Name your windowOptional
Installation help nearby
DIY Install is simple, but if you'd prefer help, enter your ZIP code to find available pros in your area.
- Fit or Free Guarantee
- Free Shipping
- 60-Day Satisfaction Guarantee
Product Information
When it comes to roller shades, the fabric opacity is generally divided into "light filtering" (which provides privacy will still letting some ambient light pass through the shade) and "blackout" (where no light can pass through the shade fabric). The fabric on our Room Darkening roller shades is in between! These shades block between 90-99% of the incoming light to significantly darken the room without being completely blackout. This shade material features a white backing that minimizes light passing through the shade. And the darker the shade color, the more light is blocked! Customize your Room Darkening Roller Shade with your choice of lift system, cassette valance option and more.
Get to know this shade:
- Shade fabric is high-quality polyester with an acrylic thermal backing that is white to the street
- Room darkening fabric blocks 90-99% of incoming light; darker colors block progressively more light
- Plain bottom hem for a simple, clean look
- Includes spring roller cordless or beaded chain lift option, or upgrade to Cordless Precision Lock or motorized lift
Why you'll love this shade:
- Provides complete privacy and significant room darkening (but not completely blackout)
- Select the perfect operating system for your window, including beaded chain, two different cordless options and even motorized lift
- Cordless Precision Lock provides effortless height adjustment – just push up or pull down on the shade (no extra tugs required!)
- Optional cassette valance hides the roller tube and installation brackets at the top of the shade and provides a finished look
- Complies with all current cord safety regulations
Key considerations:
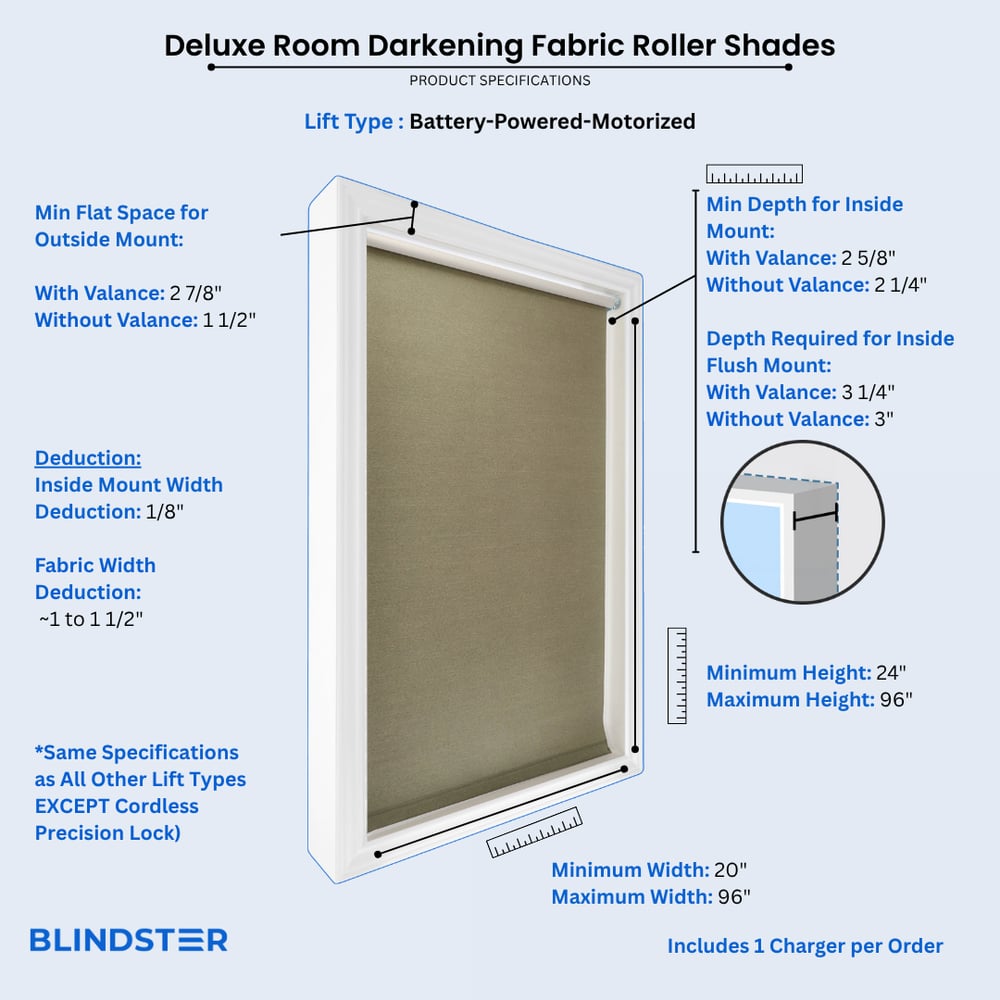
- The fabric portion of the shade will be about 1 1/2" narrower than ordered width due to the control mechanisms and brackets at the top (widest part) of the shade
- Some indirect light may be visible around the edges of the shade, but the shade will block nearly all incoming light from passing through the fabric
- The white backing of the shade material will be visible on shades with standard roll orientation and no cassette; consider adding the cassette option to cover the roll at the top of the shade
Great for:Living RoomBedroomOfficeKitchenDining RoomBathroomEntry WayUtility Room
- Easy to Clean
- Privacy
- Child & Pet Safety
Made to order, ships in 5–7 business days. Once shipped, delivery typically takes 5 business days, depending on your location.
Specifications & Restrictions
- Width
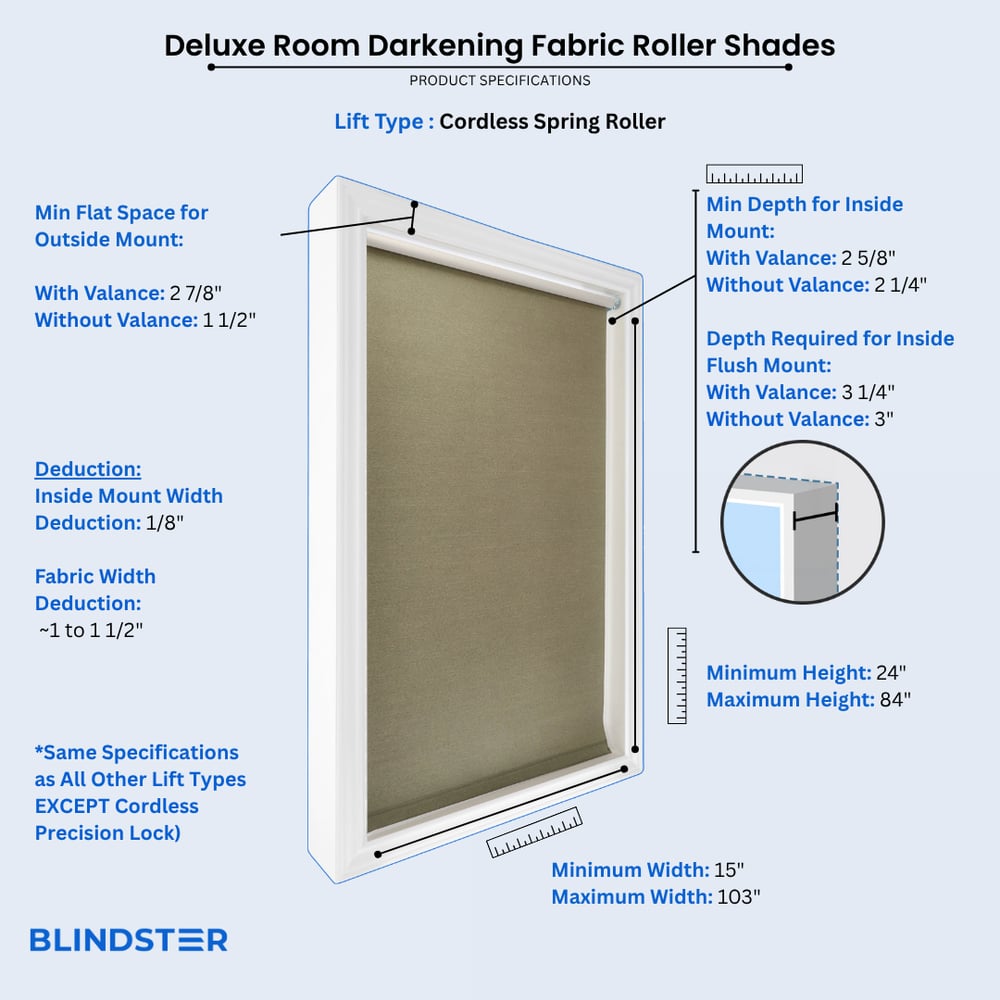
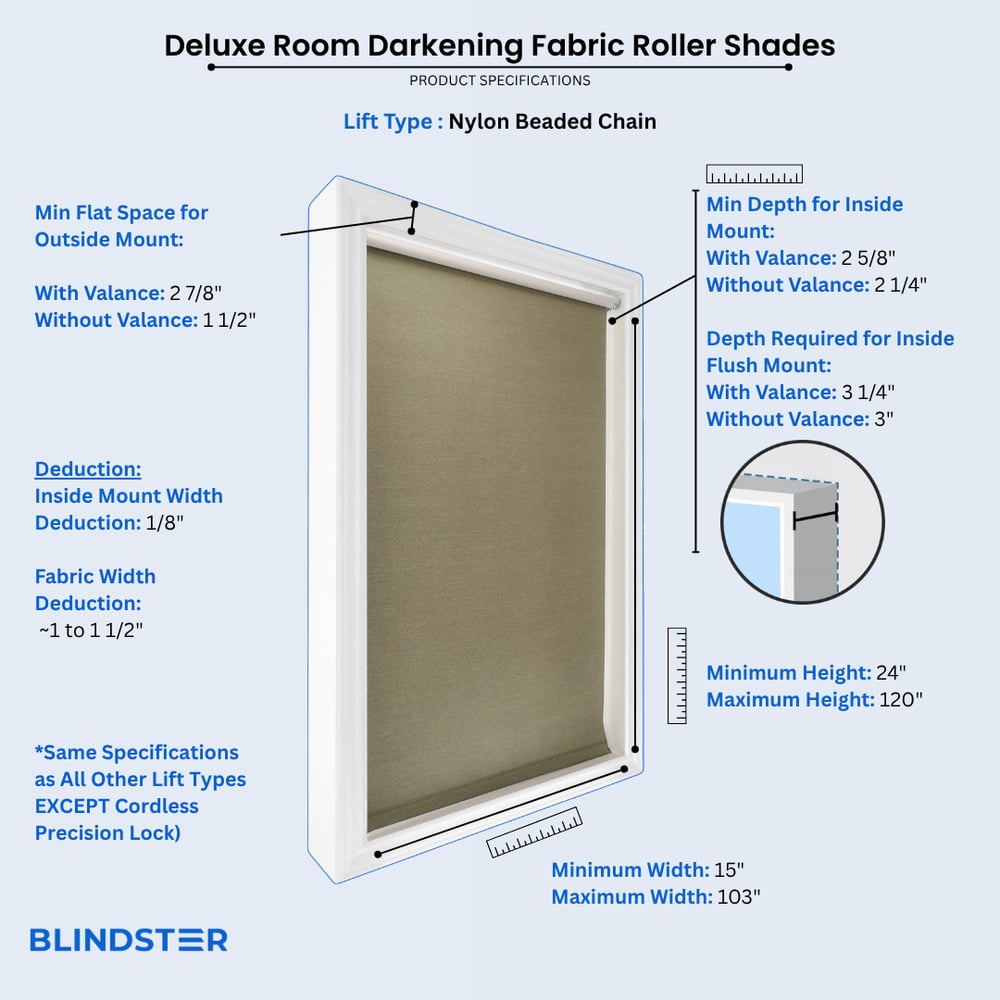
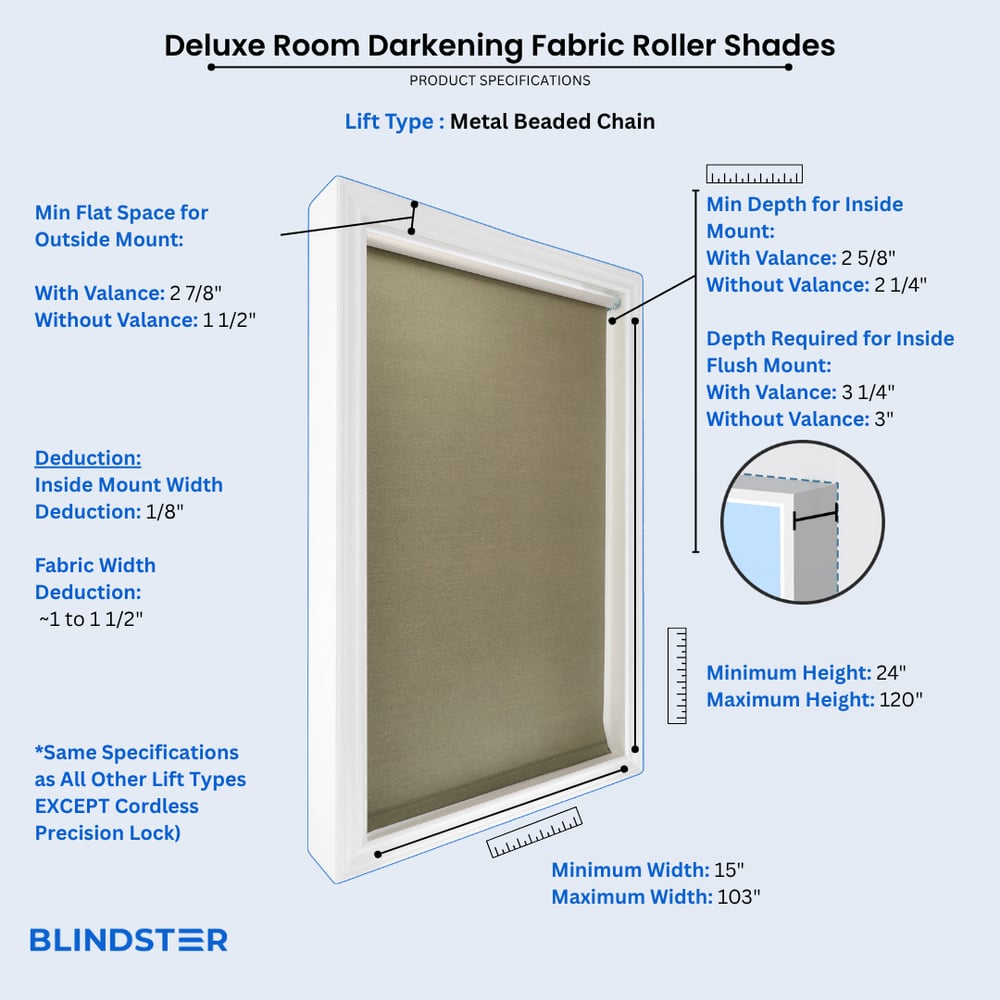
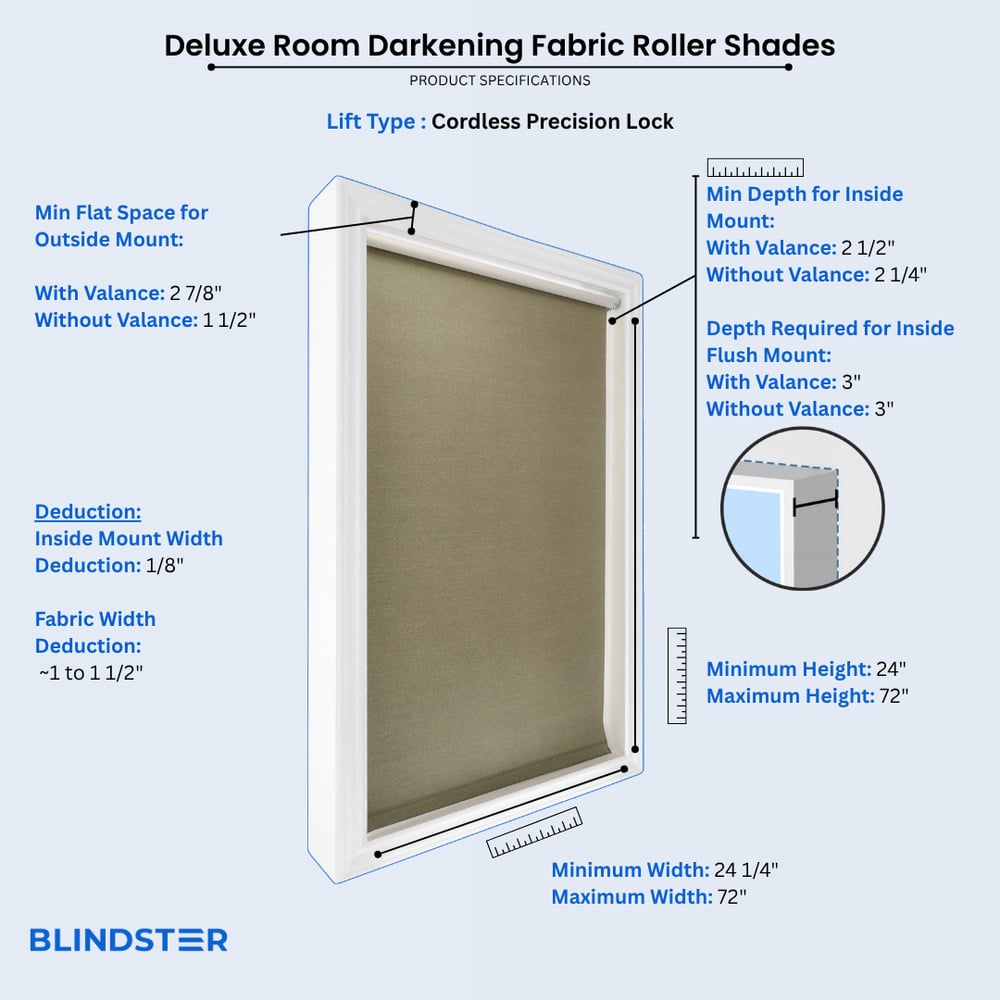
- 15" – 103"
- Height
- 24" – 120"
- Min depth for inside mount (without valance)
2 ¼ inches
- Min depth for inside mount (with valance on all lift types EXCEPT Cordless Precision Lock)
2 5/8 inches
- Depth required for flush mount (without valance)
3 inches
- Min depth required for inside mount (with valance and Cordless Precision Lock)
2 ½ inches
- Depth required for flush mount (with valance on all lift types EXCEPT Cordless Precision Lock)
3 ¼ inches
- Min Flat Space For Outside Mount (without valance)
1 ½ inches
- Min Flat Space For Outside Mount (with valance)
2 inches
- Min depth required for inside flush mount (with valance and Cordless Precision Lock)
3 inches
- Valance Size
3 ¼ inches x 3 inches
- Inside Mount Width Deduction
Approximately 1/8 inch
- Fabric Width Deduction
Approximately 1 - 1 ½ inches (applies to all roller shades regardless of mount type)
- 6 channel remote control required to operate motorized shades
Remotes from other companies will not operate Blindster shades
- All shades are pre-programmed at the factory to operate on channel 6
Each remote can be programmed to control up to 6 shades
- Remote Control Range
65 feet
- Easy Rechargeable Feature
Battery wand is integrated into the roller mechanism of all motorized shades
- This product's motorized remote is NOT compatible with the following products:
Deluxe Cellular Shades categories & Premium Solar Shades categories
- Charger included for Motorized Shades
1 Charger per order included
*Recharge time on a shade is 5 hours, chargers are not meant to be plugged into the shade long term.
Restrictions
- Reverse Roll not available with a Cassette Valance
- Cassette Valance and Cordless lift cannot be combined
- Motorized not available on widths less than 20"
- Reverse roll must be top mounted (cannot be mounted back to the wall for outside mount).
- Shades over 73" wide AND over 61" tall fabric is railroaded and a horizontal seam is visible: Length over 75" - seam is approx 55" from the top of the shade, Length less than 75" - seam is approx 45" from the top of the shade.
- Cordless Precision Lock must include a Cassette Valance.
How to Measure
How to Measure: Inside Mount
3 min read
Let's make sure an inside mount will work for your window! Using a metal tape measure, first check if you have sufficient depth:
- Measure inside the window opening from the back of the window to the front of the opening where the shade would mount. To mount the brackets, the depth at the top of the window must be at least 2 1/4" for shades without a cassette valance and 2 5/8" for shades with a cassette valance. To have a flush mount (meaning the shade is fully recessed in the window opening) the depth must be at least 3" without a cassette valance and 3 1/2" for shades with a cassette valance. If your depth is not sufficient for mounting the brackets, please see our outside mount instructions or consider a different product.
How to Measure:
Let's start with the Width:
- Measure inside of the window opening/frame from left to right at the top of the opening to the nearest 1/8". If rounding is necessary, round down to the nearest 1/8". That is your ordering width.
Now, let's do the Height:
- Measure the inside of the window opening/frame from the top of the opening to the bottom of the opening/sill to the nearest 1/8" in three places: on the left-hand side, the middle, and on the right-hand side. Write down all 3 measurements and circle the tallest. That is your ordering height.
Note: Always provide us with the actual measurement of the window opening. We will make the necessary deduction of approximately 1/8" to the width of the top of the shade to accommodate the installation brackets.
The fabric portion of the shade will be approximately 1" – 1 1/2" narrower than the ordered width (up to 3/4" gap on each side between the window opening and the edge of the fabric). When maximum light blocking is needed, consider an outside mount or an alternate product.
No deductions will be made to the ordered height.
How to Measure: Outside Mount
3 min read
Before you start measuring, decide where above your window opening you want to mount your shade. You will need at least 1 1/2" of flat vertical space above the window to mount the brackets for shades without a cassette valance, or at least 2" for shades with a cassette valance. Follow the directions below for where you'd like to install your shade.
If you do not have sufficient vertical space for mounting the brackets, please see our inside mount instructions or consider a different product.
Your ordered width will be the "tip to tip" measurement, which is the widest part of the top of the shade including the brackets and cassette valance (if applicable). The fabric portion of the shade will be approximately 1" – 1 1/2" narrower than the ordered width (up to 3/4" on each side. If you wish to have the fabric cover a specific width, we recommend ordering slightly wider – just ensure that you have enough horizontal space to mount the shade.
Width:
- Looking at your window and surrounding wall, decide what area you would like to cover. We recommend the shade extends about 2-3" on each side of the window opening for the best light control and appearance.
- Using a metal tape measure, measure from left to right including your desired extra space on each side of the window—that is your ordering width.
Height:
- Consider how far above the window you would like to install your shade but at least starting with the minimum vertical space referenced above. The shade can be positioned higher up to give the appearance of a larger window and to have more clear space in the window when the shade is raised.
- Measure from the top of where you will mount the shade on the wall down to where you want the bottom of the shade to be, using the same extra space below your window opening as you used above; if you have a protruding windowsill, measure down to the top of the sill. That is your ordering height.
Width:
- Looking at your window and surrounding wall, decide what area you would like to cover. We recommend the shade extends about 2-3" on each side of the window opening for the best light control and appearance.
- Using a metal tape measure, measure from left to right including your desired extra space on each side of the window—that is your ordering width.
Height:
- Consider how far above the window you would like to install your shade but at least starting with the minimum vertical space referenced above. Since the shade spools onto the roll, it does not need to be installed high above the window to have the shade fabric fully clear the window.
- Measure from the top of where you will mount the shade on the wall down to where you want the bottom of the shade to be, using the same extra space below your window opening as you used above; if you have a protruding windowsill, measure down to the top of the sill. That is your ordering height.
Width:
- We don't normally recommend mounting roller shades directly on the trim unless your window configuration doesn't allow for other placements. Your ordered width will be the bracket to bracket measurement which cannot exceed the width of your trim. However, the fabric portion of roller shades is always narrower than the ordered width, and will not extend to the edges of the trim.
- Confirm that the height of your trim is at least the minimum height required for installing the mounting brackets. At the top of your window, use a steel measuring tape and measure from outer edge to outer edge of the trim. That is your ordering width.
- Note that the fabric portion of the shade will be narrower than your ordered width.
Height:
- Measure from the top of your trim to the bottom of your trim or to the top of the windowsill if you have a protruding sill. That is your ordering height.
Width:
- Using a metal tape measure, measure left to right from the outside edge of the trim piece that goes around the glass to the other outside edge. That is your ordering width. However, if you have space, it is best to order the shade about 2-3" wider for better light control.
Height:
- Consider how far above the window trim piece you would like to install your shade but at least starting with the minimum vertical space referenced above. Measure down to where you want the bottom of the shade to be, using the same extra space below the window trim piece as you used above. That is your ordering height.
Note: This product is not available with hold down brackets (for attaching the bottom of the shade to the door to prevent swaying). We recommend considering a different product if installing on a door where the bottom of the shade is likely to swing back and forth.
How to Install
How to Install: Inside Mount
2 min read
Let's make sure you have what you need!
What came with your blinds?
- Mounting brackets*
- 1 ½" #8 hex head screws
- Plastic anchors (for drywall or plaster mounting)
What else will you need in order to complete the installation?
- Rechargeable drill (use 3/32" drill bit to predrill screw holes & use ¼" drill bit for wall anchors)
- Phillips screwdriver
- Pencil
- Tape measure
- Ladder
*If applicable to your order. If you did not order a cassette valance, you will receive two mounting brackets for either side of the shade. If you did order a cassette valance you will receive concealed cassette mounting brackets that will be installed across the metal cassette, across the width of the shade.
Please note that brackets and componentry may be updated or substituted over time due to availability or product improvements.
IMPORTANT: Do not remove the paper wrapping around the shade's fabric until the shade is installed. Removing this paper prior to installation could result in the fabric shifting on the tube or it might alter the stop location of the fabric.
Download the PDF below for a complete step by step guide on how to install your inside mount shades.
How to Install: Outside Mount
4 min read
Let's make sure you have what you need!
What came with your blinds?
- Mounting brackets*
- 1 ½" #8 hex head screws
- Plastic anchors (for drywall or plaster mounting)
What else will you need in order to complete the installation?
- Rechargeable drill (use 3/32" drill bit to predrill screw holes & use ¼" drill bit for wall anchors)
- Phillips screwdriver
- Pencil
- Tape measure
- Ladder
*If applicable to your order. If you did not order a cassette valance, you will receive two mounting brackets for either side of the shade. If you did order a cassette valance you will receive concealed cassette mounting brackets that will be installed across the metal cassette, across the width of the shade.
Please note that brackets and componentry may be updated or substituted over time due to availability or product improvements.
IMPORTANT: Do not remove the paper wrapping around the shade's fabric until the shade is installed. Removing this paper prior to installation could result in the fabric shifting on the tube or it might alter the stop location of the fabric.
Download the PDF below for a complete step by step guide on how to install your outside mount shades.
Videos
Roller Shades - Sleek and Simple
Cordless Blinds and Shades
Motorized Shades
How to Measure for Inside Mount Roller Shades
How to Measure for Outside Mount Roller Shades
How to Install Roller and Solar Shades
How They're Made - Roller Shades
Reviews
4.3
Based on 377 reviews
Robert
Nice quality shades and a good value overall. Super easy to install. We will be buying more.
Matt
These blinds worked out great. Hanging them was a breeze and they are exaclty what I ordered. I would definitely order again should the need arise.
Paula
I love the ease of putting this up and the color is beautiful. Still working on getting it a little tighter on the up and down motion.
Laura
I'm extremely pleased with the blinds. Great color and quality. Darkens the room nicely. I'd buy from again.
Susan W
Hi There! We ordered the ivory roller shades. Arrived on time. Packed with care. We gave them the measurements and was a perfect fit. They are top quality. We are extremely pleased with our purchase. We have more windows that need shades and will purchase again. Thank you very much
Garry
Exactly as advertised, special order cut to specification. Quick and efficient fabrication and shipping. 100 percent satisfied.
Bob a
Just what we wanted . Beautiful , well made and keeps room darkened when we want it dark for sleeping .
James
Terrific product. Fit was perfect, price was great, couldn't be better!
Darren
We love the room darkening roller shades. They were very easy to install, intelligently designed, and were a great value. We have ordered from Blindster.com on several occasions, and generally we've been satisfied every time. This time, however, I really struggled with the instructions to install the roller shades that were pre-installed in the valance cassette. The instructions were awful. I think the problem is because the team that designed the instruction manual tried to make it was multi-purpose as possible and to apply to as many models and configurations as possible. Ended up having to ask Chat GPT how to install the product. Wonderful product, easy to install, absolutely awful instructions.
Jean
great quailty & color