


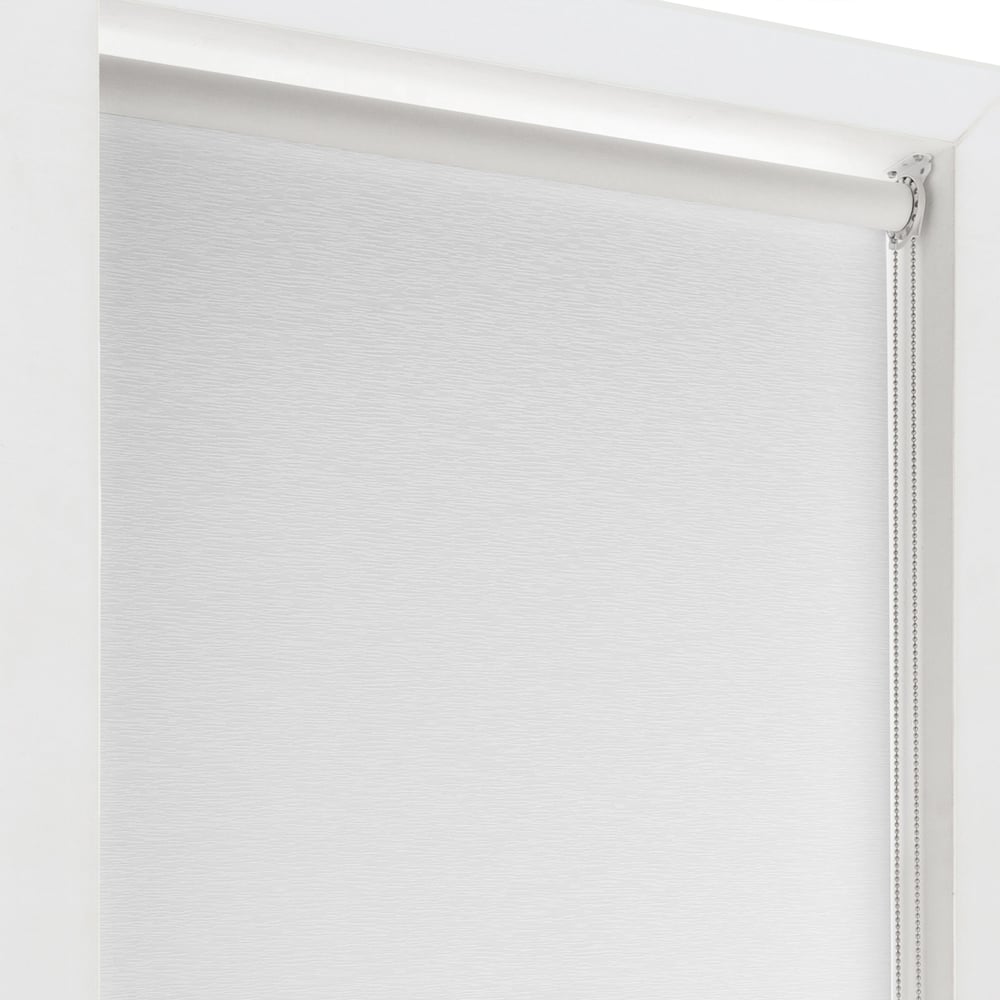

Performance Blackout Fabric Roller Shades
SKU: BPBORS136
Made to order, ships in 7–9 business days. Once shipped, delivery typically takes 5 business days, depending on your location.
Give you windows the shades they deserve – give them the quality and style of our Performance Roller Shades! Featuring fabric that darkens rooms against unwanted light, these blackout shades are the perfect balance of design and function. With a variety of customizable options including a coordinating cassette valance and motorized lift, these shades deliver the performance you're looking for in new window treatments.
- 100% Light Blockage!
- Go Cordless!
Color: Limestone
7 colors available
$ - Essential
Mount: Not selected
Size: 24" W × 36" H
Measurements to the nearest 1/8 inch.
Fit or Free Guarantee. If for any reason your window coverings don't fit, even if you make a mistake in measuring, we'll remake them in the size you need free of charge. More details about the Fit or Free Guarantee
Lift Type: Not selected
Roll Orientation: Not selected
Cassette Valance: Not selected
Name your windowOptional
Installation help nearby
DIY Install is simple, but if you'd prefer help, enter your ZIP code to find available pros in your area.
- Fit or Free Guarantee
- Free Shipping
- 60-Day Satisfaction Guarantee
Product Information
Have lesser window shades let you down? Our Performance Roller Shades are built to be reliable and stylish, so you don't have to worry about failing mechanisms or outdated looks. Our upscale shades feature contemporary fabric designs and colors that will beautifully complement and accentuate your home décor. The blackout shade fabric is perfect for blocking out light in bedrooms, offices, media rooms and anywhere else you need heightened light control. Don't settle for out-the-box-store mediocrity – with our shades, you can customize not just the size and color, but also the type of lift system, roll orientation, and valance option to fit your exact needs and preference.
Get to know this shade:
- Classic roller shade design with modernized internal components
- Blackout fabric provides complete privacy and blocks all light from passing through the shade
- Includes premium fabric-wrapped bottom hem bar
- Shade fabric is white on the back (facing the street)
Why you'll love this shade:
- Contemporary fabric design and colors beautifully complement your décor with on-trend styling
- Customize your shade to fit your window, style, and light control needs with your choice of lift style and roll orientation, and optional cassette valance
- Available motorized lift options offer convenience, style, and accessibility – a simple push of a button raises and lowers the shade
- Optional cassette valance with matching fabric insert hides the fabric roll and operating mechanisms, helps seal light gaps at the top of the window, and provides a clean, finished look
- Meets all CPSC requirements for child safety
Key considerations:
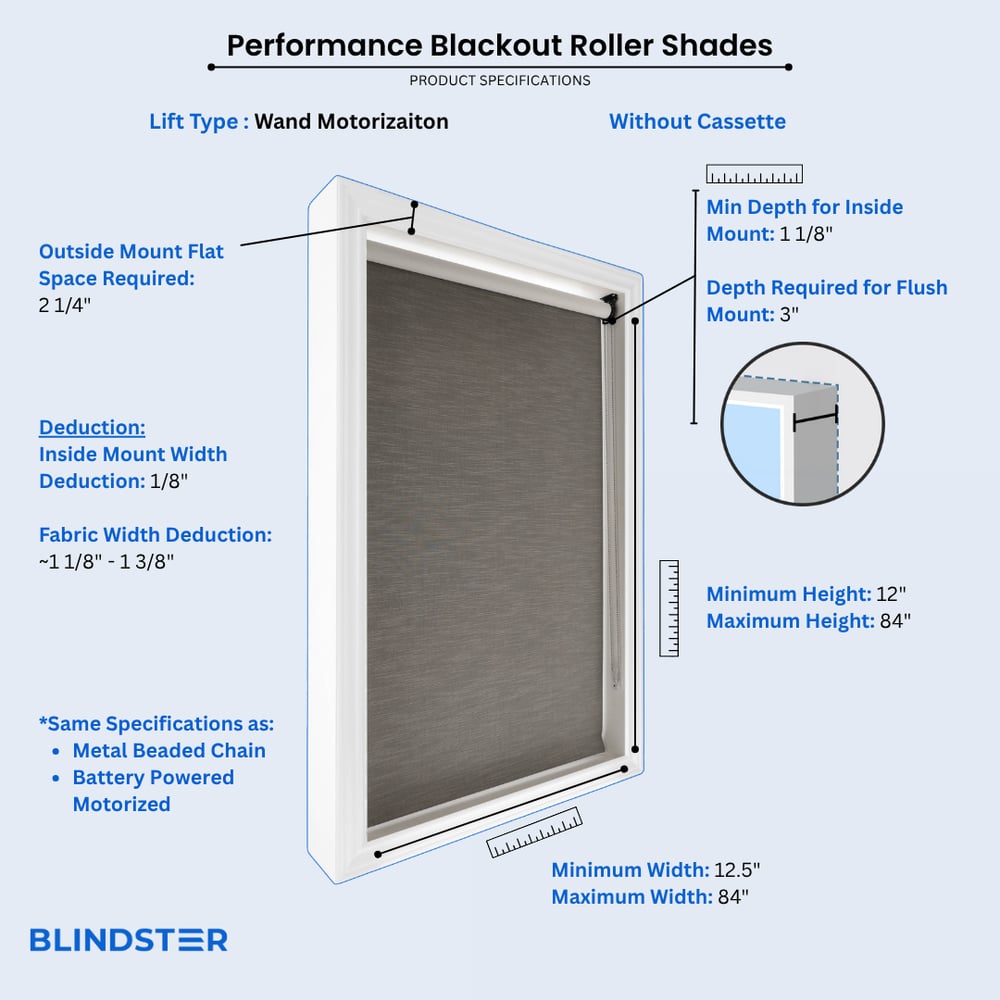
- The fabric portion of the shade will be narrower than the top of the shade (-1 1/4" for cord loop, -1" for cordless, and -1 7/16" for motorized)
- While the shade blocks any light passing directly through the shade fabric and significantly darkens the room, indirect light can be visible around the edges of the shade
- Multiple lift options help you operate your shade with convenience and ease: cord loop for all shades include tall windows, cordless for additional child safety and streamlined looks, and motorization options for push button operation with either individual wand or remote control for multi-shade ability
Great for:Living RoomBedroomOfficeKitchenDining RoomMedia RoomBathroomEntry WayUtility Room
- Privacy
- Child & Pet Safety
- Easy to Clean
Made to order, ships in 7–9 business days. Once shipped, delivery typically takes 5 business days, depending on your location.
Key Features
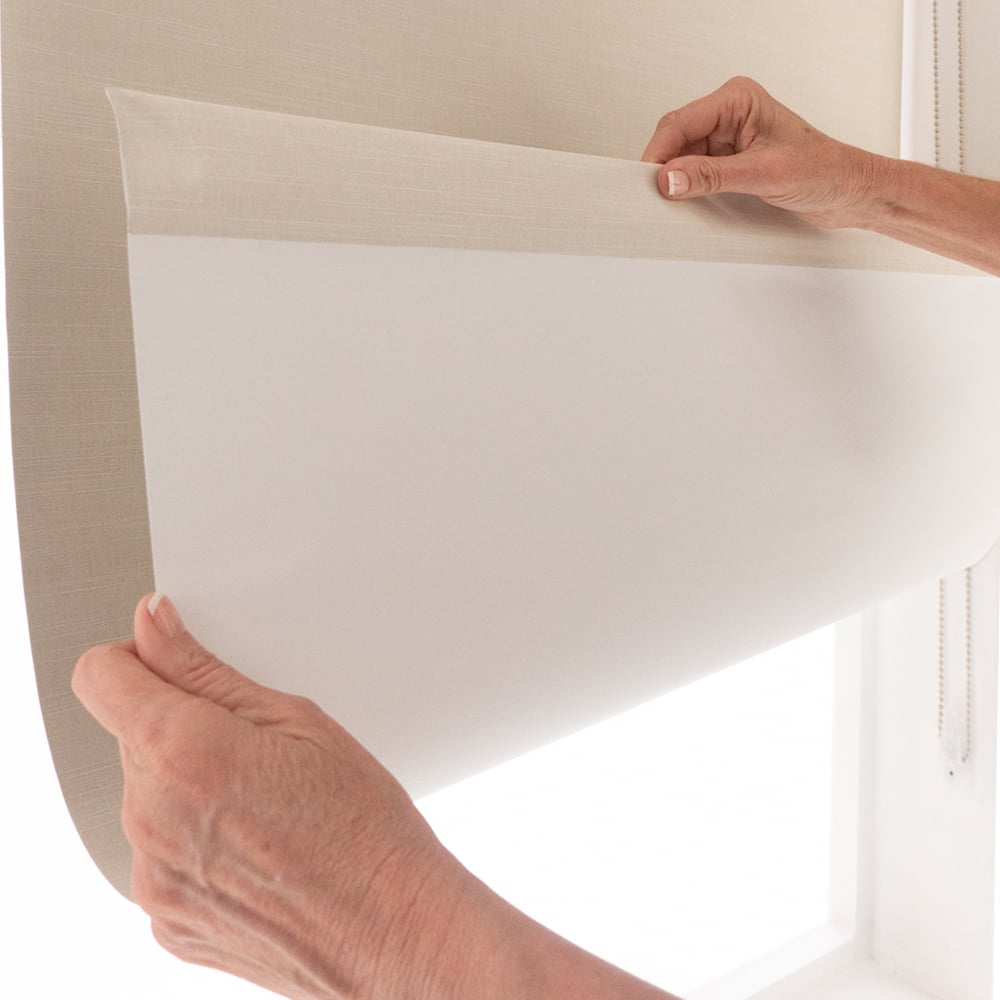
Blackout Fabric
Blackout fabric allows 0% of light to pass through the shade; white backing provides neutral appearance to the street
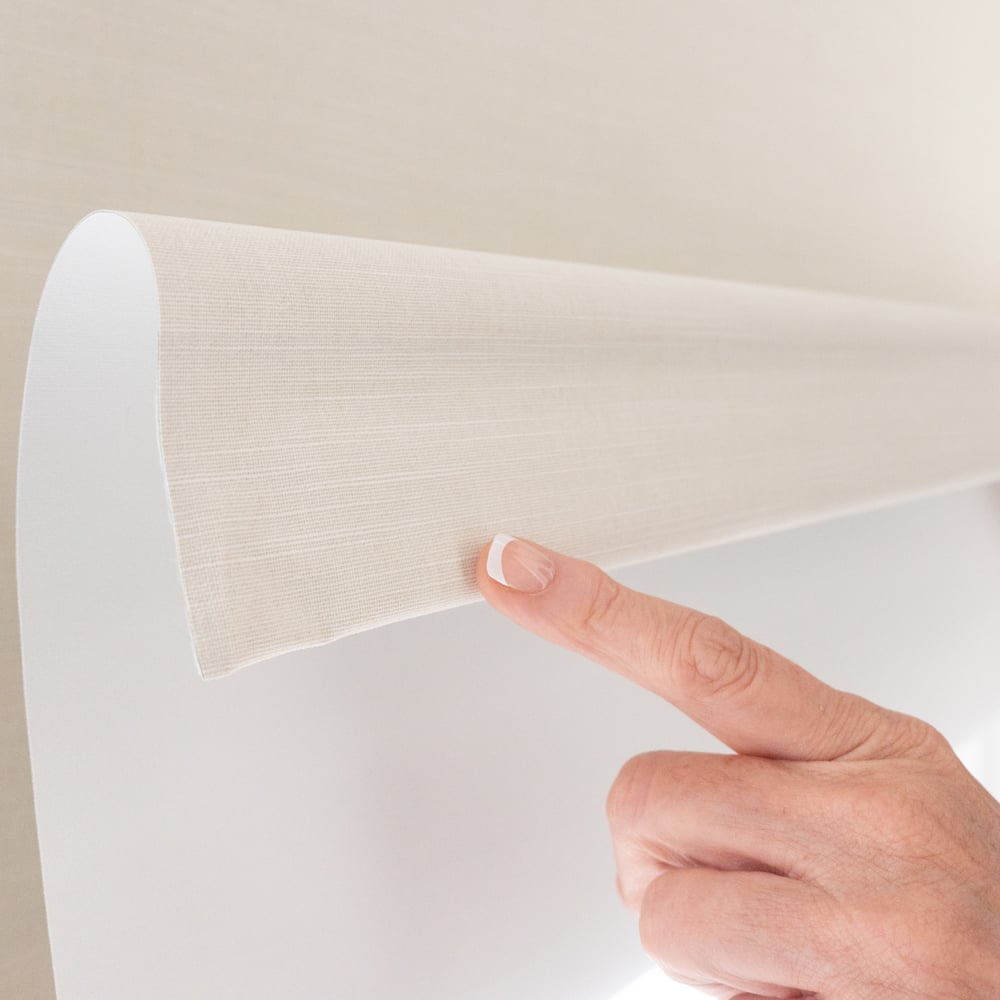
Heat Sealed Hem Bar
Heat Sealed Hem Bar
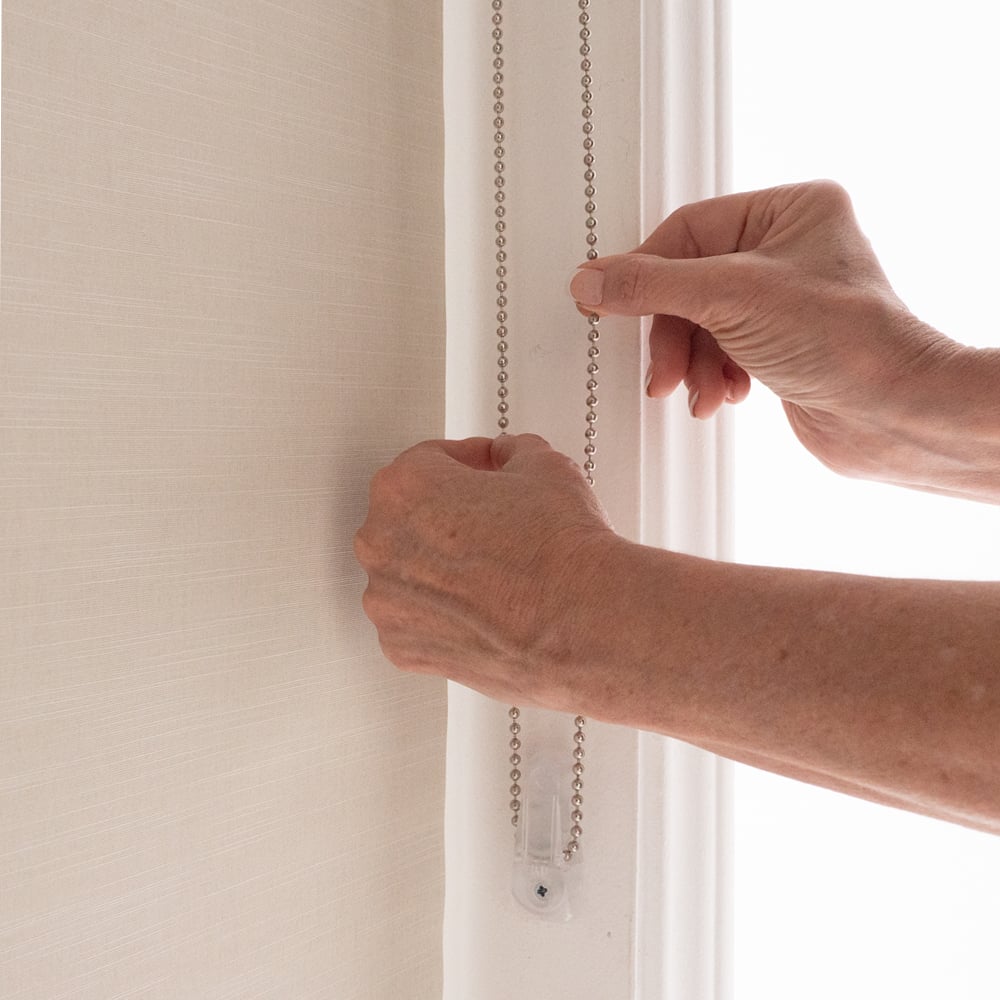
Child Safety Tensioner
Child Safety Tensioner
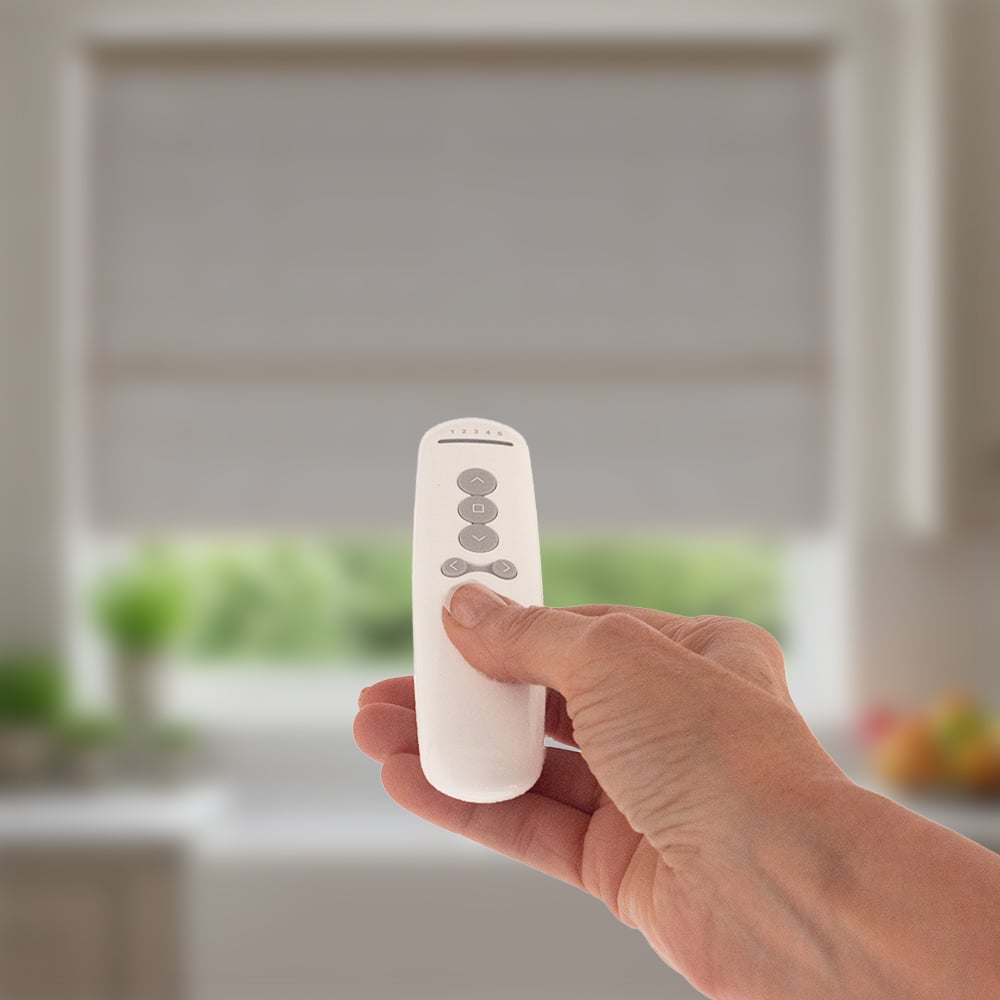
Optional 5-Channel Remote Control
Optional 5-Channel Remote Control
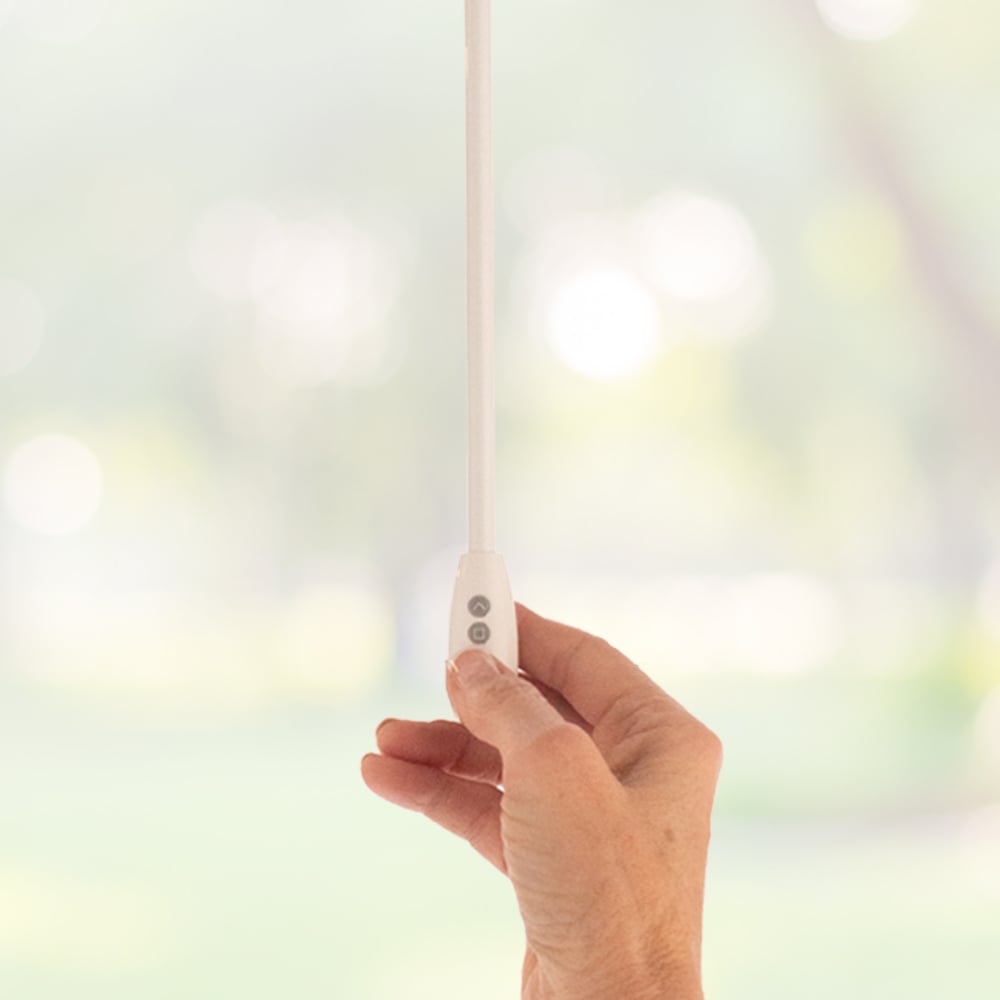
Optional Wand Motorization
Optional Wand Motorization
Specifications & Restrictions
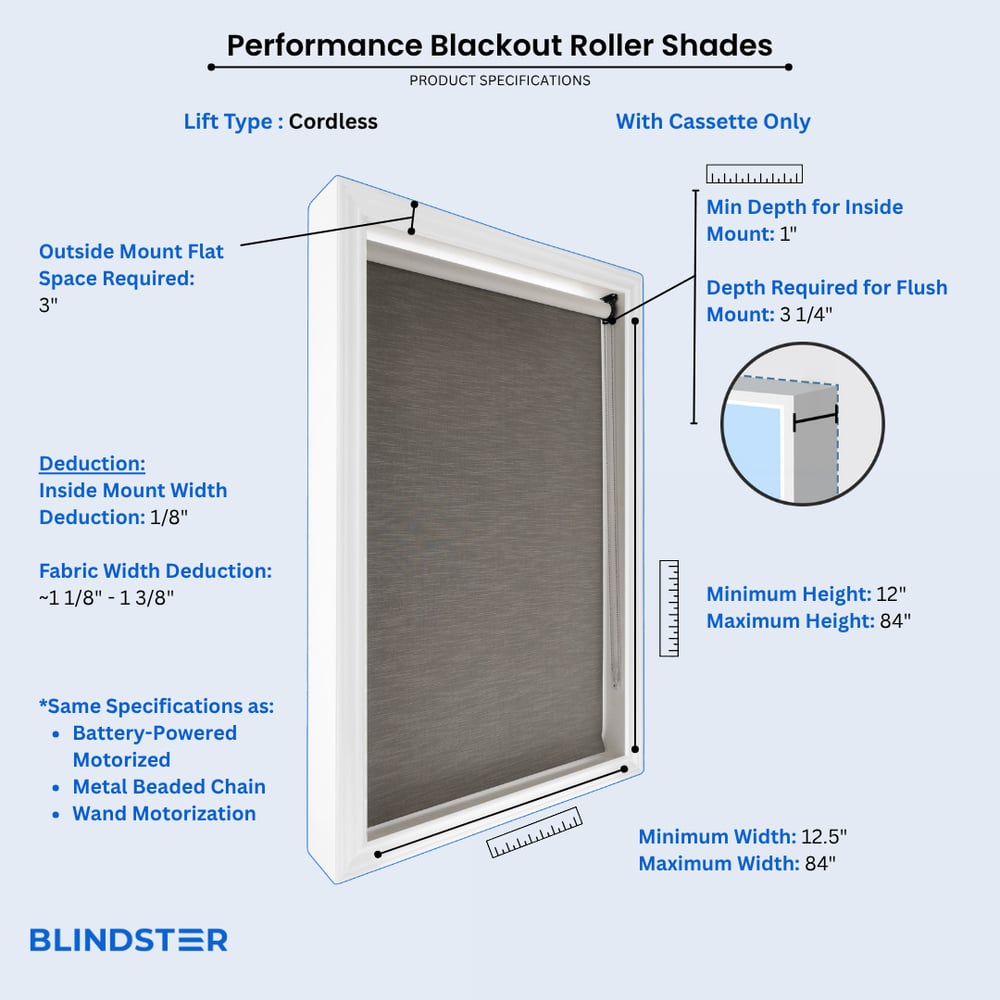
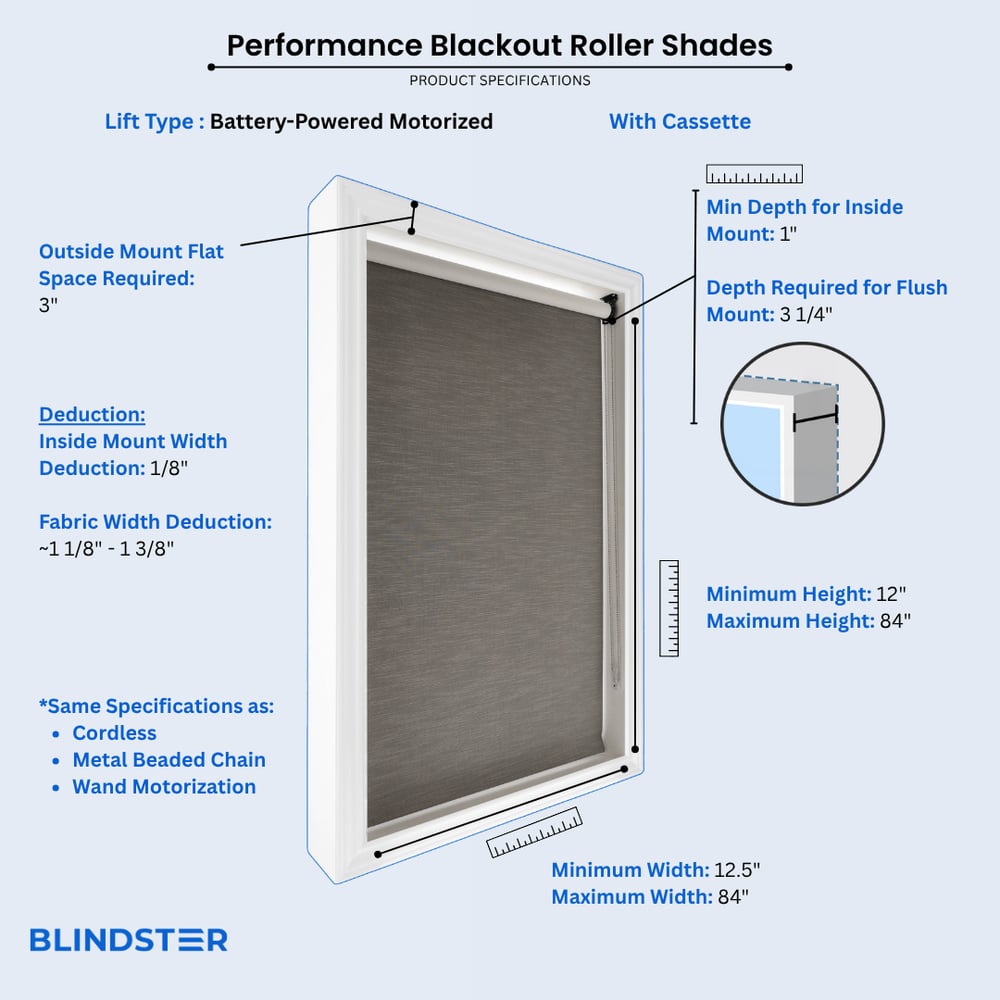
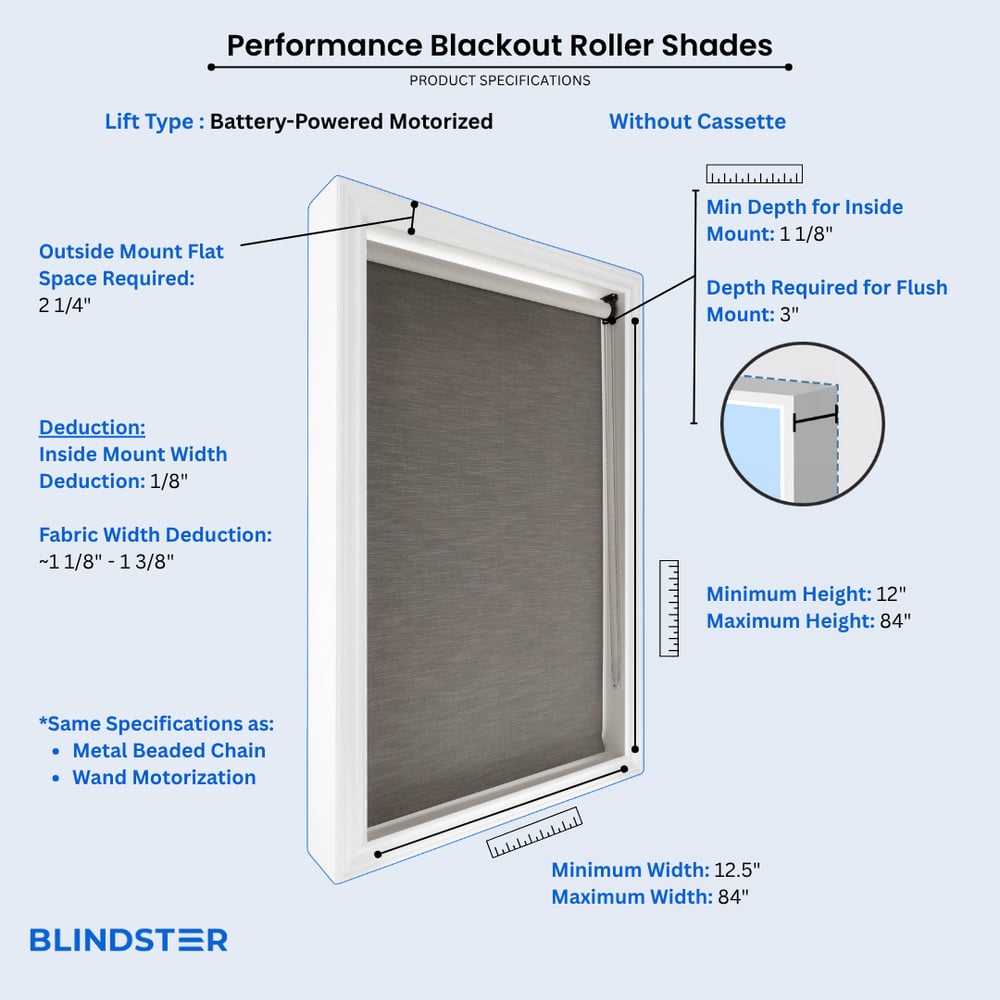
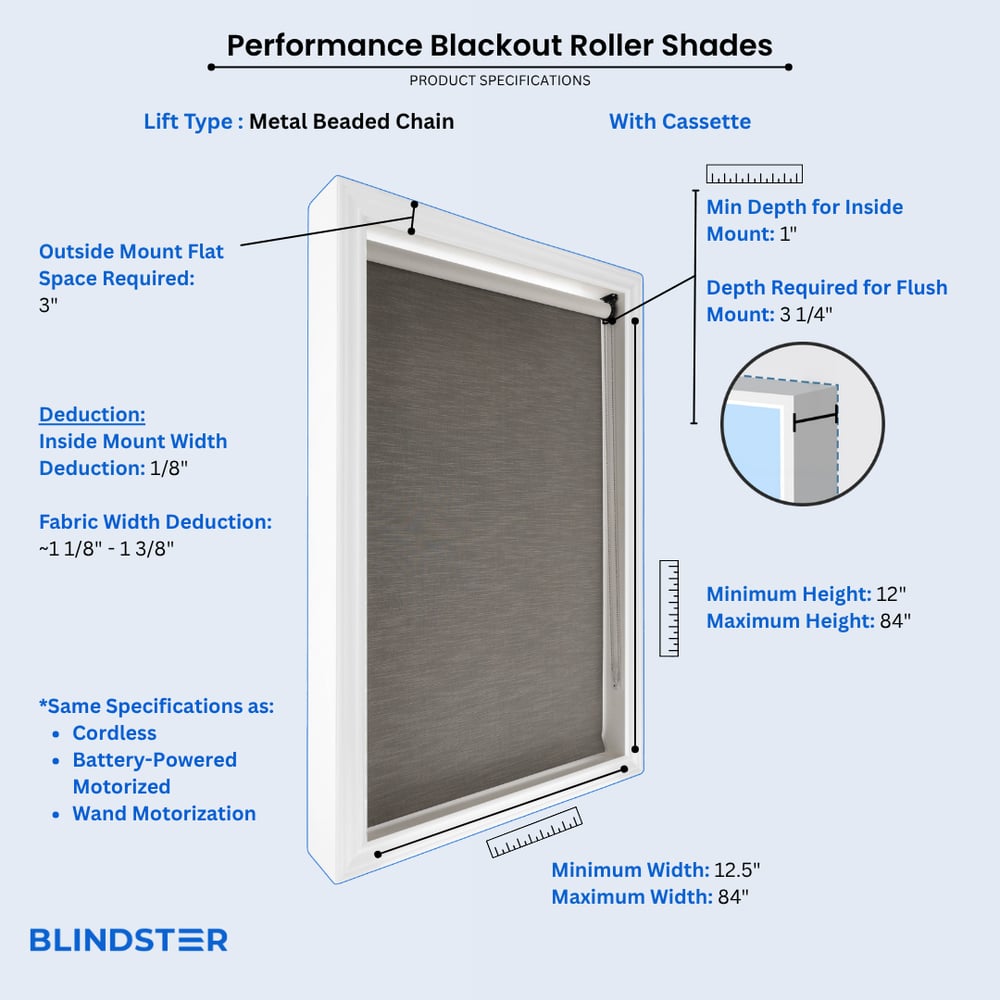
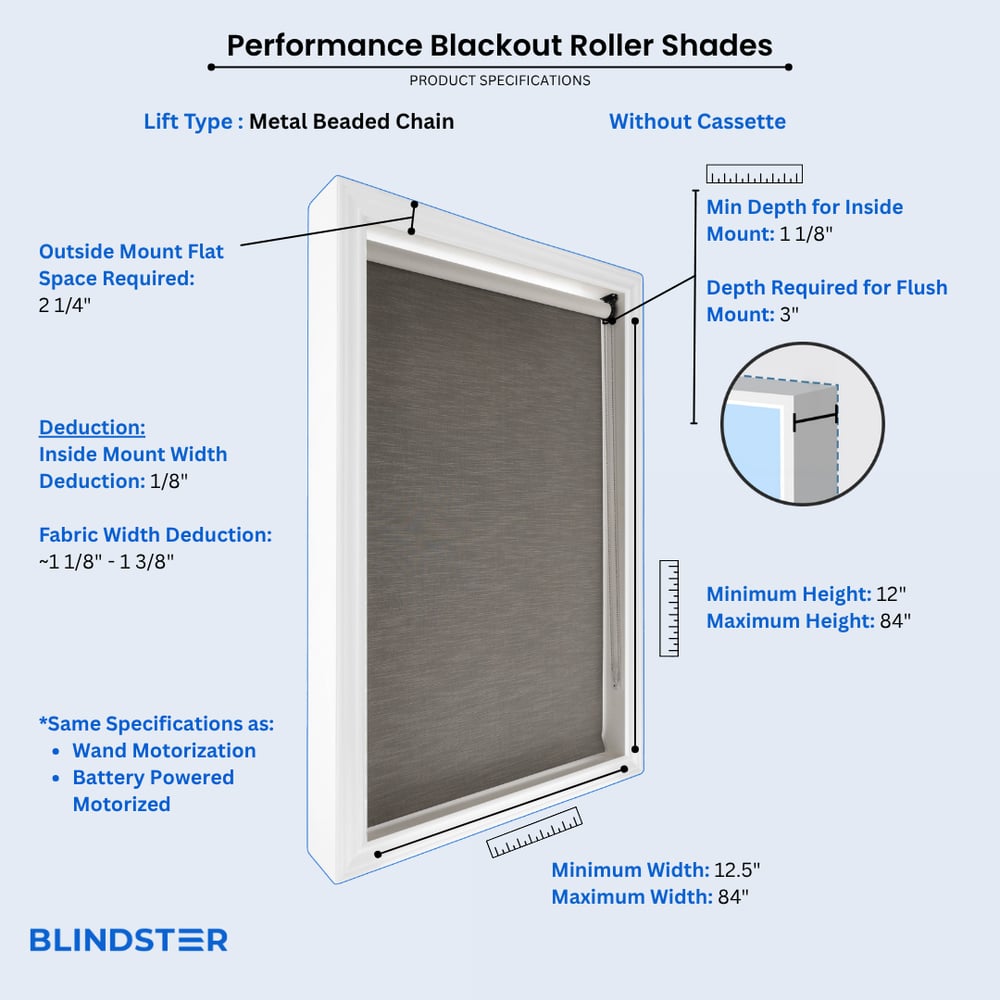
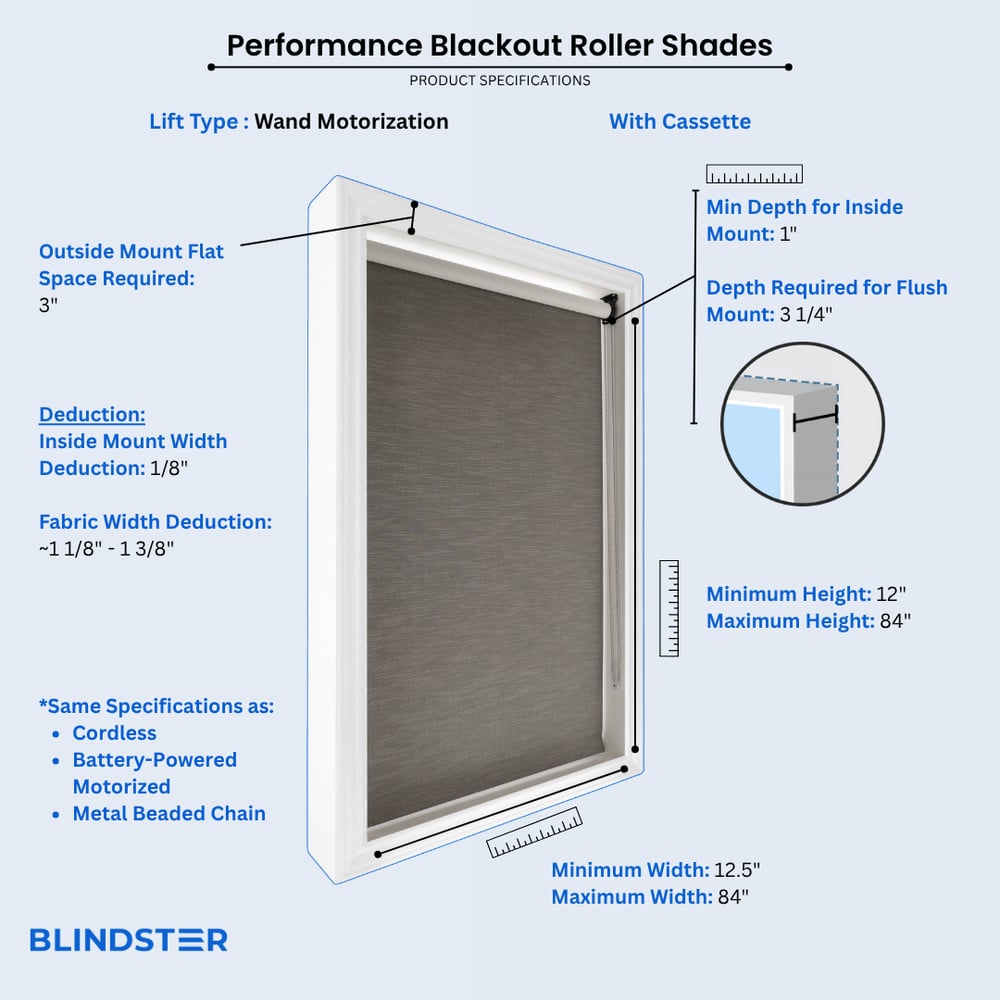
- Width
- 12 1/2" – 84"
- Height
- 12" – 84"
- Min depth for inside mount (without cassette)
1 1/8 inches
- Min depth for inside mount (with cassette)
1 inch
- Min flat space for outside mount (without cassette)
2 ¼ inches
- Min flat space for outside mount (with cassette)
3 inches
- Depth Required for Flush Mount (no cassette)
3 inches
- Depth Required for Flush Mount (with cassette)
3 ¼ inches
- Inside Mount Width Deduction
Approximately 1/8 inch
- Fabric Width Deduction
Approximately 1 1/8 inch - 1 3/8 inch
Restrictions
- Cordless Lift Type MUST come with a Cassette.
How to Measure
How to Measure: Inside Mount
3 min read
Let's make sure an inside mount will work for your window! Using a metal tape measure, first check if you have sufficient depth:
- Measure inside the window opening from the back of the window to the front of the opening where the shade would mount. To mount the brackets, the depth at the top of the window must be at least 1 5/8" for shades without a cassette valance and 1 1/2" for shades with a cassette valance. To have a flush mount (meaning the shade is fully recessed in the window opening) the depth must be between 2 1/8" and 4" (depending on roll diameter) for shades without a cassette valance and 4 3/8" for shades with a cassette valance. If your depth is not sufficient for mounting the brackets, please see our outside mount instructions or consider a different product.
How to Measure:
Let's start with the Width:
- Measure inside of the window opening/frame from left to right at the top of the opening to the nearest 1/8". If rounding is necessary, round down to the nearest 1/8". That is your ordering width.
Now, let's do the Height:
- Measure the inside of the window opening/frame from the top of the opening to the bottom of the opening/sill to the nearest 1/8" in three places: on the left-hand side, the middle, and on the right-hand side. Write down all 3 measurements and circle the tallest. That is your ordering height.
Note: Always provide us with the actual measurement of the window opening. We will make the necessary deduction of approximately 3/16" to the width of the top of the shade to accommodate the installation brackets.
The fabric portion of the shade will be approximately 1 1/4" – 1 7/16" narrower than the ordered width (up to 3/4" gap on each side between the window opening and the edge of the fabric). When maximum light blocking is needed, consider an outside mount or an alternate product.
No deductions will be made to the ordered height.
How to Measure: Outside Mount
3 min read
Before you start measuring, decide where above your window opening you want to mount your shade. You will need at least 1 1/4" of flat vertical space above the window to mount the brackets for shades without a cassette valance, or at least 4" for shades with a cassette valance. Follow the directions below for where you'd like to install your shade.
If you do not have sufficient vertical space for mounting the brackets, please see our inside mount instructions or consider a different product.
Your ordered width will be the "tip to tip" measurement, which is the widest part of the top of the shade including the brackets and cassette valance (if applicable). The fabric portion of the shade will be approximately 1 1/16" – 1 1/4" narrower than the ordered width (up to 5/8" on each side). If you wish to have the fabric cover a specific width, we recommend ordering slightly wider – just ensure that you have enough horizontal space to mount the shade.
Width:
- Looking at your window and surrounding wall, decide what area you would like to cover. We recommend the shade extends about 2-3" on each side of the window opening for the best light control and appearance.
- Using a metal tape measure, measure from left to right including your desired extra space on each side of the window—that is your ordering width.
Height:
- Consider how far above the window you would like to install your shade but at least starting with the minimum vertical space referenced above. Since the shade spools onto the roll, it does not need to be installed high above the window to have the shade fabric fully clear the window.
- Measure from the top of where you will mount the shade on the wall down to where you want the bottom of the shade to be, using the same extra space below your window opening as you used above; if you have a protruding windowsill, measure down to the top of the sill. That is your ordering height.
Width:
- Looking at your window and surrounding wall, decide what area you would like to cover. We recommend the shade extends about 2-3" on either side of the window opening for the best light control and appearance.
- Using a metal tape measure, measure from left to right including any desired extra space on each side of the window—that is your ordering width.
Height:
- Consider how far above the window you would like to install your shade but at least starting with the minimum vertical space referenced above. Since the shade spools onto the roll, it does not need to be installed high above the window to have the shade fabric fully clear the window.
- Measure from the top of where you will mount the shade on the wall down to where you want the bottom of the shade to be, using the same extra space below your window opening as you used above, or to the bottom edge of the trim if you prefer; if you have a protruding windowsill, measure down to the top of the sill. That is your ordering height.
Note: The shade fabric may rub against the trim when operating. If your trim is more than 1/2" thick, consider adding shims (not included) under the brackets for additional clearance. If your trim is 3/4" or thicker, we recommend ordering the shade with the reverse roll option.
Width:
- We don't normally recommend mounting roller shades directly on the trim unless your window configuration doesn't allow for other placements. Your ordered width will be the bracket to bracket measurement which cannot exceed the width of your trim. However, the fabric portion of roller shades is always narrower than the ordered width, and will not extend to the edges of the trim.
- Confirm that the height of your trim is at least the minimum height required for installing the mounting brackets. At the top of your window, use a steel measuring tape and measure from outer edge to outer edge of the trim. That is your ordering width.
- Note that the fabric portion of the shade will be narrower than your ordered width.
Height:
- Measure from the top of your trim to the bottom of your trim or to the top of the windowsill if you have a protruding sill. That is your ordering height.
Width:
- Using a metal tape measure, measure left to right from the outside edge of the trim piece that goes around the glass to the other outside edge. That is your ordering width. However, if you have space, it is best to order the shade about 2-3" wider for better light control.
Height:
- Consider how far above the window trim piece you would like to install your shade but at least starting with the minimum vertical space referenced above. Measure down to where you want the bottom of the shade to be, using the same extra space below the window trim piece as you used above. That is your ordering height.
How to Install
How to Install: Inside Mount
2 min read
Let's make sure you have what you need!
What came with your blinds?
- Screws
- Installation Brackets
- Safety tension device*
- Remote*
- Charger*
What else will you need in order to complete the installation?
- Rechargeable drill (use ¼" drill bit)
- Phillips screwdriver
- Pencil
- Tape measure
- Ladder
*If applicable to your order.
IMPORTANT: Do not remove the paper wrapping around the shade's fabric until the shade is installed. Removing this paper prior to installation could result in the fabric shifting on the tube or it might alter the stop location of the fabric.
Download the PDF below for a complete step by step guide on how to install your inside mount shades.
How to Install: Outside Mount
4 min read
Let's make sure you have what you need!
What came with your blinds?
- Screws
- Installation Brackets
- Safety tension device*
- Remote*
- Charger*
What else will you need in order to complete the installation?
- Rechargeable drill (use ¼" drill bit)
- Phillips screwdriver
- Pencil
- Tape measure
- Ladder
*If applicable to your order.
IMPORTANT: Do not remove the paper wrapping around the shade's fabric until the shade is installed. Removing this paper prior to installation could result in the fabric shifting on the tube or it might alter the stop location of the fabric.
Download the PDF below for a complete step by step guide on how to install your outside mount shades.
Videos
Get to Know your Performance Fabric Roller Shades
Roller Shades - Sleek and Simple
How to Measure for Inside Mount Roller Shades
How to Measure for Outside Mount Roller Shades
How to Install Roller and Solar Shades
How They're Made - Roller Shades
Reviews
5.0
Based on 1 reviews
Vanessa
These blackout roller shades from Blindster are fantastic! The shade dramatically darkened my room.