


Premium Light Filtering Fabric Roller Shades
SKU: PRLFRSC105
Made to order, ships in 6–8 business days. Once shipped, delivery typically takes 5 business days, depending on your location.
Redesigned and better than ever, our Premium Light Filtering Roller shades feature top-tier design and function, giving you trouble-free operation and a beautiful accompaniment to your decor. Light filtering fabric provides privacy while still allowing light into the room. Customize with your choice of options to get the ideal shade for your needs.
- Go Cordless!
Color: Grassy Knoll
23 colors available
$ - Essential
$$ - Classic
$$$ - Premier
Mount: Not selected
Size: 24" W × 36" H
Measurements to the nearest 1/8 inch.
Fit or Free Guarantee. If for any reason your window coverings don't fit, even if you make a mistake in measuring, we'll remake them in the size you need free of charge. More details about the Fit or Free Guarantee
Lift Type: Not selected
Roll Orientation: Not selected
Cassette Valance: Not selected
Magnetic Door Brackets (Hold Downs): Not selected
Name your windowOptional
Installation help nearby
DIY Install is simple, but if you'd prefer help, enter your ZIP code to find available pros in your area.
- Fit or Free Guarantee
- Free Shipping
- 60-Day Satisfaction Guarantee
Product Information
Redesigned with a new fabric collection, operating mechanisms and available options! Roller shades have been a staple window covering for decades, but our modern Premium Light Filtering rollers are the next generation of this classic shade. Contemporary fabrics, smooth operating mechanisms, and tailored looks all give you the peak of today's innovation and design. Best of all, you can customize each shade for the perfect fit and combination of functional and style elements suited to your needs and decor.
Quick introduction to this shade:
- Designer-inspired fabrics and colors to complement any decor
- Light filtering material softens incoming sunlight and provides privacy
- Multiple options to choose from to customize operation and design
- Shade material is the same color on front and back
- Sturdy bottom bar for stable operation and premium look
Why you'll love this shade:
- Beautiful fabric choices with upscale shade design, components and functionality
- Easy to operate optional cordless lift – simply push up or pull down and the shade easily glides into position and stays without fuss
- Optional remote-controlled motorized shades for push-button convenience – also great for tall and hard to reach window
- Connect motorized shades to home automation systems with optional smart hub component
- Available cassette valance with fabric insert provides a finishing touch, hides the fabric roll from view, and closes the gap at the top of the shade
- Most colors also available in our Premium Blackout Roller Shades, so you can mix and match light control in different rooms with the same fabric color
- Conforms with the latest CPSC child safety regulations
Key considerations:
- The fabric width will be about 1 1/4" narrower (5/8” on each side) than the ordered width in order to accommodate the mounting brackets and control mechanisms at the top of the shade
- Shade components (beaded chain, tensioner, end caps) will be coordinated to the shade fabric in one of five colors: white, vanilla, gray, bronze, or black
- This shade connects to home automation systems via Hub-C only. Any Blindster shades that are compatible with Hub-C can be connected to home automation with a single Hub-C device. Shades that are listed with a different version hub cannot be controlled with Hub-C.
Great for:Living RoomBedroomOfficeKitchenDining RoomUtility Room
- Privacy
- Child & Pet Safety
- Easy to Clean
Made to order, ships in 6–8 business days. Once shipped, delivery typically takes 5 business days, depending on your location.
Key Features
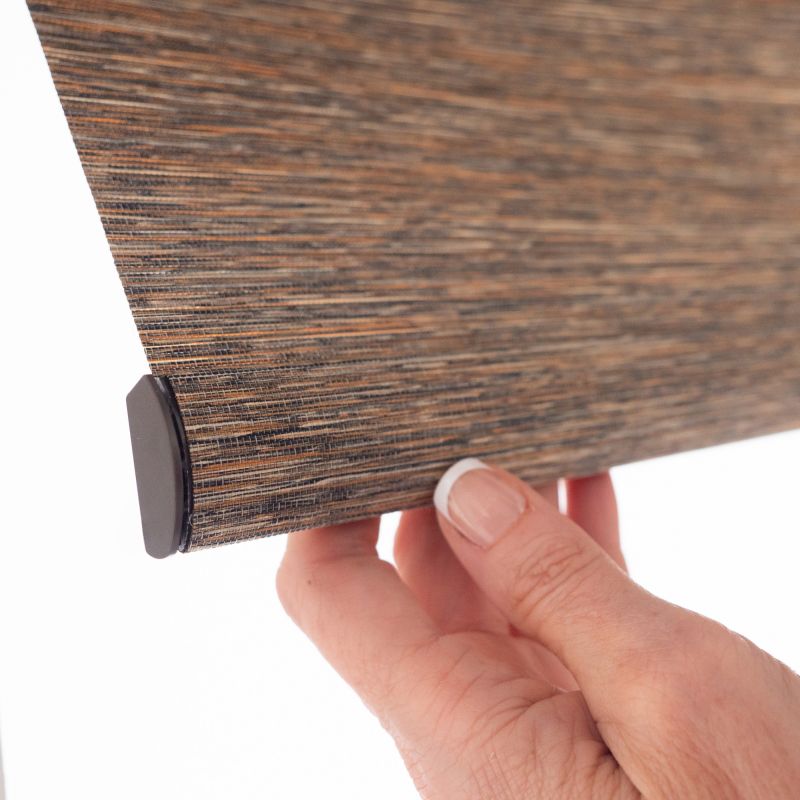
Omni Curved Wrapped bottom rail
The Omni Curved Wrapped bottom rail comes with coordinating color endcaps.
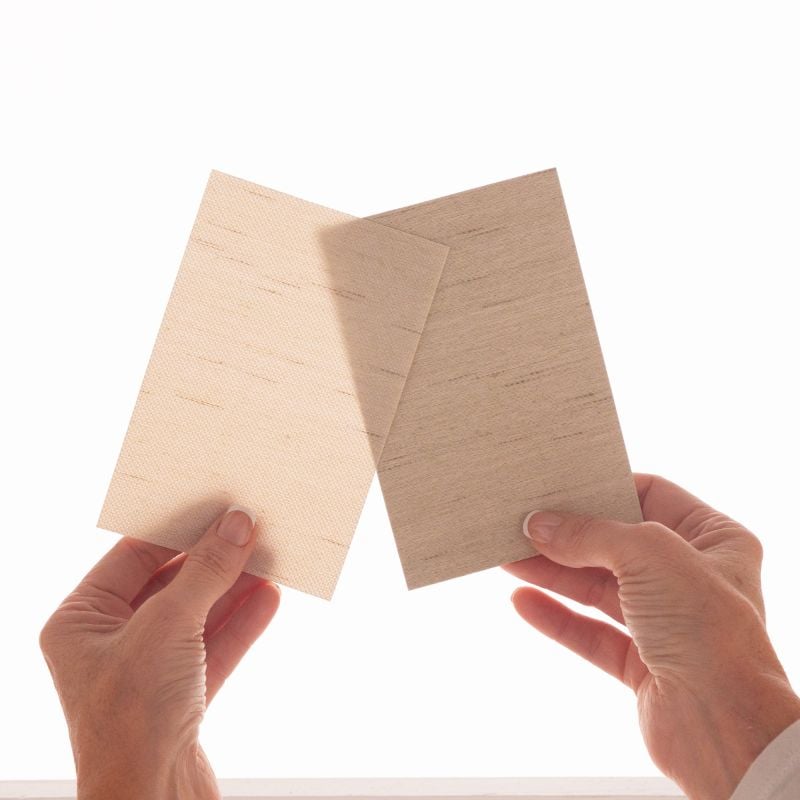
Matching Colors
Most fabrics are also available in our Premium Blackout Roller Shades, so you can mix and match light control in different rooms with the same fabric color
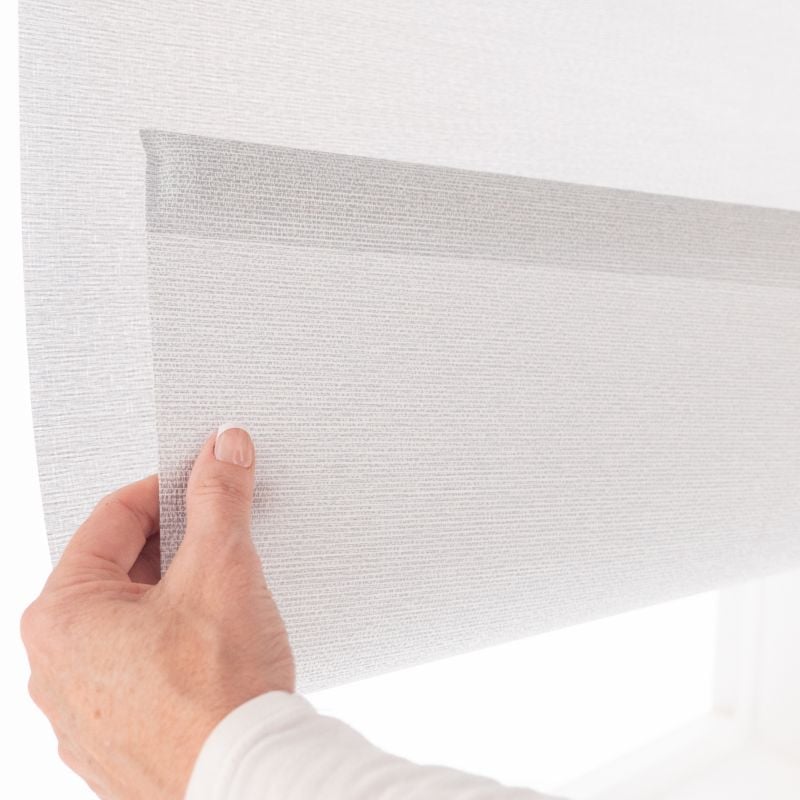
Matching Fabric
Shade material is the same color on front and back
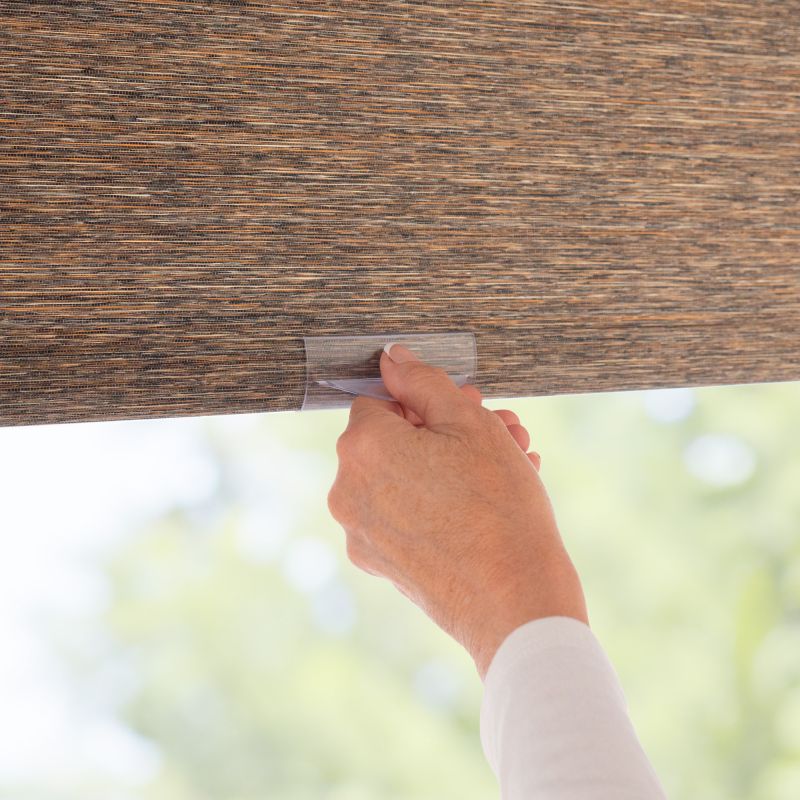
Easy-stay Cordless Lift
Optional Easy-Stay Cordless Lift provides effortless operation and an uncluttered look
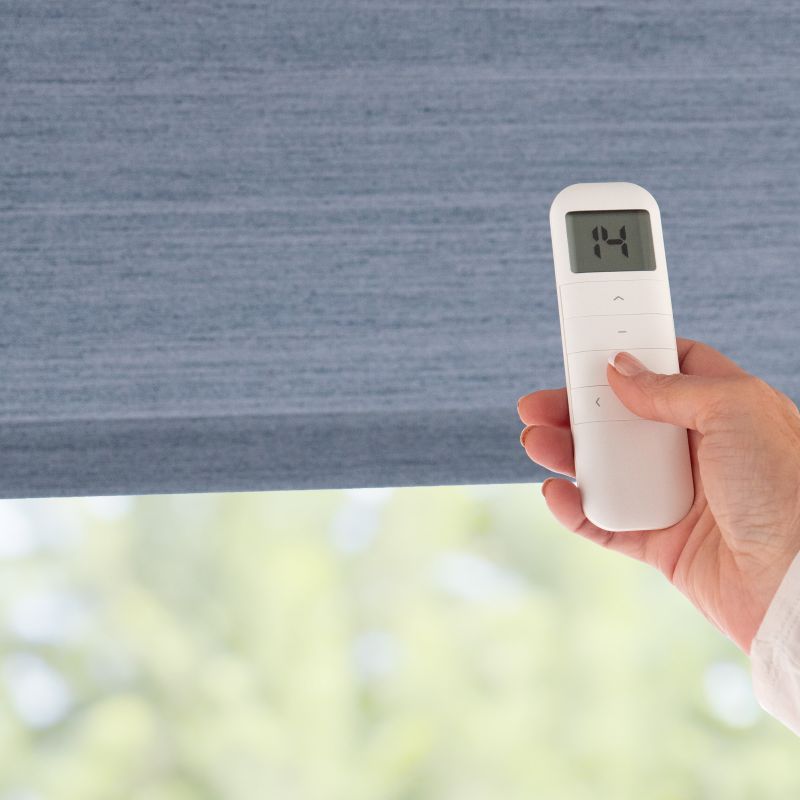
Motorized Lift Control
Upgrade to the ultimate in convenience with motorized lift control – operate multiple shades easily by remote control, even out-of-reach windows
Specifications & Restrictions
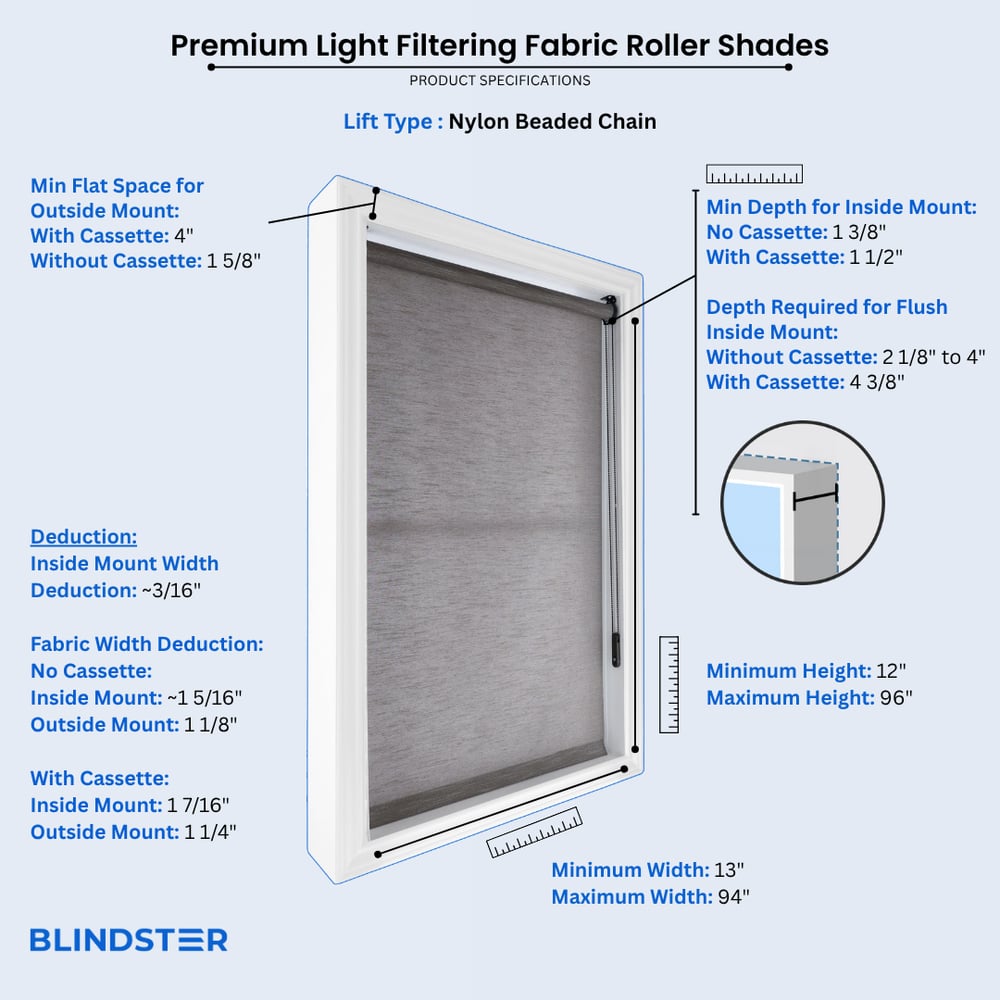
- Width
- 13" – 94"
- Height
- 12" – 96"
- Min depth for inside mount (without cassette)
1 3/8 inches
- Min depth for inside mount (with cassette)
1 ½ inches
- Min flat space for outside mount (without cassette)
1 5/8 inches
- Min flat space for outside mount (with cassette)
4 inches
- Depth Required for Flush Mount (no cassette)
2 1/8 - 4 inches (depending on roll diameter)
- Depth Required for Flush Mount (with cassette)
4 3/8 inches
- Inside Mount Width Deduction
Approximately 3/16 inch
- Fabric Width Deduction (continuous loop lift; no cassette)
Approximately 1 5/16 inches for inside mount and 1 1/8 inches less for outside mount
- Fabric Width Deduction (continuous loop lift; with cassette)
1 7/16 inches less when inside mount and 1 ¼ inches less when outside mount
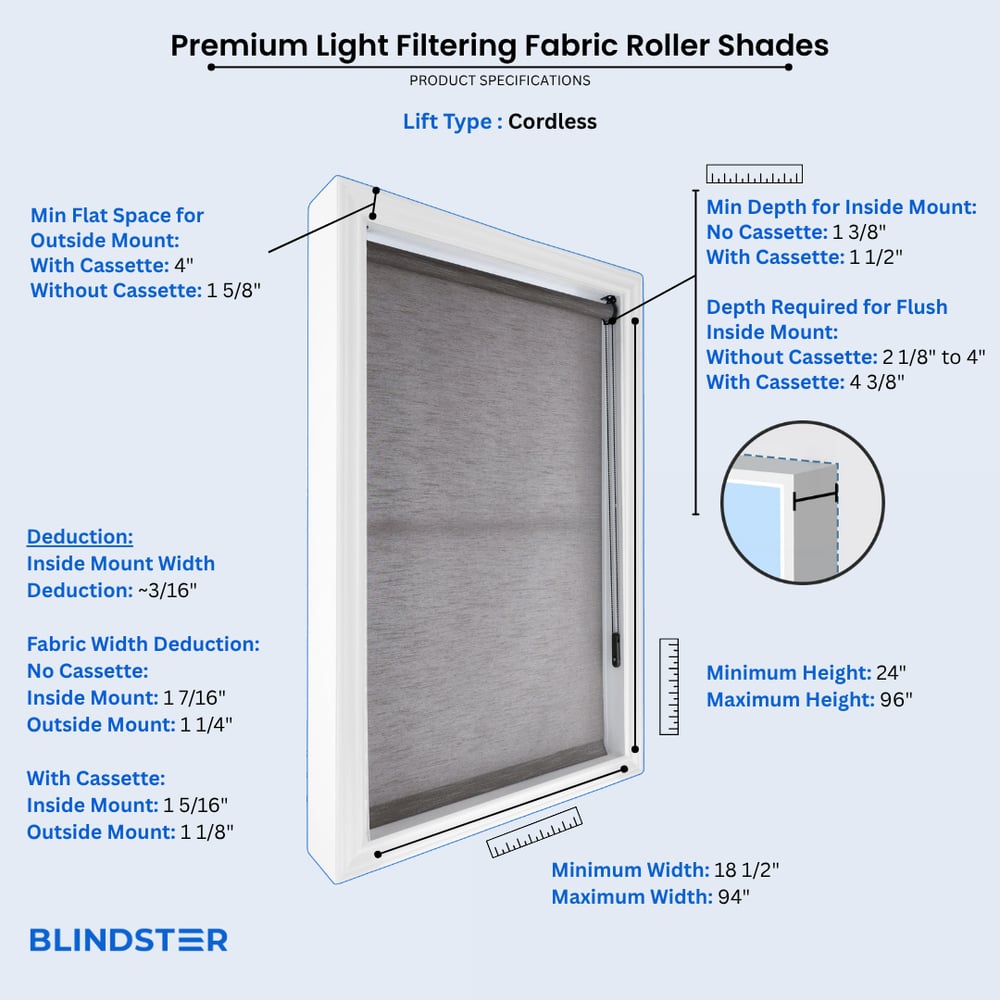
- Fabric Width Deduction (cordless lift; no cassette)
1 7/16 inches when ordered as inside mount and 1 ¼ inches when ordered as outside mount
- Fabric Width Deduction (cordless lift; with cassette)
1 5/16 inches less when inside mount; 1 1/8 inches less when outside mount
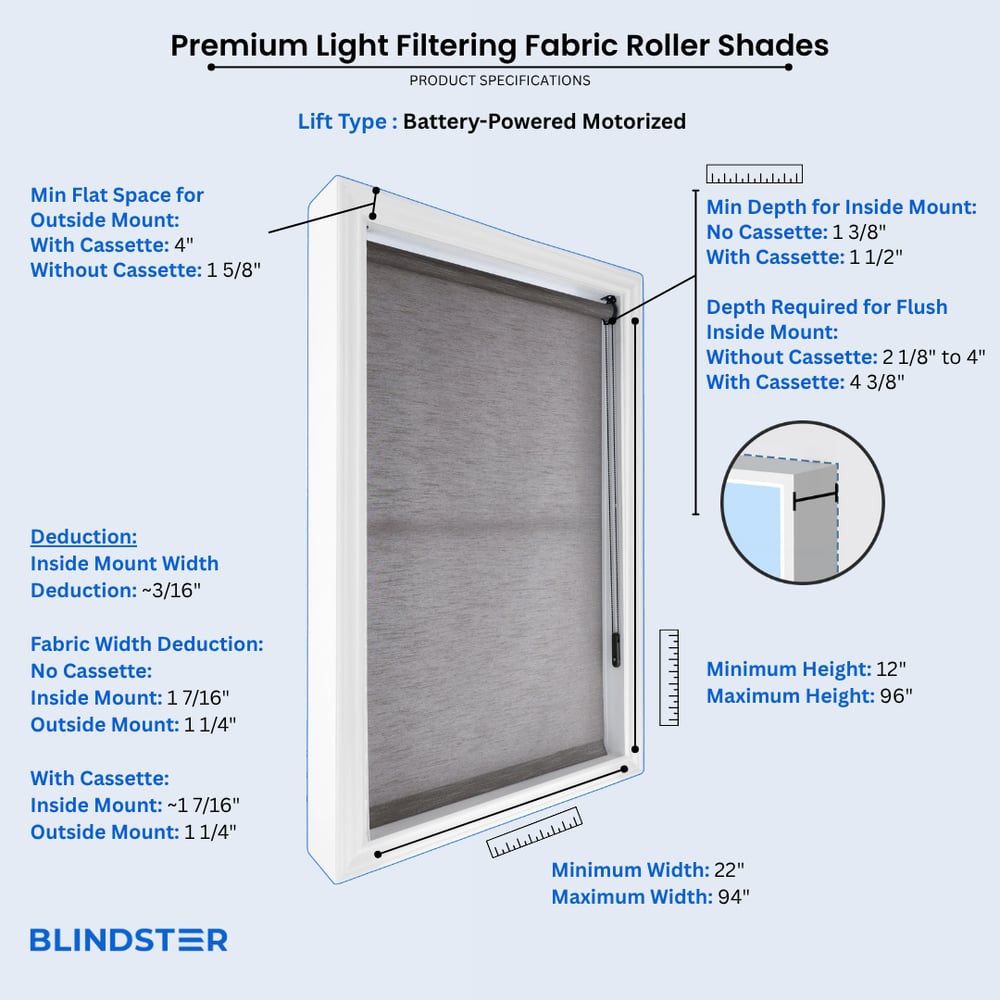
- Fabric Width Deduction (Motorized lift; no cassette)
1 7/16 inches inside mount and 1 ¼ inches outside mount
- Fabric Width Deduction (Motorized lift; with cassette)
1 7/16 inches less when inside mount and 1 ¼ inches less when outside mount
Restrictions
- Shades ordered less than 32" in height will receive a METAL beaded chain.
How to Measure
How to Measure: Inside Mount
3 min read
Let's make sure an inside mount will work for your window! Using a metal tape measure, first check if you have sufficient depth:
- Measure inside the window opening from the back of the window to the front of the opening where the shade would mount. To mount the brackets, the depth at the top of the window must be at least 1 5/8" for shades without a cassette valance and 1 1/2" for shades with a cassette valance. To have a flush mount (meaning the shade is fully recessed in the window opening) the depth must be between 2 1/8" and 4" (depending on roll diameter) for shades without a cassette valance and 4 3/8" for shades with a cassette valance. If your depth is not sufficient for mounting the brackets, please see our outside mount instructions or consider a different product.
How to Measure:
Let's start with the Width:
- Measure inside of the window opening/frame from left to right at the top of the opening to the nearest 1/8". If rounding is necessary, round down to the nearest 1/8". That is your ordering width.
Now, let's do the Height:
- Measure the inside of the window opening/frame from the top of the opening to the bottom of the opening/sill to the nearest 1/8" in three places: on the left-hand side, the middle, and on the right-hand side. Write down all 3 measurements and circle the tallest. That is your ordering height.
Note: Always provide us with the actual measurement of the window opening. We will make the necessary deduction of approximately 3/16" to the width of the top of the shade to accommodate the installation brackets.
The fabric portion of the shade will be approximately 1 1/4" – 1 7/16" narrower than the ordered width (up to 3/4" gap on each side between the window opening and the edge of the fabric). When maximum light blocking is needed, consider an outside mount or an alternate product.
No deductions will be made to the ordered height.
How to Measure: Outside Mount
3 min read
Before you start measuring, decide where above your window opening you want to mount your shade. You will need at least 1 1/4" of flat vertical space above the window to mount the brackets for shades without a cassette valance, or at least 4" for shades with a cassette valance. Follow the directions below for where you'd like to install your shade.
If you do not have sufficient vertical space for mounting the brackets, please see our inside mount instructions or consider a different product.
Your ordered width will be the "tip to tip" measurement, which is the widest part of the top of the shade including the brackets and cassette valance (if applicable). The fabric portion of the shade will be approximately 1 1/16" – 1 1/4" narrower than the ordered width (up to 5/8" on each side). If you wish to have the fabric cover a specific width, we recommend ordering slightly wider – just ensure that you have enough horizontal space to mount the shade.
Width:
- Looking at your window and surrounding wall, decide what area you would like to cover. We recommend the shade extends about 2-3" on each side of the window opening for the best light control and appearance.
- Using a metal tape measure, measure from left to right including your desired extra space on each side of the window—that is your ordering width.
Height:
- Consider how far above the window you would like to install your shade but at least starting with the minimum vertical space referenced above. Since the shade spools onto the roll, it does not need to be installed high above the window to have the shade fabric fully clear the window.
- Measure from the top of where you will mount the shade on the wall down to where you want the bottom of the shade to be, using the same extra space below your window opening as you used above; if you have a protruding windowsill, measure down to the top of the sill. That is your ordering height.
Width:
- Looking at your window and surrounding wall, decide what area you would like to cover. We recommend the shade extends about 2-3" on either side of the window opening for the best light control and appearance.
- Using a metal tape measure, measure from left to right including any desired extra space on each side of the window—that is your ordering width.
Height:
- Consider how far above the window you would like to install your shade but at least starting with the minimum vertical space referenced above. Since the shade spools onto the roll, it does not need to be installed high above the window to have the shade fabric fully clear the window.
- Measure from the top of where you will mount the shade on the wall down to where you want the bottom of the shade to be, using the same extra space below your window opening as you used above, or to the bottom edge of the trim if you prefer; if you have a protruding windowsill, measure down to the top of the sill. That is your ordering height.
Note: The shade fabric may rub against the trim when operating. If your trim is more than 1/2" thick, consider adding shims (not included) under the brackets for additional clearance. If your trim is 3/4" or thicker, we recommend ordering the shade with the reverse roll option.
Width:
- We don't normally recommend mounting roller shades directly on the trim unless your window configuration doesn't allow for other placements. Your ordered width will be the bracket to bracket measurement which cannot exceed the width of your trim. However, the fabric portion of roller shades is always narrower than the ordered width, and will not extend to the edges of the trim.
- Confirm that the height of your trim is at least the minimum height required for installing the mounting brackets. At the top of your window, use a steel measuring tape and measure from outer edge to outer edge of the trim. That is your ordering width.
- Note that the fabric portion of the shade will be narrower than your ordered width.
Height:
- Measure from the top of your trim to the bottom of your trim or to the top of the windowsill if you have a protruding sill. That is your ordering height.
Width:
- Using a metal tape measure, measure left to right from the outside edge of the trim piece that goes around the glass to the other outside edge. That is your ordering width. However, if you have space, it is best to order the shade about 2-3" wider for better light control.
Height:
- Consider how far above the window trim piece you would like to install your shade but at least starting with the minimum vertical space referenced above. Measure down to where you want the bottom of the shade to be, using the same extra space below the window trim piece as you used above. That is your ordering height.
Note: We offer magnetic hold-downs for this product which can be requested during the ordering process. These should be installed for a successful door mount as they secure the shade at the bottom of the door so that it does not swing when the door opens and closes.
How to Install
How to Install: Inside Mount
2 min read
Let's make sure you have what you need!
What came with your blinds?
- Mounting brackets
- Screws
- Idler
- Chain stops*
- Safety tension device*
- Contoured valance*
- Installation brackets*
What else will you need in order to complete the installation?
- Rechargeable drill (use ¼" drill bit)
- Phillips screwdriver
- Pencil
- Tape measure
- Ladder
*If applicable to your order.
IMPORTANT: Do not remove the paper wrapping around the shade's fabric until the shade is installed. Removing this paper prior to installation could result in the fabric shifting on the tube or it might alter the stop location of the fabric.
Download the PDF below for a complete step by step guide on how to install your inside mount shades.
How to Install: Outside Mount
4 min read
Let's make sure you have what you need!
What came with your blinds?
- Mounting brackets
- Screws
- Idler
- Chain Stops
- Safety Tension Device*
- Bracket Covers
- Screw Covers
- Contoured valance*
- Outside Mount Brackets*
- Corner Connectors*
What else will you need in order to complete the installation?
- Rechargeable drill (use ¼" drill bit)
- Phillips screwdriver
- Pencil
- Tape measure
- Ladder
*If applicable to your order.
IMPORTANT: Do not remove the paper wrapping around the shade's fabric until the shade is installed. Removing this paper prior to installation could result in the fabric shifting on the tube or it might alter the stop location of the fabric.
Download the PDF below for a complete step by step guide on how to install your outside mount shades.
Videos
Roller Shades - Sleek and Simple
How to Measure for Inside Mount Roller Shades
How to Measure for Outside Mount Roller Shades
How to Install Roller and Solar Shades
How They're Made - Roller Shades
Reviews
4.5
Based on 14 reviews
Ronald
We have used another manufacturer custom shades for the main rooms in our house, we waited and then decided to try Blindster brand for our Sunroom and Garage. The processes was very easy, we received the sample material and then we had to reverify measurements. We received 9 items very quickly. The items were packed extremely well, the directions were worthless and so was the video on their WEB site. All items fit perfectly, and once I figured out the best method for installing the shades the processes went very quickly. The shades look great and are doing a superb job of letting in light while keeping the sunroom and garage much cooler. Even though the ordering process was easy i did not like that I had to buy a warranty for additional years, Blindster should stand by their product for more then one year, the other brand that is in our house came with a lifetime replacement warranty that we have used even when it was our fault, yes we paid more but they stood behind the product, Blindster should really relook their warranty policy. I gave Blindster 5 Stars because the quality was very good for the cost (50% off during summer sale), ordering was easy, quick shipment and items were packaged perfectly to prevent damage during shipment.
Richard m
We have a window in our dining room that the morning sun comes thru and is blinding to anyone sitting on one side of the table. We have a lucious stained glass window that hangs in the window, but it does not block the intense sun. The translucent shade is located behind the stained glass so the brilliance is not blocked, but the sun glare is. Perfect
Nora
This shade looks super clean and operates very smoothly. It filters just the right amount of light. Far from blackout, but blocks out heat nicely. If I had to estimate, it blocks about 75% of direct sunlight. The brackets were easy enough to install, but clipping the blind into the brackets themselves was more challenging. It takes quite a bit of force. In fact, we accidentally pulled the strip of matching material out of the cassette while we were trying to rock it in (it's not glued in), but we were able to finesse it back into place.
Fari
I purchased the Premium Light Filtering Fabric Roller Shades from Blindster about three years ago, and I’ve been extremely happy with them. The fabric is just right—not too thin, not too thick—and it filters light beautifully. The material feels high-quality, and the price was very reasonable for the value. Recently, I contacted Blindster because I had lost one of the parts and couldn’t use the shade any more. Despite the purchase being three years old, their customer service was exceptional. They responded quickly and kindly mailed me the replacement part right away. Outstanding customer service and high-quality shades. Highly recommend!
Curtis
Beautiful! Completely satisfied.
Leslie
We ordered 3 blinds; two quite large for picture windows and one smaller one. One of the larger ones had a flaw in the fabric. I called customer service and spoke to Mayra and she immediately took care of the problem. Upon receiving the replacement, the same type of flaw was in the fabric. Again, spoke to Mayra, she did a little investigating and found that manufacturing had indeed found a flaw in that fabric. So, they sent a third and it is perfect. Customer service was great and our blinds look great and we love them. Will use Blindster again soon, as I have more windows that need covering.
Elizabeth
Blind was absolutely perfect! Quality workmanship, great fabric. Thank You!
Melody
Love the fabric on my new roller shades, they operate so smooth and add so much to my office.
Melody
Love the fabric on my new roller shades, they operate so smooth and add so much to my office.