


2 Inch Deluxe Room Darkening Sheer Shades
SKU: BLN-2DRDSSP
Made to order, ships in 7–9 business days. Once shipped, delivery typically takes a few days, depending on your location.
Looking for luxury sheer shades that are beautiful and affordable? This shade has soft, room-darkening fabric vanes that float between two layers of sheer mesh fabric, creating a lovely blend of style and functionality. It's like having two shades in one!
- Conforms with C.P.S.C. child safety guidelines
- Motorized shades are perfect for hard-to-reach windows
- Provides 99% UV protection and helps keep rooms darker when vanes are closed
Color: Hazy Beige
2 colors available
$ - Essential
Mount: Not selected
Size: 24" W × 36" H
Measurements to the nearest 1/8 inch.
Fit or Free Guarantee. If for any reason your window coverings don't fit, even if you make a mistake in measuring, we'll remake them in the size you need free of charge. More details about the Fit or Free Guarantee
Lift Type: Not selected
Name your windowOptional
Installation help nearby
DIY Install is simple, but if you'd prefer help, enter your ZIP code to find available pros in your area.
- Fit or Free Guarantee
- Free Shipping
- 60-Day Satisfaction Guarantee
Product Information
Sheer shades are designed to give you the benefits of two different shades in one. When lowered, you can position the horizontal fabric vanes in an "open" position like a wood blind, letting the two layers of sheer material softly filter incoming sunshine and more evenly disperse the softened light around the room (that's shade #1!). When you need extra privacy or want to darken the room, just rotate the fabric vanes down flat to fully cover the window (shade #2!). Of course you can always raise the shade and let the sun shine in – the sheer shade material rolls up into the cassette valance and disappears for an unobstructed view outside. Upgrade to motorized lift control for a truly remarkable window covering!
Get to know this shade:
- Room-darkening fabric vanes open and close like a horizontal blind when the shade is fully lowered
- Durable aluminum cassette valance with color-coordinated fabric insert provides a finished look
- Beaded nylon chain is the default lifting mechanism, or choose the available motorized lift with rechargeable battery
Why you'll love this shade:
- Versatile light control options give you the flexibility to darken the room, gently filter light, or raise the shade completely
- Room darkening fabric provides complete privacy and excellent light control
- Sheer material helps filter damaging UV rays to protect your furnishings from fading and helps distribute incoming light more evenly
- Easy to operate with either the continuous cord loop or motorized lift feature
- Meets all CPSC child safety guidelines
Key considerations:
- Bottomrail and cassette valance will both be ivory, and cassette will include a color-coordinated fabric insert
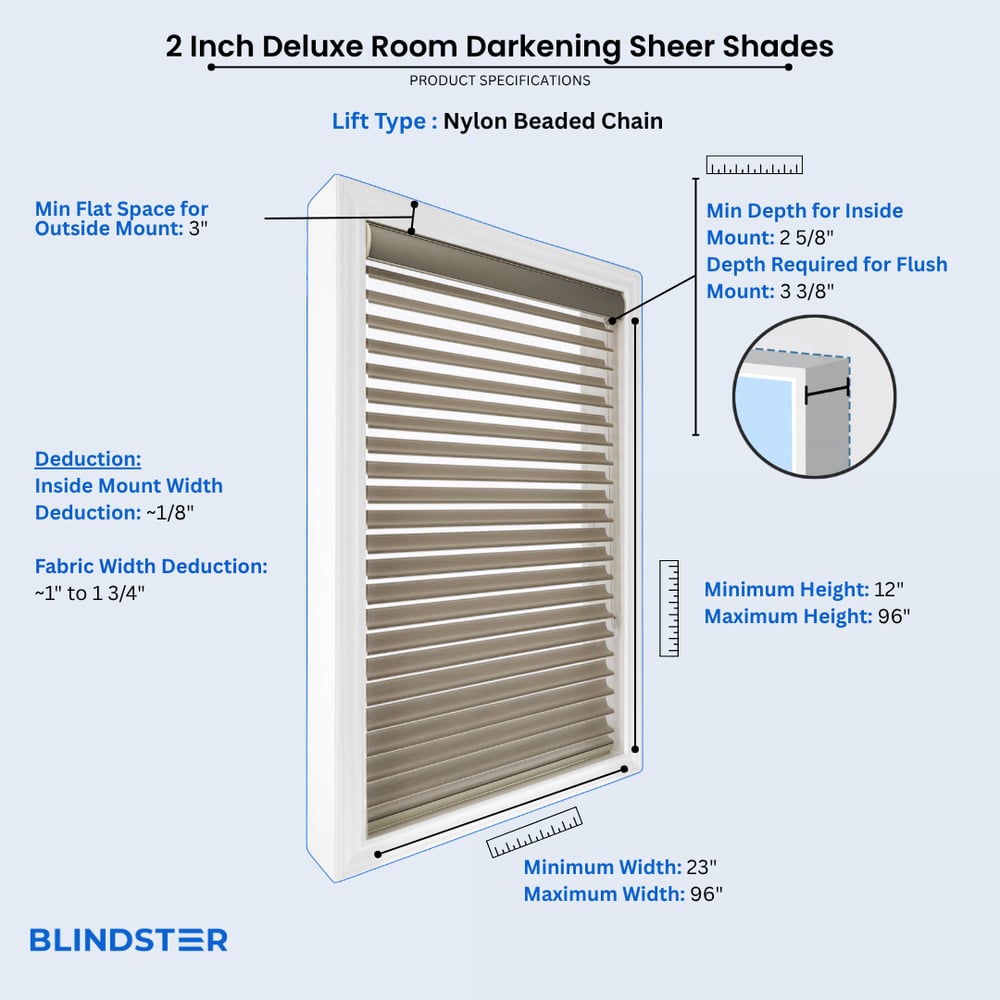
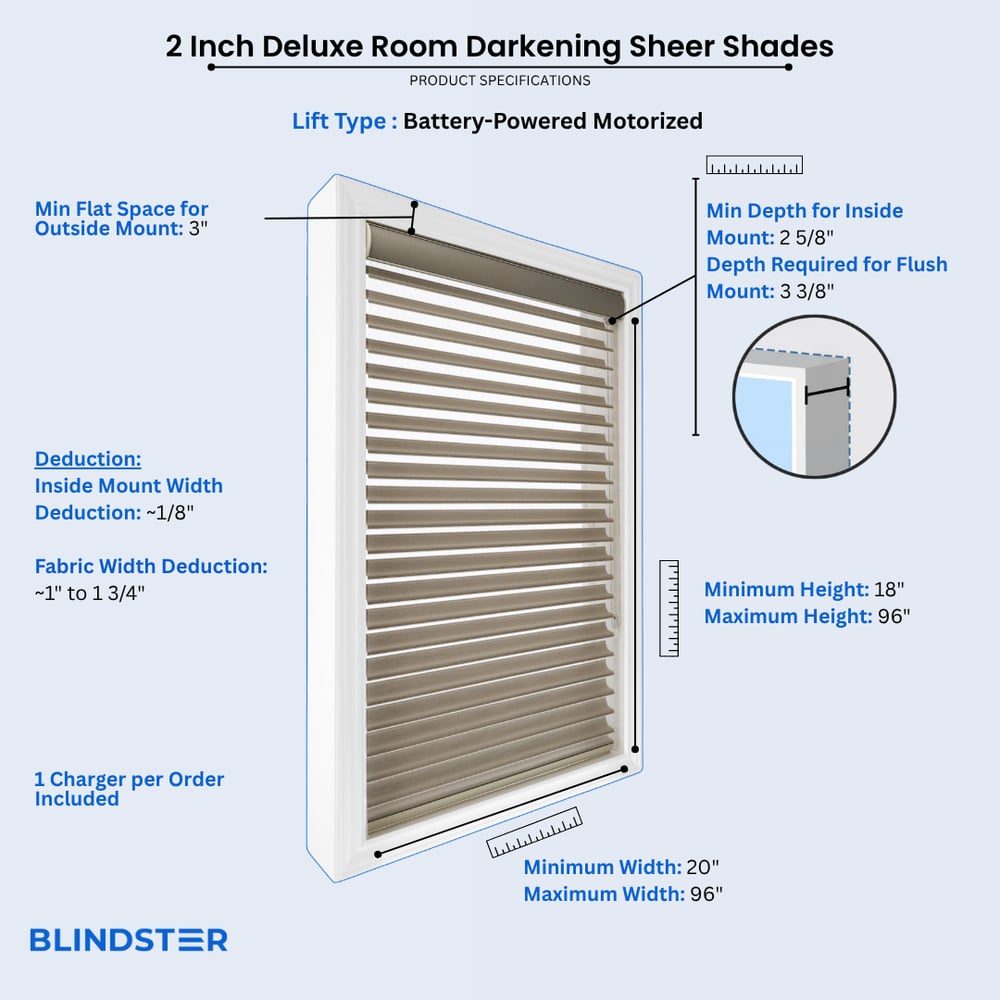
- Shade material will be 1 – 1 3/4" narrower than ordered width in order to accommodate the control mechanisms and brackets at the top of the shade
- Shade is top mount only, side mount is not available (brackets must be installed either at the top of the window frame or on the wall)
Great for:Living RoomBedroomOfficeKitchenDining RoomMedia RoomBathroomEntry WayUtility Room
- Child & Pet Safety
- Privacy
Made to order, ships in 7–9 business days. Once shipped, delivery typically takes a few days, depending on your location.
Specifications & Restrictions
- Width
- 20" – 96"
- Height
- 12" – 96"
- Min Depth for Inside Mount
2 5/8 inches
- Depth required for flush mount
3 3/8 inches
- Min Flat Space For Outside Mount
3 inches
- Cassette Valance Dimensions
3 inches (height) x 3 3/8 inches (depth)
- Inside Mount Width Deduction
Approximately 1/8 inch
- Fabric Width Deduction
Approximately 1" - 1 ¾" inches depending on the lift type.
- 6 channel remote control required to operate motorized shades
Remotes from other companies will not operate Blindster shades
- All shades are pre-programmed at the factory to operate on channel 6
Each remote can be programmed to control up to 6 shades
- Remote Control Range
65 feet
- Easy Rechargeable Feature
Battery wand is integrated into the roller mechanism of all motorized shades
- This product's motorized remote is NOT compatible with the following products:
Deluxe Cellular Shades categories & Premium Solar Shades categories
- Charger included for Motorized Shades
1 Charger per order included
*Recharge time on a shade is 5 hours, chargers are not meant to be plugged into the shade long term.
- Fabric Slat Size
2 inches
Restrictions
- Bottomrail and Cassette valance will both be Ivory. Cassette will include a color-coordinated fabric insert.
- This product's motorized remote is NOT compatible with Motorized Cellular Shades, Premium Motorized Solar Shades Exotic Collection or Premium Motorized Light Filtering Solar Shades, or Premium Motorized Blackout Solar Shades
- Not able to side mount, top or surface mount only
How to Measure
How to Measure: Inside Mount
INSIDE MOUNT:
Let's make sure an inside mount will work for your window! Using a metal tape measure, first check if you have sufficient depth:
- Measure inside the window opening from the back of the window to the front of the opening where the shade would mount. To mount the brackets, the depth at the top of the window must be at least 2 5/8". To have a flush mount (meaning the shade is fully recessed in the window opening) the depth must be at least 3 3/8". If your depth is not sufficient for mounting the brackets, please see our outside mount instructions or consider a different product.
How to Measure:
Let's start with the Width:
- Measure inside of the window opening/frame from left to right at the top of the opening to the nearest 1/8". If rounding is necessary, round down to the nearest 1/8". That is your ordering width.
Now, let's do the Height:
- Measure the inside of the window opening/frame from the top of the opening to the bottom of the opening/sill to the nearest 1/8" in three places: on the left-hand side, the middle, and on the right-hand side. Write down all 3 measurements and circle the tallest. That is your ordering height.
Note: Always provide us with the actual measurement of the window opening. We will make the necessary deduction of approximately 1/8" to the width of the top of the shade to accommodate the installation brackets.
The fabric portion of the shade will be approximately 1" – 1 3/4" narrower than the ordered width depending on the lift type (up to 7/8" gap on each side between the window opening and the edge of the fabric). When maximum light blocking is needed, consider an outside mount or an alternate product.
No deductions will be made to the ordered height.
How to Measure: Outside Mount
Before you start measuring, decide where above your window opening you want to mount your shade. You will need at least 3" of flat vertical space above the window to mount the brackets. Follow the directions below for where you'd like to install your shade.
If you do not have sufficient vertical space for mounting the brackets, please see our inside mount instructions or consider a different product.
Your ordered width will be the width of the cassette at the top of the shade. The fabric portion of the shade will be approximately 1" – 1 3/4" narrower than the ordered width (up to 7/8" on each side). If you wish to have the fabric cover a specific width, we recommend ordering slightly wider – just ensure that you have enough horizontal space to mount the shade.
Width:
- Looking at your window and surrounding wall, decide what area you would like to cover. We recommend the shade extends about 2-3" on each side of the window opening for the best light control and appearance.
- Using a metal tape measure, measure from left to right including your desired extra space on each side of the window—that is your ordering width.
Height:
- Consider how far above the window you would like to install your shade but at least starting with the minimum vertical space referenced above. Since the shade spools onto the roll, it does not need to be installed high above the window to have the shade fabric fully clear the window.
- Measure from the top of where you will mount the shade on the wall down to where you want the bottom of the shade to be, using the same extra space below your window opening as you used above; if you have a protruding windowsill, measure down to the top of the sill. That is your ordering height.
Width:
- Looking at your window and surrounding wall, decide what area you would like to cover. We recommend the shade extends about 2-3" on either side of the window opening for the best light control and appearance.
- Using a metal tape measure, measure from left to right including any desired extra space on each side of the window—that is your ordering width.
Height:
- Consider how far above the window you would like to install your shade but at least starting with the minimum vertical space referenced above. Since the shade spools onto the roll, it does not need to be installed high above the window to have the shade fabric fully clear the window.
- Measure from the top of where you will mount the shade on the wall down to where you want the bottom of the shade to be, using the same extra space below your window opening as you used above, or to the bottom edge of the trim if you prefer; if you have a protruding windowsill, measure down to the top of the sill. That is your ordering height.
Note: The shade fabric may rub against the trim when operating. If your trim is more than 1/2" thick, consider adding shims (not included) under the brackets for additional clearance.
Width:
- We don't normally recommend mounting zebra dual shades directly on the trim unless your window configuration doesn't allow for other placements. Your ordered width will be the width of the cassette at the top of the shade. However, the fabric portion of roller shades is always narrower than the ordered width, and will not extend to the edges of the trim. Conversely, having the width of the fabric equal the width of your window trim will mean the top of the shade will extend beyond the width of the window trim.
- Confirm that the height of your trim is at least the minimum height required for installing the mounting brackets. At the top of your window, use a steel measuring tape and measure from outer edge to outer edge of the trim. That is your ordering width.
- Note that the fabric portion of the shade will be narrower than your ordered width.
Height:
- Measure from the top of your trim to the bottom of your trim or to the top of the windowsill if you have a protruding sill. That is your ordering height.
This shade is not suitable for installing on a door. The motion could cause the fabric to shift and telescope off the tube which will result in the material fraying on the edges.
How to Install
How to Install: Inside Mount
2 min read
Let's make sure you have what you need!
What came with your blinds?
- Mounting brackets*
- 1 ½" Screws (two per bracket)
- Screws for Tension Device (if Continuous Chain Operation ordered)
- 6 Channel Remote Control (if ordered)
What else will you need in order to complete the installation?
- Rechargeable drill (use 5/64" drill bit to predrill screw holes & use ¼" drill bit for wall anchors, if needed)
- Phillips screwdriver
- Pencil
- Tape measure
- Ladder
*Quantity will vary depending on width. Please note that brackets and componentry may be updated or substituted over time due to availability or product improvements.
Download the PDF below for a complete step by step guide on how to install your inside mount blinds and for more information on how many brackets are required for your order.
How to Install: Outside Mount
2 min read
Let's make sure you have what you need!
What came with your blinds?
- Mounting brackets*
- 1 ½" Screws (two per bracket)
- Screws for Tension Device (if Continuous Chain Operation ordered)
- 6 Channel Remote Control (if ordered)
What else will you need in order to complete the installation?
- Rechargeable drill (use 5/64" drill bit to predrill screw holes & use ¼" drill bit for wall anchors, if needed)
- Phillips screwdriver
- Pencil
- Tape measure
- Ladder
*Quantity will vary depending on width. Please note that brackets and componentry may be updated or substituted over time due to availability or product improvements.
Download the PDF below for a complete step by step guide on how to install your outside mount blinds and for more information on how many brackets are required for your order.
Videos
How to Measure for Inside Mount Blinds and Shades
How to Measure for Outside Mount Blinds and Shades
Reviews
4.8
Based on 10 reviews
Jon
Installed 3 blinds and set up with remote in less than an hour. They look and work great
Frank
We were very pleased with the quality and appearance of the 2" deluxe blinds we ordered and when we had issues with fitment on a few of them, Blindster's fit guarantee helped us get the issue rectified.
Stephanie
Fit was great! Quality is very good and installation is relatively easy. The blinds met my expectations - which were pretty high!
Damon
We are extremely happy with our blinds.
Fred
Easy to order. Easy to install. Customer service excellentl.
Melissa
Great product! Installation went well and works as I had expected.