


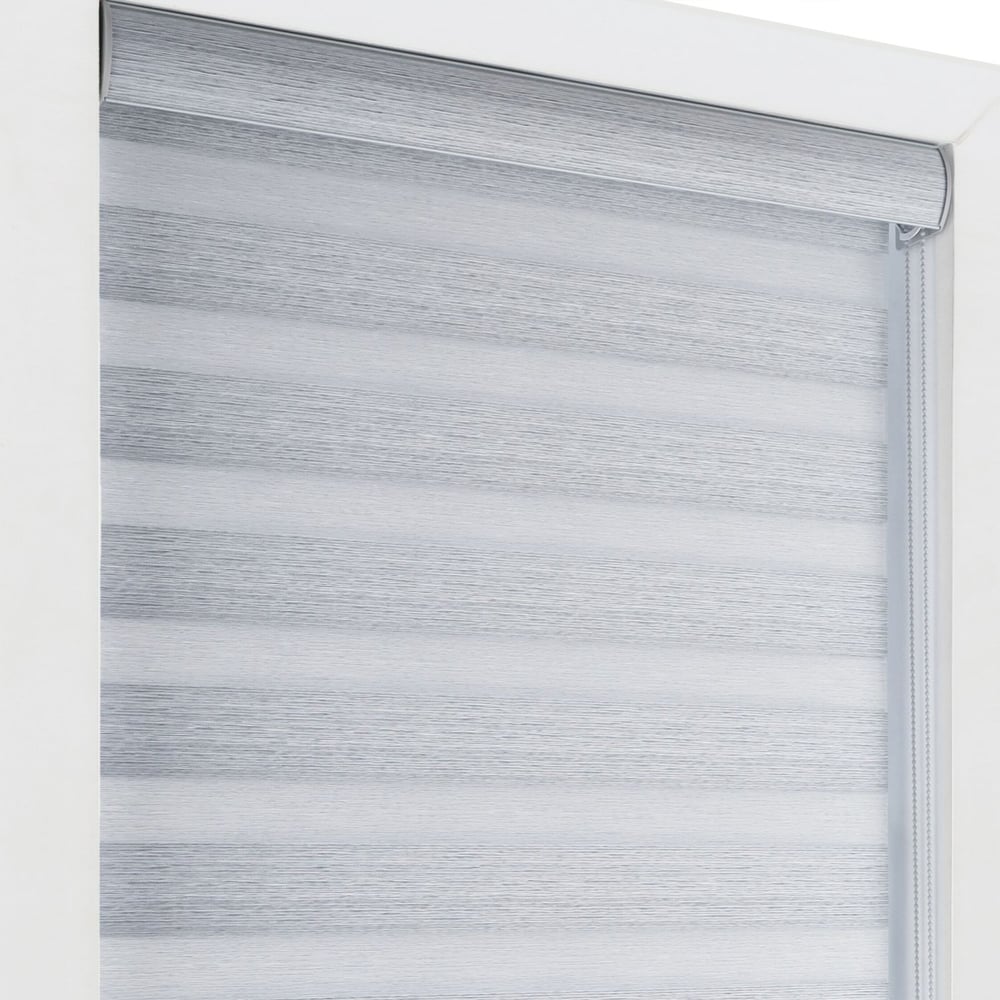

LEVOLOR Room Darkening Zebra Sheer Shades
SKU: LRDZSS121
Made to order, ships in 5–7 business days. Once shipped, delivery typically takes 5 business days, depending on your location.
Completely change the look and ambiance of your home with banded shades from LEVOLOR. The unique two-layered design of these shades lets you regulate light and privacy like never before, with alternating sheer and opaque bands of fabric on the shade that can be positioned in countless ways.
Color: Mohave Snowfall
6 colors available
$ - Essential
Mount: Not selected
Size: 24" W × 36" H
Measurements to the nearest 1/8 inch.
Fit or Free Guarantee. If for any reason your window coverings don't fit, even if you make a mistake in measuring, we'll remake them in the size you need free of charge. More details about the Fit or Free Guarantee
Lift Type: Not selected
Name your windowOptional
Installation help nearby
DIY Install is simple, but if you'd prefer help, enter your ZIP code to find available pros in your area.
- Fit or Free Guarantee
- Free Shipping
- 60-Day Satisfaction Guarantee
Product Information
If you've never seen shades like these before, you don't know what you've been missing! The ground-breaking design of these shades starts with the unique banded fabric – a horizontal strip of sheer material is seamless connected to a band of opaque material to alternate down the length of the shade. This material is then looped around the bottom rail and then connected back at the top of the shade, forming two layers of material. As the shade is raised and lowered, the bands of material pass by each other and alternately align to welcome in outside light, or are staggered to provide privacy and to dim the room. When fully lowered you get maximum light blocking, or position the shade at any height to get creative with how much outside light and view you desire!
You can't go wrong with the stunning array of fabric colors and styles to elevate your decor. Choose from three available lift options to operate your shade – the standard continuous cord loop with beaded chain, the extremely smooth and easy to use cordless lift, or the ultimate in convenience and style: motorized lift! You can even add the optional hub to connect your motorized shades to home automation systems like Alexa to access a wide range of programmable features.
Get to know this shade:
- Unique banded material is looped around the bottom rail for two layers of material
- As the shade moves, the bands alternately overlap and align for variable light and privacy control
- Opaque fabric bands provide a high degree of light blocking to dim the room
- Cassette valance included standard to hide the operating mechanisms and provide a finished look
- Shade operates with continuous cord loop, or upgrade to cordless lift or motorized control
Why you'll love this shade:
- Stunning modern design is both minimalist and eye-catching
- Provides the adjustable light control of a blind with the softer look and operation of a shade
- Beautifully crafted fabrics are airy and sophisticated, and available in an array of colors and styles
- Available easy-to-use PerfectPlacement™ cordless system – the shade smoothly adjusts with a simple push or pull on the bottom rail
- Upgrade to motorized lift for effortless control of multiple shades at once with remote control or add the hub to connect to home automation systems
- Included cassette valance tops off the shade for a designer finish
- Complies with all current child safety requirements
Key considerations:
- Because this is a roller-style shade, the fabric will be up to 1 7/16" narrower than the ordered width to accommodate the brackets and connecting rods inside the shade
- Cords, end caps and other hardware is coordinated to fabric color, preselected in either white, vanilla, gray, bronze or black
Great for:Living RoomBedroomOfficeKitchenDining RoomMedia RoomBathroomEntry WayUtility Room
- Child & Pet Safety
- Privacy
Made to order, ships in 5–7 business days. Once shipped, delivery typically takes 5 business days, depending on your location.
Key Features
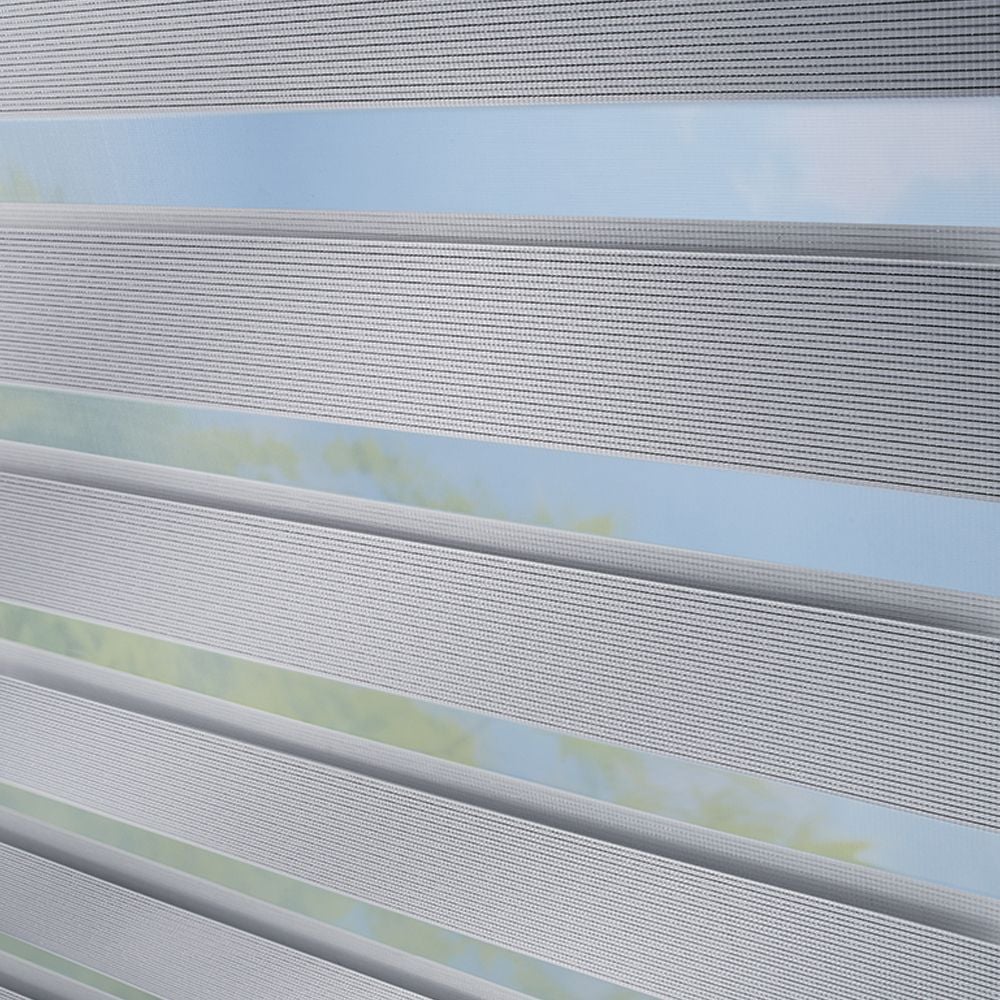
Alternately Overlapping Bands
As the shade moves, the bands alternately overlap and align for variable light and privacy control.
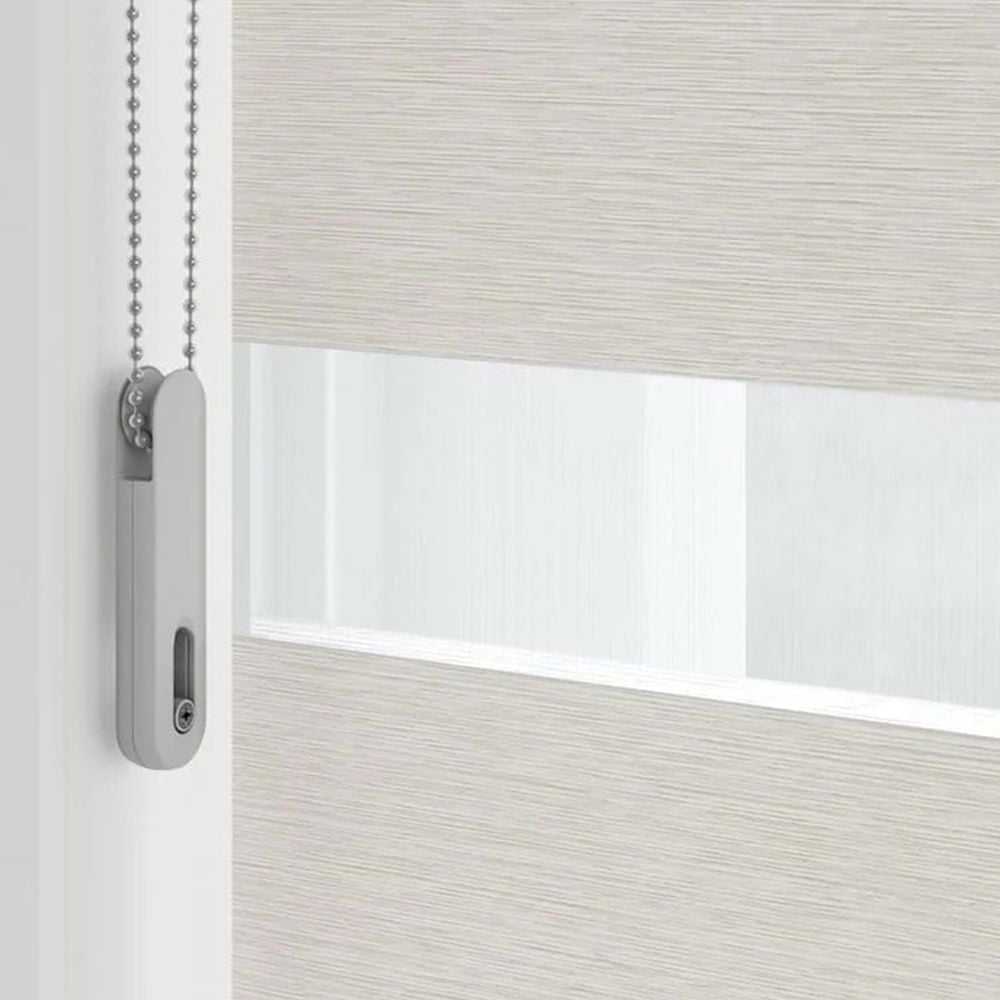
Lift Control Options - Continuous Cord Loop
Shade operates with continuous cord loop (shown) or upgrade to cordless lift or motorized control.
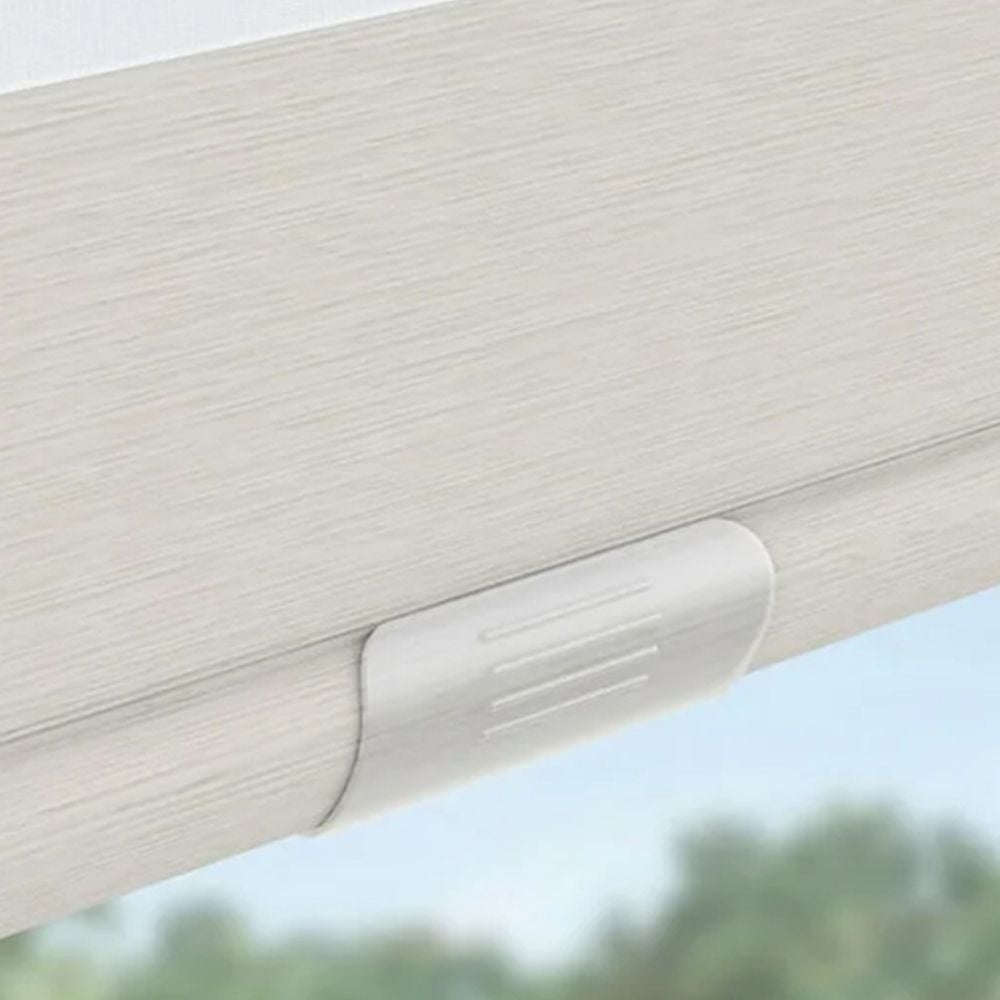
Lift Control Options - PerfectPlacement™ Cordless System
Available easy-to-use PerfectPlacement™ cordless system – the shade smoothly adjusts with a simple push or pull on the bottom rail
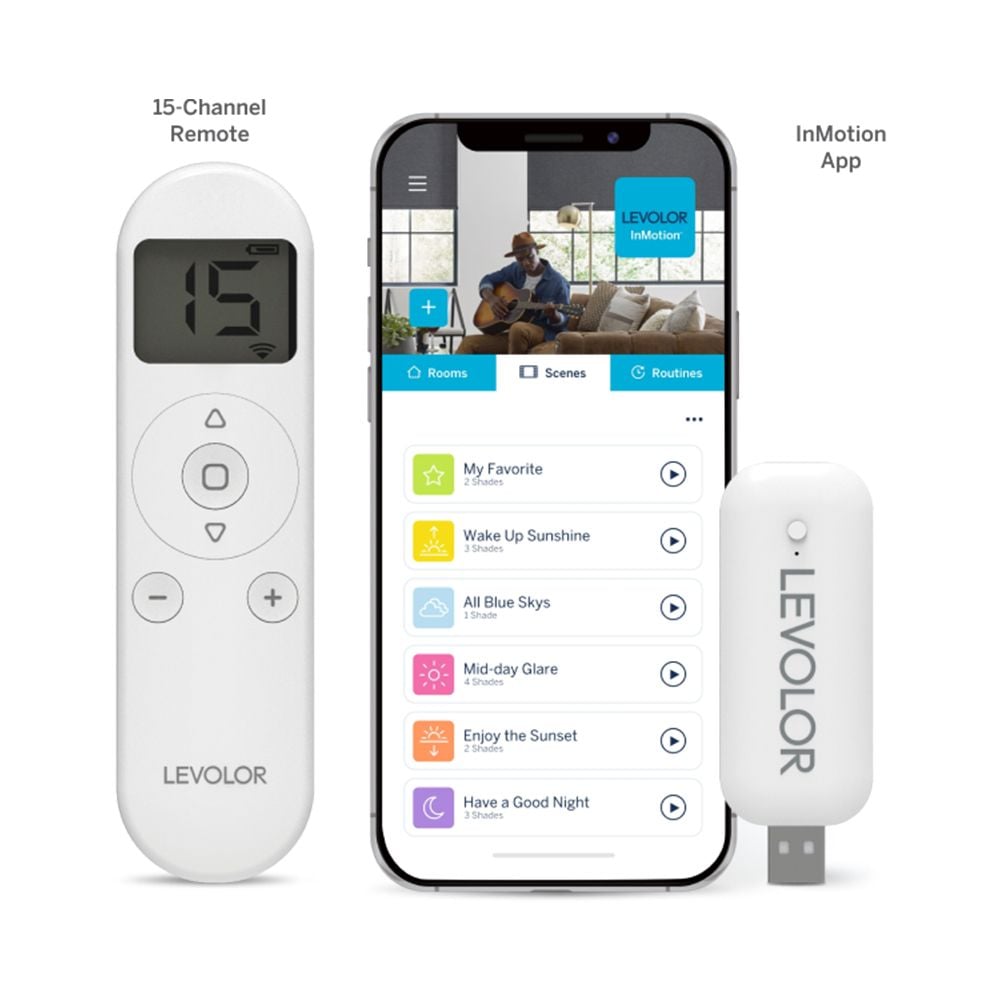
Lift Control Options - Motorized Lift
Upgrade to motorized lift for effortless control of multiple shades at once with remote control or add the hub to connect to home automation systems.
Specifications & Restrictions
- Width
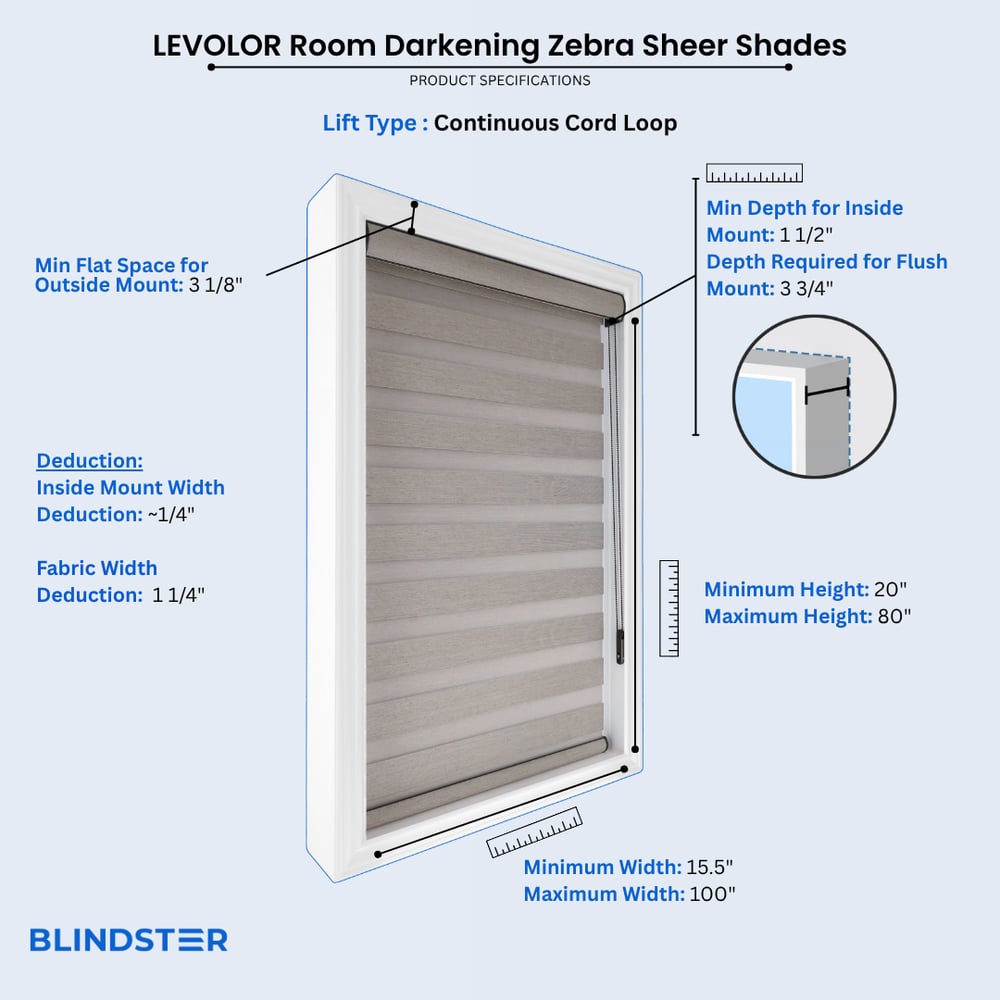
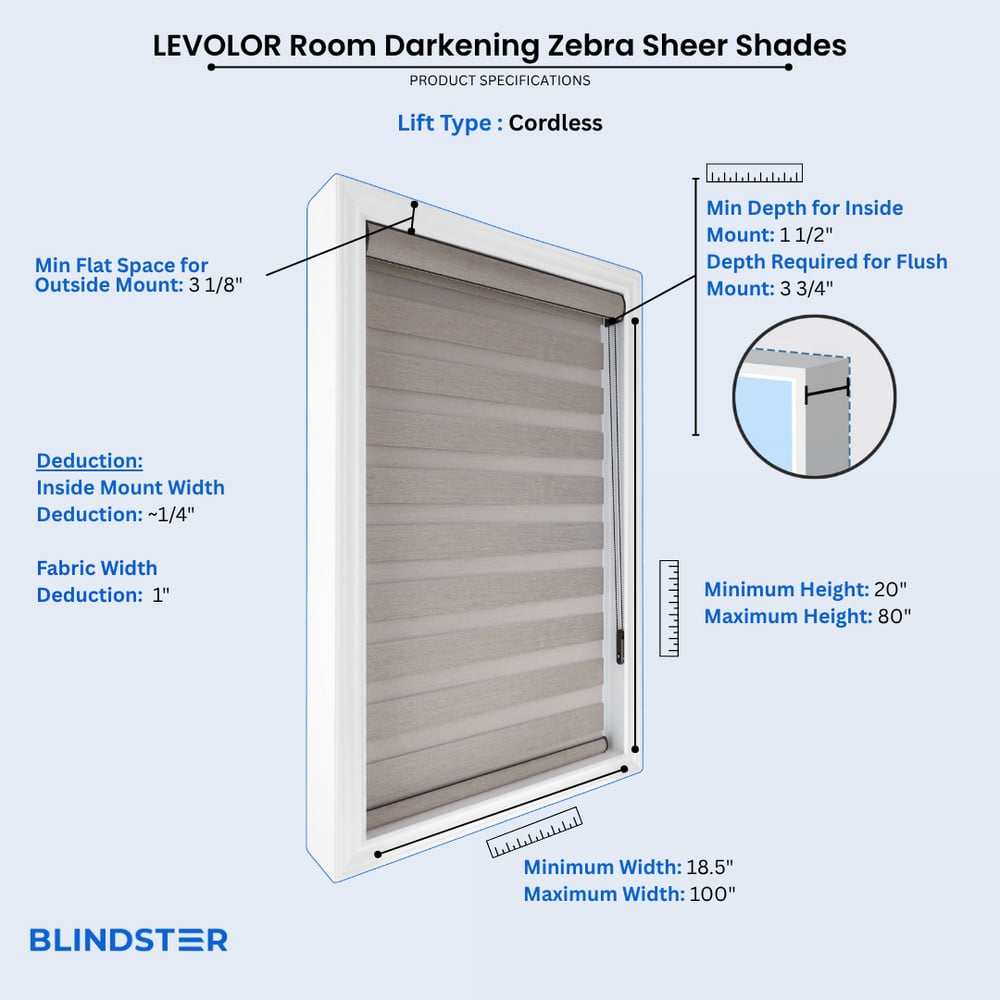
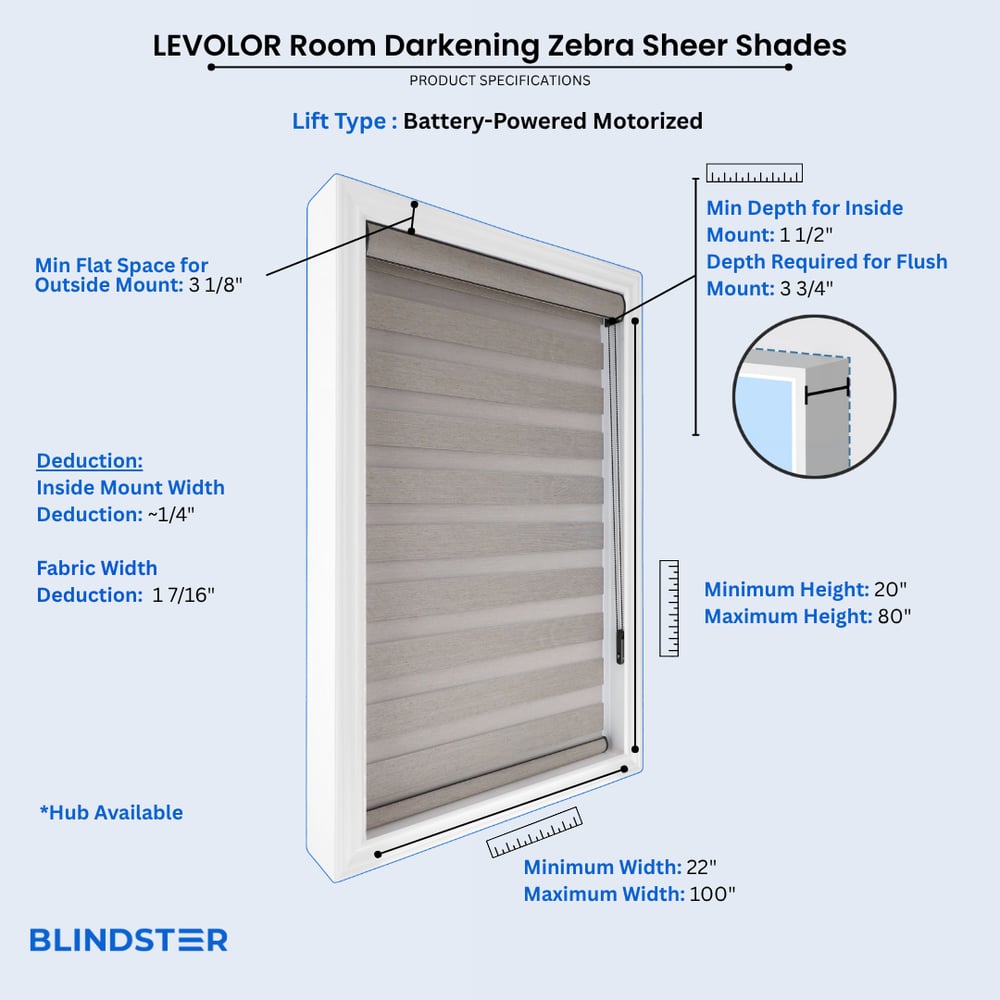
- 15 1/2" – 100"
- Height
- 20" – 80"
- Min Depth for Inside Mount
1½ inches
- Depth required for flush mount
3 ¾ inches
- Min Flat Space For Outside Mount
3 1/8 inches
- Curved Cassette Dimensions
3 1/8 inches (height) x 3 ¾ inches (depth)
- Inside Mount Width Deduction
¼ inch
- Fabric Width Deduction
1 ¼ inches (Cordloop); 1 inch (Cordless); 1 7/16 inches (Motorized)
- Fabric-Wrapped Bottom Rail
1 5/8 inches (high) x 1 ¼ inches (deep)
- 15 channel remote control required to operate motorized shades
Remote will only operate LEVOLOR motorized shades; other Blindster remotes will not operate the shades
- REMOTE CONTROL RANGE
98 feet
- EASY RECHARGEABLE FEATURE
Powered by an integrated, rechargeable lithium-ion battery
- CHARGER REQUIRED TO OPERATE MOTORIZED SHADES
At least 1 charger needs to be ordered
*Recharge time on a shade is 5 hours, chargers are not meant to be plugged into the shade long term.
- HUB OFFERED FOR MOTORIZED SHADES
Optional hub syncs to Wi-Fi to enable app control and smart home integration
*Connects up to 30 shades
Restrictions
- When ordering a hub, at least one remote must be ordered as well
- Shades shorter than 32" requires a metal chain
- Florence fabrics have a maximum width of 92" and a maximum height of 70"
How to Measure
How to Measure: Inside Mount
Let's make sure an inside mount will work for your window! Using a metal tape measure, first check if you have sufficient depth:
- Measure inside the window opening from the back of the window to the front of the opening where the shade would mount. To mount the brackets, the depth at the top of the window must be at least 1 1/2". To have a flush mount (meaning the shade is fully recessed in the window opening) the depth must be at least 3 3/4". If your depth is not sufficient for mounting the brackets, please see our outside mount instructions or consider a different product.
How to Measure:
Let's start with the Width:
- Measure inside of the window opening/frame from left to right at the top of the opening to the nearest 1/8". If rounding is necessary, round down to the nearest 1/8". That is your ordering width.
Now, let's do the Height:
- Measure the inside of the window opening/frame from the top of the opening to the bottom of the opening/sill to the nearest 1/8" in three places: on the left-hand side, the middle, and on the right-hand side. Write down all 3 measurements and circle the tallest. That is your ordering height.
Note: Always provide us with the actual measurement of the window opening. We will make the necessary deduction of approximately 1/4" to the width of the top of the shade to accommodate the installation brackets.
The fabric portion of the shade will be approximately 1" to 1 7/16" narrower than the ordered width (up to 3/4" gap on each side between the window opening and the edge of the fabric) depending on the lift option. When maximum light blocking is needed, consider an outside mount or an alternate product.
No deductions will be made to the ordered height.
How to Measure: Outside Mount
Before you start measuring, decide where above your window opening you want to mount your shade. You will need at least 3 1/8" of flat vertical space above the window to mount the brackets. Follow the directions below for where you'd like to install your shade.
If you do not have sufficient vertical space for mounting the brackets, please see our inside mount instructions or consider a different product.
Your ordered width will be the width of the cassette at the top of the shade. The fabric portion of the shade will be approximately 1" to 1 7/16" narrower than the ordered width (up to 3/4" on each side) depending on the lift option. If you wish to have the fabric cover a specific width, we recommend ordering slightly wider – just ensure that you have enough horizontal space to mount the shade.
Width:
- Looking at your window and surrounding wall, decide what area you would like to cover. We recommend the shade extends about 2-3" on each side of the window opening for the best light control and appearance.
- Using a metal tape measure, measure from left to right including your desired extra space on each side of the window—that is your ordering width.
Height:
- Consider how far above the window you would like to install your shade but at least starting with the minimum vertical space referenced above. Since the shade spools onto the roll, it does not need to be installed high above the window to have the shade fabric fully clear the window.
- Measure from the top of where you will mount the shade on the wall down to where you want the bottom of the shade to be, using the same extra space below your window opening as you used above; if you have a protruding windowsill, measure down to the top of the sill. That is your ordering height.
Width:
- Looking at your window and surrounding wall, decide what area you would like to cover. We recommend the shade extends about 2-3" on either side of the window opening for the best light control and appearance.
- Using a metal tape measure, measure from left to right including any desired extra space on each side of the window—that is your ordering width.
Height:
- Consider how far above the window you would like to install your shade but at least starting with the minimum vertical space referenced above. Since the shade spools onto the roll, it does not need to be installed high above the window to have the shade fabric fully clear the window.
- Measure from the top of where you will mount the shade on the wall down to where you want the bottom of the shade to be, using the same extra space below your window opening as you used above, or to the bottom edge of the trim if you prefer; if you have a protruding windowsill, measure down to the top of the sill. That is your ordering height.
Note: The shade fabric may rub against the trim when operating. If your trim is more than 1/2" thick, consider adding shims (not included) under the brackets for additional clearance.
Width:
- We don't normally recommend mounting zebra dual shades directly on the trim unless your window configuration doesn't allow for other placements. Your ordered width will be the width of the cassette at the top of the shade. However, the fabric portion of roller shades is always narrower than the ordered width, and will not extend to the edges of the trim. Conversely, having the width of the fabric equal the width of your window trim will mean the top of the shade will extend beyond the width of the window trim.
- Confirm that the height of your trim is at least the minimum height required for installing the mounting brackets. At the top of your window, use a steel measuring tape and measure from outer edge to outer edge of the trim. That is your ordering width.
- Note that the fabric portion of the shade will be narrower than your ordered width.
Height:
- Measure from the top of your trim to the bottom of your trim or to the top of the windowsill if you have a protruding sill. That is your ordering height.
This shade is not suitable for installing on a door. The motion could cause the fabric to shift and telescope off the tube which will result in the material fraying on the edges.
How to Install
How to Install: Inside Mount
Let's make sure you have what you need!
What came with your blinds?
- Mounting brackets*
- 1 ½" Screws (two per bracket)
- Screws for Tension Device (if Continuous Chain Operation ordered)
- Remote Control Kit (if ordered)
What else will you need in order to complete the installation?
- Rechargeable drill (use 3/32" drill bit to predrill screw holes & use ¼" drill bit for wall anchors, if needed)
- ¼" hex driver
- Phillips screwdriver
- Pencil
- Tape measure
- Ladder
*Quantity will vary depending on width.
Download the PDF below for a complete step by step guide on how to install your inside mount blinds and for more information on how many brackets are required for your order.
How to Install: Outside Mount
Let's make sure you have what you need!
What came with your blinds?
- Mounting brackets*
- 1 ½" Screws (two per bracket)
- Extension Brackets (if ordered)
- Spacer Blocks (if ordered)
- Screws for Tension Device (if Continuous Chain Operation ordered)
- 6 Channel Remote Control (if ordered)
What else will you need in order to complete the installation?
- Rechargeable drill (use 3/32" drill bit to predrill screw holes & use ¼" drill bit for wall anchors, if needed)
- Phillips screwdriver
- Pencil
- Tape measure
- Ladder
*Quantity will vary depending on width.
Download the PDF below for a complete step by step guide on how to install your outside mount blinds and for more information on how many brackets are required for your order.
Videos
Introduction to LEVOLOR Banded Shades
How to Measure for LEVOLOR Inside Mount Blinds and Shades
How to Measure for LEVOLOR Outside Mount Blinds and Shades
LEVOLOR Motorized Banded Shades
Reviews
4.7
Based on 3 reviews
Natalie
I'm loving my Levolor Room Darkening Zebra Sheer Shades! They let in just the right amount of light while still giving me privacy, and they look great in the room.
Natalie
I'm loving my Levolor Room Darkening Zebra Sheer Shades! They let in just the right amount of light while still giving me privacy, and they look great in the room.