


Faux Wood Plantation Shutters
SKU: BLN-PFWS-CB
Made to order, ships in 4–6 business days. Once shipped, delivery typically takes 5 business days, depending on your location.
Designed for do-it-yourselfers, our faux wood window solutions offer the look of real wood with greater durability and easier installation. Each piece is custom-made to order and typically ships in about two weeks, which is less than half the time of most traditional wood options.
- Easy To Self-Install
- 2 1/2" or 3 1/2" Louver Size
- Hidden Tilt Option
Color: Cotton
3 colors available
$ - Essential
Size: 24" W × 36" H
Measurements to the nearest 1/8 inch.
Fit or Free Guarantee. If for any reason your window coverings don't fit, even if you make a mistake in measuring, we'll remake them in the size you need free of charge. More details about the Fit or Free Guarantee
Window Molding: Not selected
Protruding Sill: Not selected
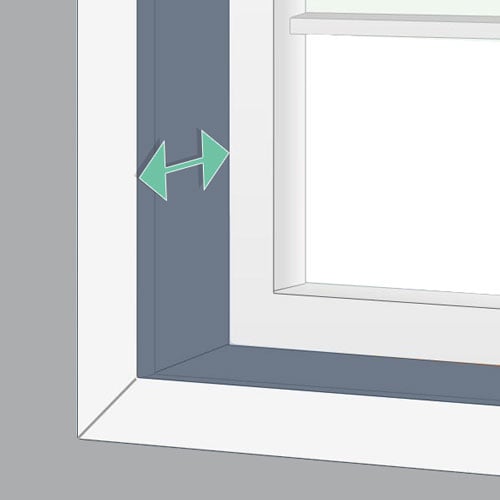
Window Opening Depth: Not selected
The measurement of the inside of your window frame. There are different depth requirements for each shutter mount/frame.
Mount Type and Frame Style: Not selected
Louver Size: Not selected
Panel Type: Not selected
Divider Rail: Not selected
Mount Location: Not selected
Tilt Bar Type: Not selected
Name your windowOptional
Installation help nearby
DIY Install is simple, but if you'd prefer help, enter your ZIP code to find available pros in your area.
- Fit or Free Guarantee
- 60-Day Satisfaction Guarantee
Product Information
If you can hang a blind, you can install our Faux Wood Plantation Shutters. Designed for the DIYer, they deliver the look of real wood with greater durability and easier installation. Each unit is hand-crafted to your specifications and typically ships in about two weeks. Traditional wood versions often take 8 to 12 weeks to produce.
Product highlights:
- Made from lead-free molded polyresin, which is extremely durable, waterproof, and scratch-resistant, with UV inhibitors to prevent fading
- Powder-coated stainless steel hinges that resist rust and scratches for long-term performance
- Superior insulation with a higher insulating value than typical blinds or shades
- Greenguard® Certified to support better indoor air quality
- Integrated panel locks provide a clean, secure closure without the risk of loosening like visible magnets
- Lightweight design makes installation easy for one person, unlike heavier wood alternatives
Great for:Living RoomBedroomOfficeKitchenDining RoomMedia RoomBathroomEntry WayUtility Room
- Water Resistant
- Child & Pet Safety
- Easy to Clean
- Privacy
- Eco-Friendly
Made to order, ships in 4–6 business days. Once shipped, delivery typically takes 5 business days, depending on your location.
Specifications & Restrictions
- Width
- 10" – 96"
- Height
- 18" – 90"
- Min flat space For Outside Mount L-Frame
1 3/8 inches
- Insulating/Energy Efficient
Insulating/Energy Efficient
- Min Depth For Inside Mount Z-Frame, 2 1/2" Louvers, Front Tilt
1 1/8 inches
- Min Depth For Inside Mount Z-Frame, 2 1/2" Louvers, Gear Tilt
1 1/4 inches
- Min Depth For Inside Mount Z-Frame, 3 1/2" Louvers, Front Tilt
1 5/8 inches
- Min Depth For Inside Mount Z-Frame, 3 1/2" Louvers, Gear Tilt
1 3/4 inches
- Min Depth For Inside Mount L-Frame, 2 1/2" Louvers, Front Tilt
2 1/8 inches
- Min Depth For Inside Mount L-Frame, 2 1/2" Louvers, Gear Tilt
2 1/8 inches
- Min Depth For Inside Mount L-Frame, 3 1/2" Louvers, Front Tilt
2 5/8 inches
- Min Depth For Inside Mount L-Frame, 3 1/2" Louvers, Gear Tilt
2 3/8 inches
- Min Depth For Outside Mount L-Frame, 2 1/2" Louvers, Front Tilt
0 inches
- Min Depth For Outside Mount L-Frame, 2 1/2" Louvers, Gear Tilt
1/8 inch
- Min Depth For Outside Mount L-Frame, 3 1/2" Louvers, Front Tilt
½ inch
- Min Depth For Outside Mount L-Frame, 3 1/2" Louvers, Gear Tilt
3/8 inch
- Inside Mount Width/Height Deduction
Approximately 1/8 - ¼ inch depending on frame style
Restrictions
- Our shutters are designed for square and rectangular windows only. We do not offer shutters for arched, curved, or specialty size windows.
- Divider rail required on all single and double panel shutters over 60" in height and four panel shutters over 50" in height
- Tilt in windows must have shutters installed as an Outside Mount
How to Measure
How to Measure: Inside Mount
4 min read
Please Note: Our shutters are designed for square and rectangular windows only. We do not offer shutters for arched, curved, or specialty size windows.
Let's make sure you have what you need!
- A metal tape measure
- Pen and paper to record all measurements
- Determine whether you will mount as an inside mount Z-Frame or an inside mount L-Frame based on the depth requirements and your window configuration.
- Z-Frame: Mounted inside the front edges of the window opening with a trim-cased window frame.
- Can be installed in windows with up to a ½" variance between your 3 width and 3 height measurements (see below).
- Have a protruding sill? This frame will have a flat bottom that rest on top of the sill for support.
- Depth requirements:
- 2 ½" Louvers with a Front Tilt: 1 1/8"
- 2 ½" Louvers with a Hidden Tilt: 1 5/8"
- 3 ½" Louvers with a Front Tilt: 1 5/8"
- 3 ½" Louvers with a Hidden Tilt: 2"
- L-Frame: Mounted inside the window opening, is fully recessed and flush with the wall.
- *Window frames that do not have equal measurements may create gaps between the shutter frame and the window opening. Caulk can be used to fill the gap.
- If the variance between your 3 width and/or height measurements is more than ½", we recommend an outside mount L-Frame.
- Depth requirements:
- 2 ½" Louvers with a Front Tilt: 2 1/8"
- 2 ½" Louvers with a Hidden Tilt: 2 5/8"
- 3 ½" Louvers with a Front Tilt: 2 5/8"
- 3 ½" Louvers with a Hidden Tilt: 3"
- Z-Frame: Mounted inside the front edges of the window opening with a trim-cased window frame.
How to Measure:
Let's start with the Width:
- Inside of the window opening/frame measure from left to right at the top of the opening, the middle of the opening, and then the bottom of the opening. Write down all 3 measurements and circle the narrowest. If rounding is necessary, round down to the nearest 1/8”. That is your ordering width.
Now, let's do the Height:
- Inside of the window opening/frame measure from the top of the opening to the bottom of the opening/sill on the left-hand side, the middle, and on the right-hand side. Write down all 3 measurements and circle the smallest. If rounding is necessary, round down to the nearest 1/8". That is your ordering height.
Note: You are ordering the exact window opening size, not the size of the shutter to the nearest 1/8". The factory will make a deduction to your Width or Height to ensure your shutter will fit your opening.
How to Measure: Outside Mount
4 min read
Please Note: Our shutters are designed for square and rectangular windows only. We do not offer shutters for arched, curved, or specialty size windows.
Let's make sure you have what you need!
- A metal tape measure
- Pen and paper to record all measurements
- Check if you have sufficient flat space and depth: This outside mount L-Frame requires 1 3/8" of flat space around the window. If you plan to mount this frame onto existing molding or trim, that space must also be at least 1 3/8" wide.
- L-Frame: Mounted outside the window opening onto an existing wall, door, molding, or trim.
- Depth requirements:
- 2 ½" Louvers with a Front Tilt: 0"
- 2 ½" Louvers with a Hidden Tilt: ½"
- 3 ½" Louvers with a Front Tilt: ½"
- 3 ½" Louvers with a Hidden Tilt: 1"
- Depth requirements:
- L-Frame: Mounted outside the window opening onto an existing wall, door, molding, or trim.
How to Measure:
Let's start with the Width:
- If you are mounting the frames onto existing molding or trim, measure from the outside edges of the molding left to right at the top of the opening, the middle of the opening, and then the bottom of the opening. Write down all 3 measurements and circle the largest. If rounding is necessary, round down to the nearest 1/8”. That is your ordering width.
- If you are not mounting on existing molding or trim, measure from left to right at the top of the opening, the middle of the opening, and then the bottom of the opening. Write down all 3 measurements and circle the largest. Add at least 3" to the largest width measurement (the one you circled). That is your ordering width.
Now, let's do the Height:
- Follow the instructions for the configuration that applies to you:
- YES to molding/trim, YES to a protruding windowsill:
- Measure from the top of the sill to the outside edge of the trim above the window opening on the left-hand side, the middle, and on the right-hand side. Write down all 3 measurements and circle the tallest. That is your ordering height.
- NO to molding/trim, YES to a protruding windowsill:
- Measure from the top of the sill to the top of the window opening on the left-hand side, the middle, and on the right-hand side. Write down all 3 measurements and circle the tallest. Add at least 1 ½" to your tallest measurement (the one you circled). That is your ordering height.
- NO to molding/trim, NO to a protruding windowsill:
- Measure the height of the window opening on the left-hand side, the middle, and on the right-hand side. Write down all 3 measurements and circle the tallest. Add at least 3" to your tallest measurement (the one you circled). If rounding is necessary, round up to the nearest 1/8". That is your ordering height.
- YES to molding/trim, NO to a protruding windowsill:
- Measure the height of the window frame including trim, from outside edge to outside edge on the left-hand side, the middle, and on the right-hand side. Write down all 3 measurements and circle the tallest. If rounding is necessary, round up to the nearest 1/8". That is your ordering height.
- YES to molding/trim, YES to a protruding windowsill:
Note: The factory will make the exact sizes you specify, including the frames from outside edge to outside edge. They will not make any deductions to your Width or Height.
How to Install
How to Install Shutters
2 min read
Let's make sure you have what you need!
What else will you need in order to complete the installation?
- Variable speed drill
- Slotted screwdriver
- Non marring hammer
- Level
- Pencil
- Tape measure
- Ladder
Can be purchased locally
- 3" Robertson bits #0, #1 and #2
- Caulk or sealant for both mitered corners and to cover gaps between the frames and window jambs
Download the PDF below for a complete step by step guide on how to install your new shutters.
How to Install Shutters
2 min read
Let's make sure you have what you need!
What came with your shutters?
- Contact cement (outside mount L-frame only)
What else will you need in order to complete the installation?
- Variable speed drill
- Slotted screwdriver
- Non marring hammer
- Level
- Pencil
- Tape measure
- Ladder
Can be purchased locally
- 3" Robertson bits #0, #1 and #2
- Caulk or sealant for both mitered corners and to cover gaps between the frames and window jambs
Download the PDF below for a complete step by step guide on how to install your new shutters.
Videos
Product Expert Review - Blindster Faux Wood Plantation Shutters
Faux Wood Plantation Shutters - Classic Style and Durability
How to Measure for Shutters
How to Install Inside Mount Z-Frame Faux Wood Shutters
How They're Made - Faux Wood Shutters
Reviews
4.9
Based on 482 reviews
Holli
I am so happy with our purchase. I only bought 2 sets for our spare room to try them out. Very happy with the quality and very easy to install. Can’t wait to buy more for the rest of the house!
Kristine
Purchased Shutter while remodeling my master bath. Love the look and privacy of the shutter over the soaking tub. The shutter design is sleek and modern which matches the finishes used in the remodel.
Jim
The wood faux plantation shutters were a replacement for my original shutters. They are made slightly different than the first shutters. They are made to the exact measurements that I gave to the 1/8”. My original had some minor gap at the perimeter. The new shutters were made to the exact measurement so some tweaking was needed, but they look beautiful. Just what I wanted. Thank you Blindster!!
Raymond
The shutters were easy to install and look beautiful
Ronald
COLOR, TEXTURE, MEASUREMENTS, QUALITY WERE ALL PERFECT
Donald
Amazingly easy to install and a perfect fit!
Pamela
Easy to install, look great
Patricia
We love our shutters - they were a little difficult to install but turned out beautifully
Michael
I was pleased with the quality of the shutters and the ease of installation. The shipping/packing insured no damage to the product. Instructions for installation were easy to follow. Several questions that I asked prior to ordering were all answered and explained by the customer service rep. Very satisfied with the product as I was in the past when ordering remote controlled blinds
Peter
Blindster is Great! Measuring was easy, ordering was a snap. Delivery was quick, packed incredibly safe to resist damage. Installation was straight forward and easy. Best of all the Plantation Blinds look amazing