


Motorized Premium Soft Fold Roman Shades
SKU: MPSFRS
Made to order, ships in 4–6 business days. Once shipped, delivery typically takes a few days, depending on your location.
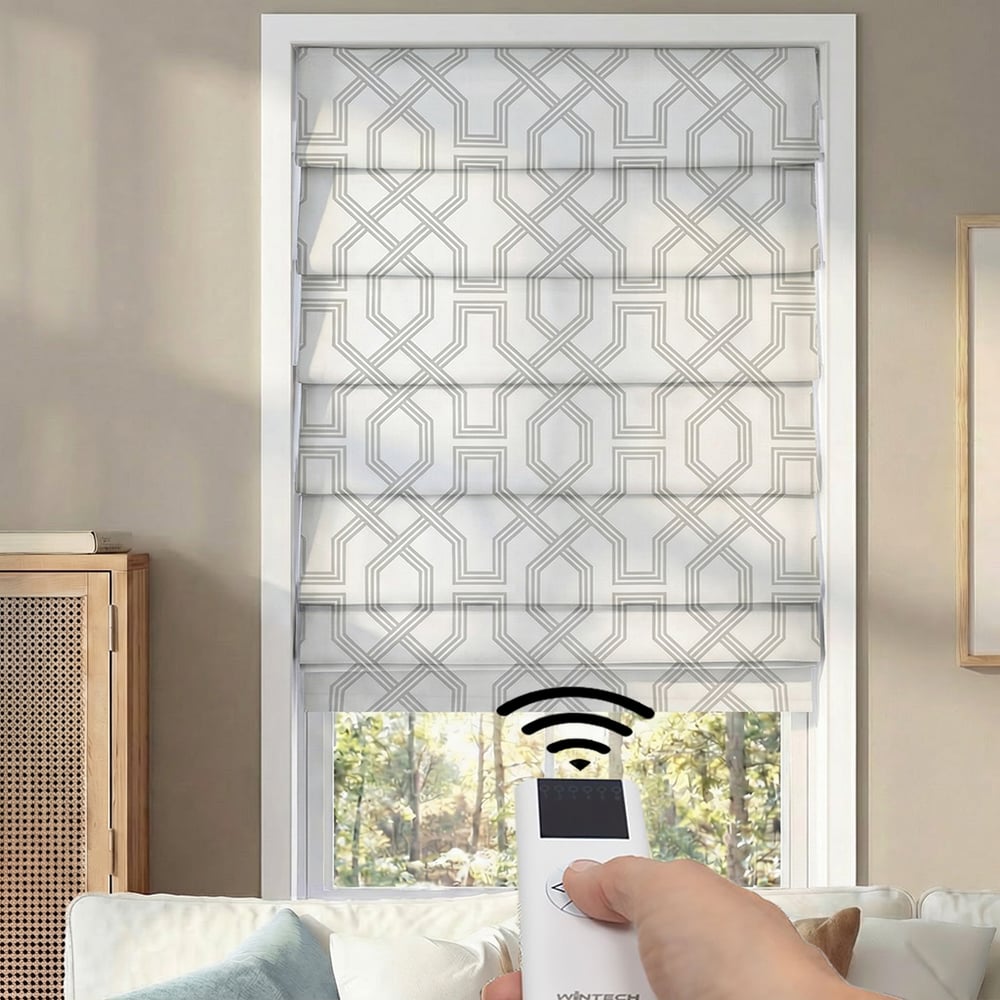
The beauty of cascading folds of fabric combines perfectly with the convenience of motorized operation in our Motorized Premium Soft Fold Roman Shades. This all-inclusive shade has motorized lift built right into the headrail for easy remote-control operation, plus the handcrafted elegance of a tailored roman shade with included liner. Add lasting comfort, elegance, and motorized convenience to your home!
- Soft, Cascading Folds
- Optional Liners
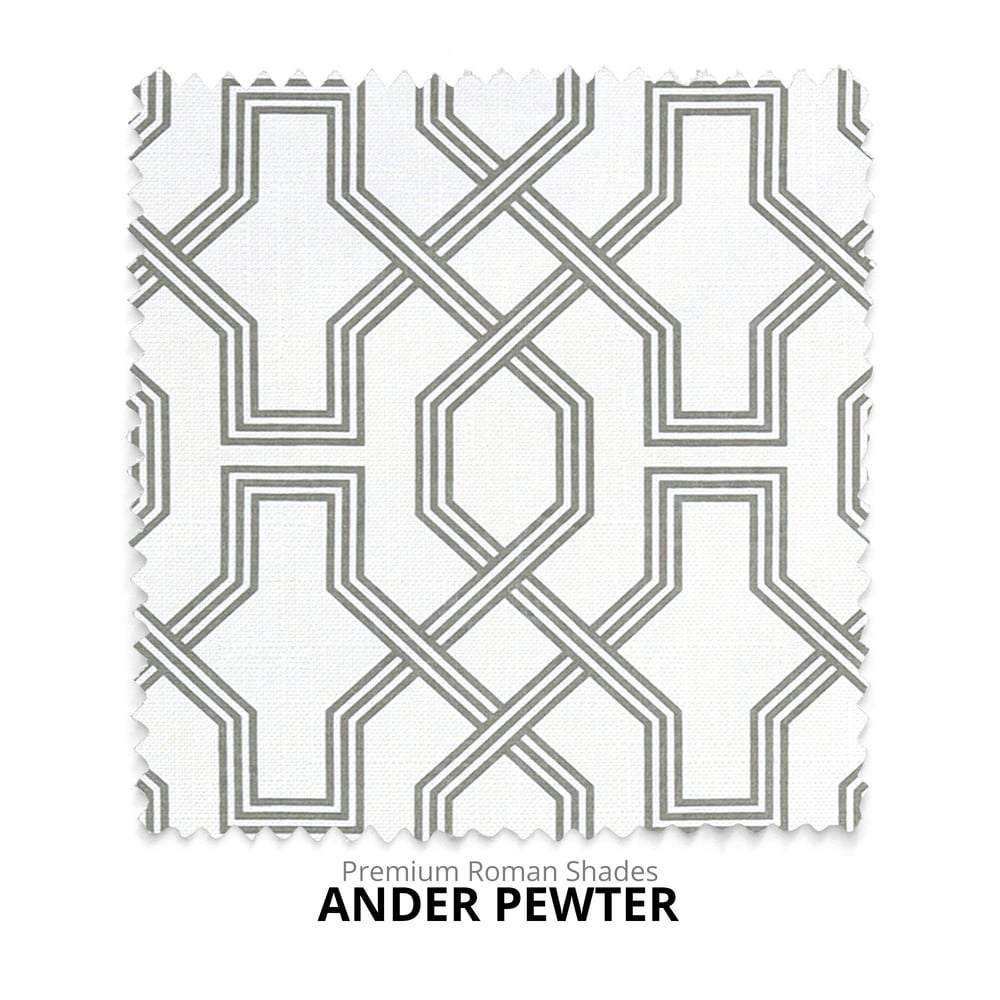
Color: Ander Pewter
103 colors available · Fabric: 100% cotton
$ - Essential
$$ - Classic
$$$ - Premier
$$$$ - Exclusive
Mount: Not selected
Size: 24" W × 36" H
Measurements to the nearest 1/8 inch.
Fit or Free Guarantee. If for any reason your window coverings don't fit, even if you make a mistake in measuring, we'll remake them in the size you need free of charge. More details about the Fit or Free Guarantee
Liner Type: Not selected
Name your windowOptional
Installation help nearby
DIY Install is simple, but if you'd prefer help, enter your ZIP code to find available pros in your area.
- Fit or Free Guarantee
- Free Shipping
- 60-Day Satisfaction Guarantee
Product Information
Enjoy controlling your shades with the push of a button with our Motorized Premium Soft Fold Roman Shades! With the 6-channel remote, you can operate individual shades or group shades together for simultaneous raising or lowering. You'll love the effortless control, especially for tall or hard-to-reach windows. Whether you're going for an upscale, luxurious look or casual comfort, our Premium Soft Fold Roman Shades are the answer for both. This style is sometimes referred to as "hobbled" roman shades due to the way the fabric hangs in gentle loops of fabric on the front of the shade. You'll love the look of these custom workroom shades with motorized operation, all at a DIY-friendly price!
Get to know this shade:
- Motorized lift features long-lasting rechargeable battery and easy remote-control operation
- At least one remote control must be ordered to operate shades
- One charging cord is included per order
- Fabric panels cascade in soft folds at 6" intervals when the shade is lowered
- Shades are hand-sewn and assembled to your customized choices for size and liner type
- Standard backing liner hangs flat to provide a clean, neutral appearance from outside
Why you'll love this shade:
- Sleek motorized operation raises and lowers shades effortlessly via remote control
- Rechargeable battery lasts for months between charges with typical daily use
- With a wide range of fabric options choose from, you'll be sure to find the color and design perfect for your decor
- Fabric folds create a textured look in the window and create a calming softness within the room
- A white light filtering liner is included standard on the back of the shade, or upgrade to the blackout liner for more complete light blocking
- Conforms with CPSC child safety regulations
Key considerations:
- Large patterned fabrics will appear slightly interrupted by the fabric folds/seam
- For smaller patterns, including diamonds and other geometric designs, we suggest our Flat Fold Deluxe Roman Shade with no seams for uninterrupted patterns
- Due to the handmade stitching of the fabrics, small threads may be visible and can be trimmed at the customer's discretion.
- A single remote control can operate multiple shades – you can have one remote for all the shades in your home, or use a different remote for each room
Great for:Living RoomBedroomOfficeKitchenDining RoomMedia RoomBathroomRvEntry WayUtility Room
- Privacy
- Insulating/Energy Efficient
- Child & Pet Safety
Made to order, ships in 4–6 business days. Once shipped, delivery typically takes a few days, depending on your location.
Specifications & Restrictions
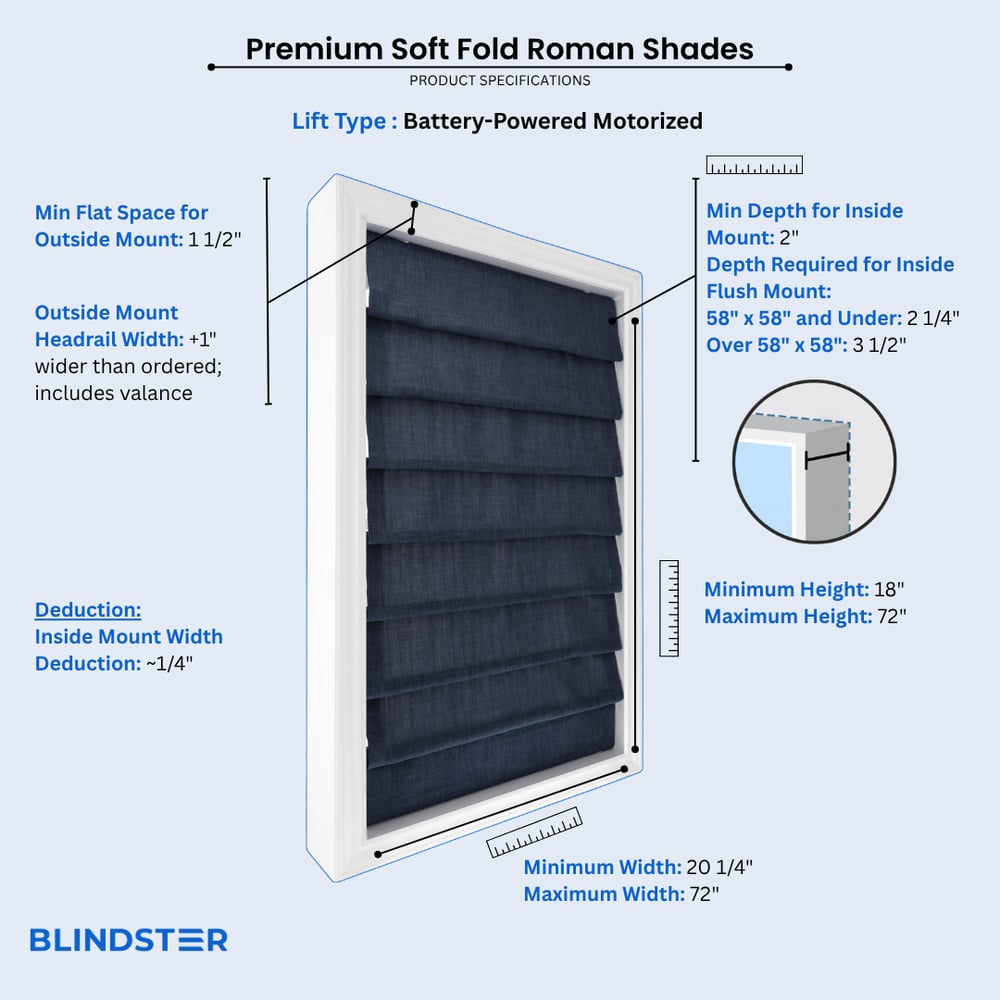
- Width
- 20 1/4" – 72"
- Height
- 18" – 72"
- Vertical Seams
Shades wider than 48" may have vertical seams
- Min depth for inside mount
2 inches
- Min depth for inside flush mount
2 ¼ inches (58 x 58" and under); 3 ½ inches (over 58 x 58")
- Inside Mount Width Deduction
Approximately ¼ inch
- Outside Mount headrail width
+1 inch wider than width ordered; will also include valance
- Min flat space for outside mount
1 ½ inches
- 6 CHANNEL REMOTE CONTROL REQUIRED TO OPERATE MOTORIZED SHADES
Remotes from other companies will not operate Blindster shades
- ALL SHADES ARE PRE-PROGRAMMED AT THE FACTORY TO OPERATE ON CHANNEL 6
Each remote can be programmed to control up to 6 shades
- REMOTE CONTROL RANGE
65 feet
- EASY RECHARGEABLE FEATURE
Battery wand is integrated into the shade's tube of all motorized shades
- CHARGER INCLUDED FOR MOTORIZED SHADES
1 Charger per order included
*Recharge time on a shade is 5 hours, chargers are not meant to be plugged into the shade long term.
- Bottom Pleat Variance
The bottom pleat (distance between the bottom hem of the shade up to the first “O” ring) will vary from 2" to 7 7/8"
Restrictions
- Only shades ordered at the same height can be guaranteed to have matching folds.
- Only outside mount motorized shades will have a valance. The valance will be 1" wider than the width ordered.
- Due to the handmade stitching of the fabrics, small threads may be visible and can be trimmed at the customer's discretion.
How to Measure
How to Measure: Inside Mount
3 min read
Let's make sure an inside mount will work for your window! Using a metal tape measure, first check if you have sufficient depth:
- Measure inside the window opening from the back of the window to the front of the opening where the shade would mount. The depth at the top of the window must be at least 2" to mount the brackets.
- To have a flush mount (meaning the shade is fully recessed in the window opening) the depth must be at least 2 1/4" on motorized shades 58" x 58" and under, or 3 ½" for motorized shades larger than 58" x 58".
- If your depth is not sufficient for mounting the brackets, please see our outside mount instructions or consider a different product.
How to Measure:
Let's start with the Width:
- Measure inside of the window opening/frame from left to right to the nearest 1/8" at three places: at the top of the opening, the middle of the opening, and then the bottom of the opening. Write down all 3 measurements and circle the narrowest. If rounding is necessary, round down to the nearest 1/8". That is your ordering width.
Now, let's do the Height:
- Measure the inside of the window opening/frame from the top of the opening to the bottom of the opening/sill to the nearest 1/8" in three places: on the left-hand side, the middle, and on the right-hand side. Write down all 3 measurements and circle the tallest. That is your ordering height. Please note that when ordering multiple shades for the same room, shades with different heights may have a different number of pleats.
Note: Always provide us with the actual measurement of the window opening. We will make the necessary deduction of approximately 1/4" to your shade's width to allow room for installation and for proper movement of the shade within the window opening. No deductions will be made to your height.
How to Measure: Outside Mount
3 min read
Before you start measuring, decide where above your window opening you want to mount your shade. You will need at least 1 1/2" of flat vertical space above the window to mount the brackets. The shade can be installed directly above the window opening, or higher up to give the appearance of a larger window and to have more clear space in the window when the shade is raised.
If you have trim around the window, you can mount the shade above the trim, directly on the trim (if you have the required minimum flat space for the brackets), or to the sides of the trim if you do not enough mounting space above the window or on the trim itself. See the directions below for how you'd like to install your shade.
If you do not have sufficient vertical space for mounting the brackets, please see our inside mount instructions or consider a different product.
Width:
- Looking at your window and surrounding wall, decide what area you would like to cover. We recommend the shade extends about 2" on each side of the window opening for the best light control and appearance.
- Using a metal tape measure, measure from left to right including your desired extra space on each side of the window—that is your ordering width. Note that outside mount shades include a valance which will extend 1/2" beyond your ordered width on each side of shade.
Height:
- Consider how far above the window you would like to install your shade but at least starting with the minimum vertical space referenced above. The shade can be positioned higher up to give the appearance of a larger window and to have more clear space in the window when the shade is raised.
- Measure from the top of where you will mount the shade on the wall down to where you want the bottom of the shade to be, using the same extra space below your window opening as you used above; if you have a protruding windowsill, measure down to the top of the sill. That is your ordering height. Please note that when ordering multiple shades for the same room, shades with different heights may have a different number of pleats.
Width:
- Looking at your window and surrounding wall, decide what area you would like to cover. We recommend the shade extends about 2" on either side of the window opening for the best light control and appearance. You can also choose to have the shade the same width as your window trim.
- Using a metal tape measure, measure from left to right including any desired extra space on each side of the window—that is your ordering width. Note that outside mount shades include a valance which will extend 1/2" beyond your ordered width on each side of shade.
Height:
- Consider how far above the window you would like to install your shade but at least starting with the minimum vertical space referenced above. The shade can be positioned higher up to give the appearance of a larger window and to have more clear space in the window when the shade is raised.
- Measure from the top of where you will mount the shade on the wall down to where you want the bottom of the shade to be, using the same extra space below your window opening as you used above, or to the bottom edge of the trim if you prefer; if you have a protruding windowsill, measure down to the top of the sill. That is your ordering height. Please note that when ordering multiple shades for the same room, shades with different heights may have a different number of pleats.
Width:
- Confirm that the height of your trim is at least the minimum height required for installing the mounting brackets. At the top of your window, use a steel measuring tape and measure from outer edge to outer edge of the trim. That is your ordering width. Note that outside mount shades include a valance which will extend 1/2" beyond your ordered width on each side of shade.
Height:
- Measure from the top of your trim to the bottom of your trim or to the top of the windowsill if you have a protruding sill. That is your ordering height. Please note that when ordering multiple shades for the same room, shades with different heights may have a different number of pleats.
Width:
- Using a metal tape measure, measure left to right from the outside edge of the trim piece that goes around the glass to the other outside edge. That is your ordering width. However, if you have space, it is best to order the shade about 2" wider for better light control. Note that outside mount shades include a valance which will extend 1/2" beyond your ordered width on each side of shade.
Height:
- Consider how far above the window trim piece you would like to install your shade but at least starting with the minimum vertical space referenced above. Measure down to where you want the bottom of the shade to be, using the same extra space below the window trim piece as you used above. That is your ordering height. Please note that when ordering multiple shades for the same room, shades with different heights may have a different number of pleats.
How to Install
How to Install: Inside Mount
2 min read
Let's make sure you have what you need!
What came with your blinds?
- #8 hex head wood screws
- Motorization lift supplies*
What else will you need in order to complete the installation?
- Rechargeable drill with ¼" hex bit
- Phillips screwdriver
- Pencil
- Tape measure
- Ladder
*If applicable to your order.
Download the PDF below for a complete step by step guide on how to install your inside mount blinds based on the lift type ordered.
How to Install: Outside Mount
4 min read
Let's make sure you have what you need!
What came with your blinds?
- Installation brackets
- #8 hex head wood screws (one per bracket mounting hole)
- Motorization lift supplies
What else will you need in order to complete the installation?
- Rechargeable drill with ¼" hex bit
- Phillips screwdriver
- Pencil
- Tape measure
- Ladder
*If applicable to your order.
Download the PDF below for a complete step by step guide on how to install your outside mount blinds based on the lift type ordered and for more information on how many brackets are required for your order.
Videos
Roman Shades - Hand-Crafted Elegance
How to Measure for Inside Mount
How to Measure for Outside Mount
How to Install Roman Shades
How They're Made - Roman Shades
Reviews
4.7
Based on 3 reviews
Lisa
I took a chance on line ordering my Roman shades. I felt comfortable because the company was in USA and family owned. All went well my shades arrived quickly and they look great.
Gina
Upgraded my windows with these motorized roman shades, and I’m loving the look and feel.