


Premium Flat Fold Roman Shades
SKU: BLN-PFFRS
Made to order, ships in 4–6 business days. Once shipped, delivery typically takes 5 business days, depending on your location.
Make a statement with our Premium Flat Fold Roman Shades! The front of this workroom designer shade has no visible seams. This shade style is particularly suited to fabrics with patterns and large prints since the fabric design won't be interrupted by any horizontal seams. See for yourself!
- Flat, Seamless Folds
- Optional Liners
Color: Antelope Port
44 colors available · Fabric: 100% cotton
$ - Essential
$$ - Classic
$$$ - Premier
$$$$ - Exclusive
Mount: Not selected
Size: 24" W × 36" H
Measurements to the nearest 1/8 inch.
Fit or Free Guarantee. If for any reason your window coverings don't fit, even if you make a mistake in measuring, we'll remake them in the size you need free of charge. More details about the Fit or Free Guarantee
Liner Type: Not selected
Name your windowOptional
Installation help nearby
DIY Install is simple, but if you'd prefer help, enter your ZIP code to find available pros in your area.
- Fit or Free Guarantee
- Free Shipping
- 60-Day Satisfaction Guarantee
Product Information
Our flat fold roman shade is seamlessly hand crafted to your specifications...and we do mean seamless. This roman shade has no seams down the length of the shade! It hangs straight when lowered, and stacks into elegant folds when raised. Since there are no seams, fabrics with patterns and larger designs can be showcased without interruption. You'll love the look and the craftsmanship of these designer workroom shades. You can also customize your new shade with your choice of lift options, starting with the standard cordless lift option for easy cord-free operation – or upgrade to motorized for extra convenience!
Get to know this shade:
- Premium fabrics hand sewn into gorgeous flat front shades
- Shade stacks into soft folds when raised
- Choose your fabric, color, lift system, and liner option for a customized look all your own
Why you'll love this shade:
- Beauty and function rolled into one – luxurious soft fabric like a drapery with the easy operation of a shade
- Customer favorite for the high designer look without high designer prices
- Every shade has a standard liner included, or blackout liner is also available; both are white to the street for a neutral appearance
- Wide selection of premium fabrics – choose elegant solids, subtle stripes or bolder patterns for a real statement
- Operate your shades with the push of a button by adding the motorized lift upgrade.
- Available motorized upgrade provides easy remote-control operation with a rechargeable motor inside the shade
- Meets all CPSC child safety guidelines
Be sure to note:
- The small tack stitches used to attach the cords and cord guides to the shade will be visible on the front of the shade
- Due to the handmade stitching of the fabrics, small threads may be visible and can be trimmed at the customer's discretion.
- Inner support rods on the back of the shade may be visible when the shade is backlit (not applicable to shades with blackout liner)
Great for:Living RoomBedroomOfficeKitchenDining RoomMedia RoomBathroomRvEntry WayUtility Room
- Insulating/Energy Efficient
- Privacy
Made to order, ships in 4–6 business days. Once shipped, delivery typically takes 5 business days, depending on your location.
Specifications & Restrictions
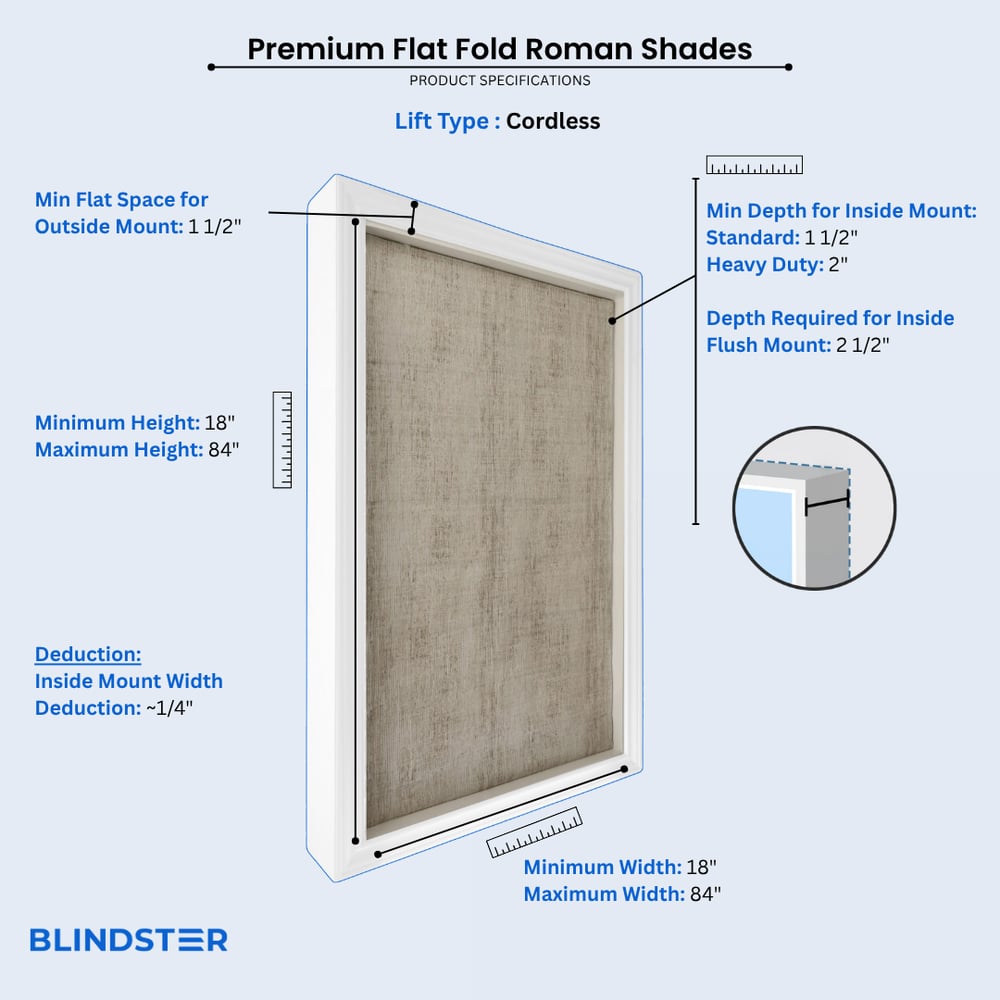
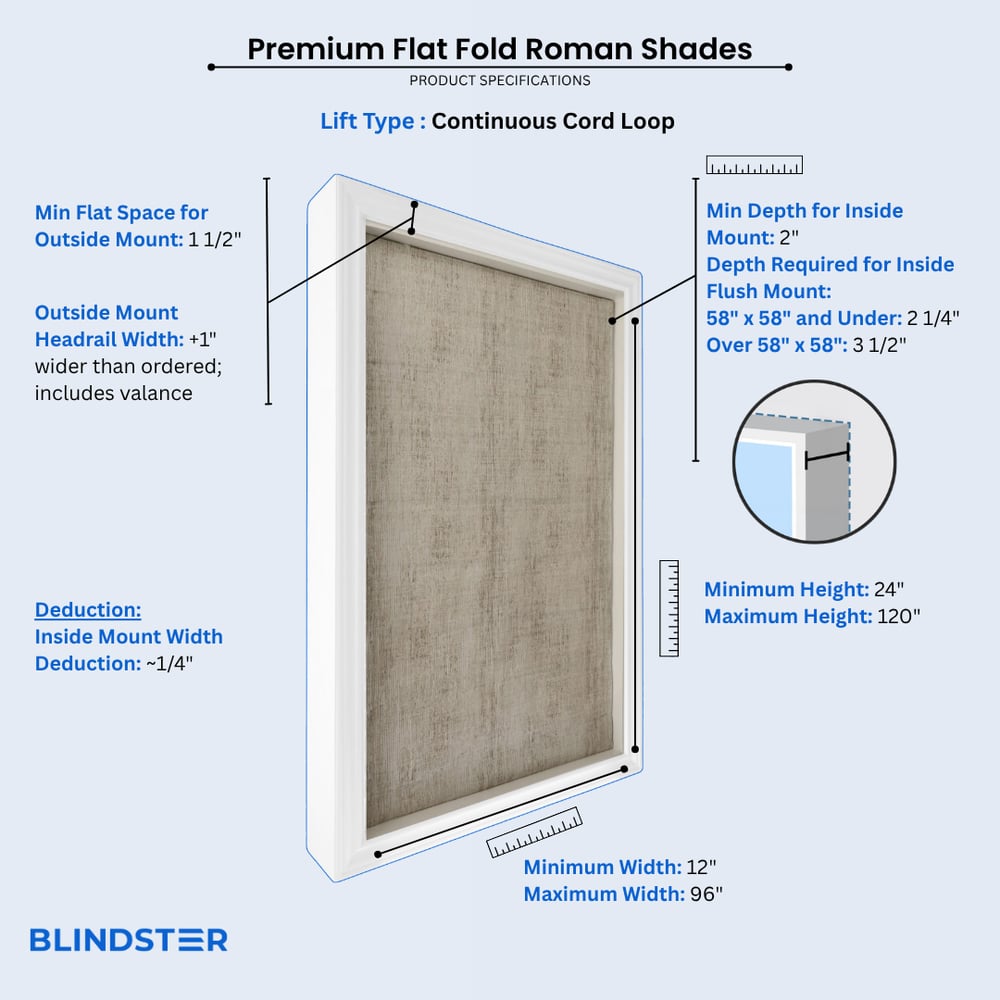
- Width
- 12" – 96"
- Height
- 18" – 120"
- Min flat space for outside mount
1 ½ inches
- Vertical Seams
Shades wider than 48" may have vertical seams
- Min depth for Inside Mount (Cordless Lift)
1 ½ inches
- Min depth for Inside Flush Mount (Cordless lift)
2 1/2 inches
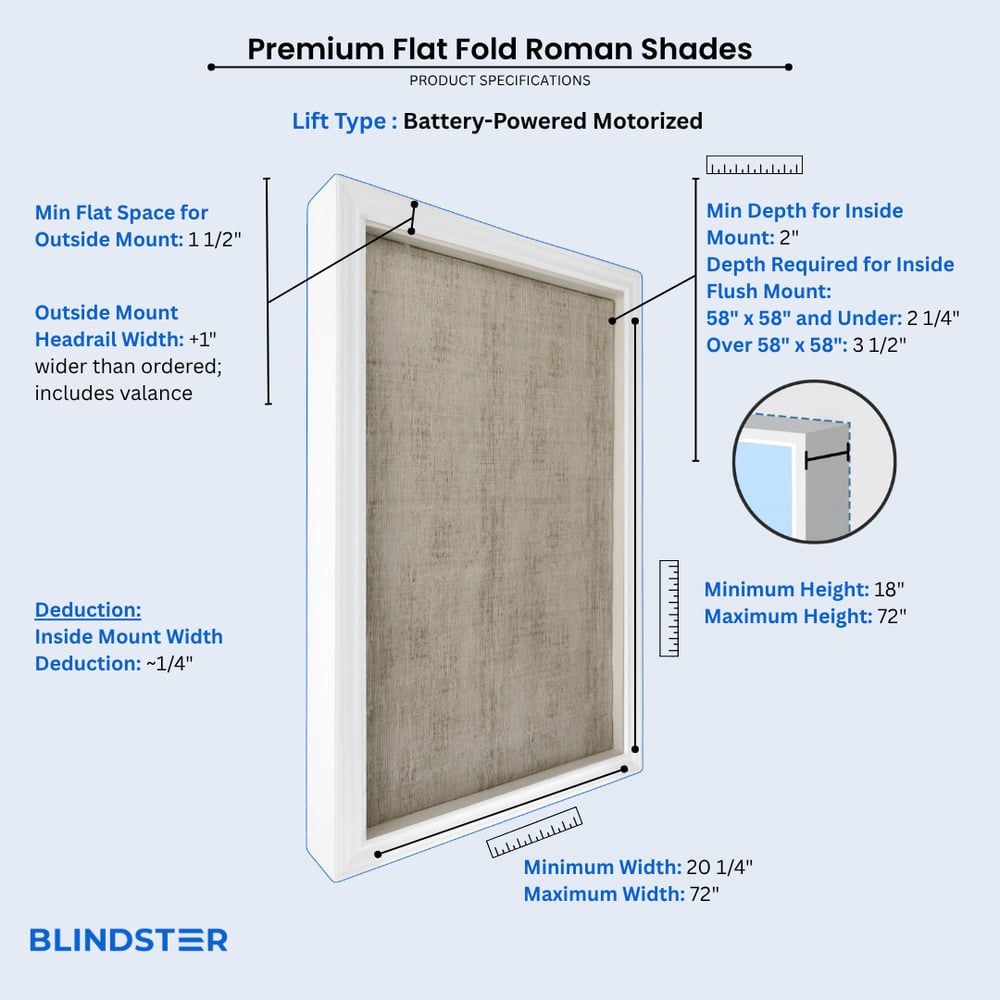
- Min depth for inside mount (continuous cord loop and motorized)
2 inches
- Min depth for inside flush mount (continuous cord loop and motorized)
2 ¼ inches (58 x 58" and under); 3 ½ inches (over 58 x 58")
- Inside Mount Width Deduction
Approximately ¼ inch
- Outside Mount headrail width (continuous cord loop and motorized)
+1 inch wider than width ordered; will also include valance
- Min flat space for outside mount
1 ½ inches
- Heavy Duty Cordless Materials
Varick, Fresh Files
- ALL SHADES ARE PRE-PROGRAMMED AT THE FACTORY TO OPERATE ON CHANNEL 6
Each remote can be programmed to control up to 6 shades
- 6 CHANNEL REMOTE CONTROL REQUIRED TO OPERATE MOTORIZED SHADES
Remotes from other companies will not operate Blindster shades
- REMOTE CONTROL RANGE
65 feet
- EASY RECHARGEABLE FEATURE
Battery wand is integrated into the shade's tube of all motorized shades
- CHARGER INCLUDED FOR MOTORIZED SHADES
1 Charger per order included
*Recharge time on a shade is 5 hours, chargers are not meant to be plugged into the shade long term.
- Bottom Pleat Variance
The bottom pleat (distance between the bottom hem of the shade up to the first “O” ring) will vary from 2" to 7 7/8"
Restrictions
- Only shades ordered at the same height can be guaranteed to have matching folds.
- Due to the material's weight, the Fresh Files fabrics will require the Heavy Duty Cordless system. The headrails will be slightly larger for these fabrics and the installation brackets will be different than the standard cordless
- Due to the handmade stitching of the fabrics, small threads may be visible and can be trimmed at the customer's discretion.
- Only Outside Mount Continuous Cord Loop & Motorized shades will have a valance. The valance will be 1" wider than the width ordered.
How to Measure
How to Measure: Inside Mount
3 min read
Let's make sure an inside mount will work for your window! Using a metal tape measure, first check if you have sufficient depth:
- Measure inside the window opening from the back of the window to the front of the opening where the shade would mount. The depth at the top of the window must be at least 2" to mount the brackets.
- To have a flush mount (meaning the shade is fully recessed in the window opening) the depth must be at least 2" for cordless lift, and 2 1/4" for continuous cordloop and motorized shades 58" x 58" and under, or 3 1/4" for continuous cordloop and motorized shades larger than 58" x 58".
- If your depth is not sufficient for mounting the brackets, please see our outside mount instructions or consider a different product.
How to Measure:
Let's start with the Width:
- Measure inside of the window opening/frame from left to right to the nearest 1/8" at three places: at the top of the opening, the middle of the opening, and then the bottom of the opening. Write down all 3 measurements and circle the narrowest. If rounding is necessary, round down to the nearest 1/8". That is your ordering width.
Now, let's do the Height:
- Measure the inside of the window opening/frame from the top of the opening to the bottom of the opening/sill to the nearest 1/8" in three places: on the left-hand side, the middle, and on the right-hand side. Write down all 3 measurements and circle the tallest. That is your ordering height. Please note that when ordering multiple shades for the same room, shades with different heights may have a different number of pleats.
Note: Always provide us with the actual measurement of the window opening. We will make the necessary deduction of approximately 1/4" to your shade's width to allow room for installation and for proper movement of the shade within the window opening. No deductions will be made to your height.
How to Measure: Outside Mount
3 min read
Before you start measuring, decide where above your window opening you want to mount your shade. You will need at least 1 1/2" of flat vertical space above the window to mount the brackets. The shade can be installed directly above the window opening, or higher up to give the appearance of a larger window and to have more clear space in the window when the shade is raised.
If you have trim around the window, you can mount the shade above the trim, directly on the trim (if you have the required minimum flat space for the brackets), or to the sides of the trim if you do not enough mounting space above the window or on the trim itself. See the directions below for how you'd like to install your shade.
If you do not have sufficient vertical space for mounting the brackets, please see our inside mount instructions or consider a different product.
Width:
- Looking at your window and surrounding wall, decide what area you would like to cover. We recommend the shade extends about 2" on each side of the window opening for the best light control and appearance.
- Using a metal tape measure, measure from left to right including your desired extra space on each side of the window—that is your ordering width. Note that outside mount shades include a valance which will extend 1/2" beyond your ordered width on each side of shade.
Height:
- Consider how far above the window you would like to install your shade but at least starting with the minimum vertical space referenced above. The shade can be positioned higher up to give the appearance of a larger window and to have more clear space in the window when the shade is raised.
- Measure from the top of where you will mount the shade on the wall down to where you want the bottom of the shade to be, using the same extra space below your window opening as you used above; if you have a protruding windowsill, measure down to the top of the sill. That is your ordering height. Please note that when ordering multiple shades for the same room, shades with different heights may have a different number of pleats.
Width:
- Looking at your window and surrounding wall, decide what area you would like to cover. We recommend the shade extends about 2" on either side of the window opening for the best light control and appearance. You can also choose to have the shade the same width as your window trim.
- Using a metal tape measure, measure from left to right including any desired extra space on each side of the window—that is your ordering width. Note that outside mount shades include a valance which will extend 1/2" beyond your ordered width on each side of shade.
Height:
- Consider how far above the window you would like to install your shade but at least starting with the minimum vertical space referenced above. The shade can be positioned higher up to give the appearance of a larger window and to have more clear space in the window when the shade is raised.
- Measure from the top of where you will mount the shade on the wall down to where you want the bottom of the shade to be, using the same extra space below your window opening as you used above, or to the bottom edge of the trim if you prefer; if you have a protruding windowsill, measure down to the top of the sill. That is your ordering height. Please note that when ordering multiple shades for the same room, shades with different heights may have a different number of pleats.
Width:
- Confirm that the height of your trim is at least the minimum height required for installing the mounting brackets. At the top of your window, use a steel measuring tape and measure from outer edge to outer edge of the trim. That is your ordering width. Note that outside mount shades include a valance which will extend 1/2" beyond your ordered width on each side of shade.
Height:
- Measure from the top of your trim to the bottom of your trim or to the top of the windowsill if you have a protruding sill. That is your ordering height. Please note that when ordering multiple shades for the same room, shades with different heights may have a different number of pleats.
Width:
- Using a metal tape measure, measure left to right from the outside edge of the trim piece that goes around the glass to the other outside edge. That is your ordering width. However, if you have space, it is best to order the shade about 2" wider for better light control. Note that outside mount shades include a valance which will extend 1/2" beyond your ordered width on each side of shade.
Height:
- Consider how far above the window trim piece you would like to install your shade but at least starting with the minimum vertical space referenced above. Measure down to where you want the bottom of the shade to be, using the same extra space below the window trim piece as you used above. That is your ordering height. Please note that when ordering multiple shades for the same room, shades with different heights may have a different number of pleats.
How to Install
How to Install: Inside Mount
2 min read
Let's make sure you have what you need!
What came with your blinds?
- Cord cleats
- #8 hex head wood screws (one per bracket mounting hole)
What else will you need in order to complete the installation?
- Rechargeable drill with ¼" hex bit
- Phillips screwdriver
- Pencil
- Tape measure
- Ladder
Download the PDF below for a complete step by step guide on how to install your inside mount blinds based on the lift type ordered.
How to Install: Outside Mount
4 min read
Let's make sure you have what you need!
What came with your blinds?
- Cord cleats
- #8 hex head wood screws (one per bracket mounting hole)
What else will you need in order to complete the installation?
- Rechargeable drill with ¼" hex bit
- Phillips screwdriver
- Pencil
- Tape measure
- Ladder
Download the PDF below for a complete step by step guide on how to install your outside mount blinds based on the lift type ordered.
Videos
Roman Shades - Hand-Crafted Elegance
How to Measure for Inside Mount
How to Measure for Outside Mount
How to Install Roman Shades
How They're Made - Roman Shades
Reviews
4.7
Based on 122 reviews
Nora
True to color, Nice quality, easy to hang. I actually hung one by myself. I’m a 78 year old women, the shade was 6 feet long and needed three brackets. The other shade was hung over a big claw foot tub. I had my grandson give me a hand. Really easy, looks beautiful. The lining is of high quality. The window gets direct sun. It’s not black out but definitely filters the sun. I didn’t want black out.
Bob
Your ordering process couldn’t be any easier. The blinds were delivered promptly. We couldn’t be happier with them. My only regret is that I didn’t know about you earlier. I thought your pricing was more than reasonable.
Jama
I am so happy with my new kitchen roman shades, they fit perfectly and the remote was so easy. Not to mention they are beautiful so I like them so much that I am doing my bathroom and I just requested some more samples. I'll probably do several rooms now, I wanted to make sure they fit exactly 1st.. They were here in an extremely timely manner. I cannot be more happier with my Roman shades. I feel the price was extremely fair. The motorized version moves these shades up and down so smoothly.
Amy
My blinds are beautiful. Very well made and fit perfectly! I’ve already ordered another one!
Wanda
I love my blinds. Perfect fit.
Abby
It took a long time (4 months) because of several back order delays, but I didn’t want to compromise on a different pattern. It was worth the wait. They were very nice about it and took great care of me while waiting. The only issue was the installation. It’s a very long shade and there are only 4 holes to drill into the ceiling. They didn’t put one in the very middle which would help. It is very difficult to go around the roller to get a good straight angle. I think the plastic chain cord and mechanism are cheap. I have 3 other shades from them (4-5 years ago) and they are metal cords and much nicer. My husband and I put it up in under a half hour once we figured out what we were doing. We are very good DYI people, but clearer and better instructions would have helped before starting
Gregory
The custom roman shades we ordered were made and shipped quickly; easy to install; and look beautiful.
Jason
We love the pattern. The flowers give a softening touch to blinds that both block the light and cold.
Kristy
The outside mount blinds are a wonderful solution for old windows that open inward. Each window can open independently without getting caught up in long curtains but still look as elegant as heavy drapery. The quality of the materials is good and I installed them myself easily. You just have to raise them slowly so they will fold up smoothly. I plan to purchase more, but they are a little pricey so I will just purchase one room at a time.
Lisa
Beautiful shade, I would like to order more but the price is too high.